Scott Generating Set Restoration (Continues)
+9
Robotstar5
nickh
RichieR
oldgit
Andrew1971
maryalice
blue cat
StuartTurnerSteve
Woodsman
13 posters
Page 4 of 13
Page 4 of 13 •  1, 2, 3, 4, 5 ... 11, 12, 13
 Re: Scott Generating Set Restoration (Continues)
If you want some of the white tape I have a roll of just under 20mm wide I could post, then you can post back once you've used what you need?.
_________________
Stuart
Robotstar5- Life Member

- Posts : 1109
Join date : 2018-09-25
 Re: Scott Generating Set Restoration (Continues)
https://www.ebay.co.uk/itm/203016414918?chn=ps&norover=1&mkevt=1&mkrid=710-153316-527457-8&mkcid=2&itemid=203016414918&targetid=4584894773047612&device=c&mktype=&googleloc=&poi=&campaignid=398226962&mkgroupid=1300722490880837&rlsatarget=pla-4584894773047612&abcId=2145997&merchantid=87779&msclkid=86d98bb3c7971b2b0defebaa06d23c83
_________________
Specialist in precision guesswork.

mattblack- Life Member

- Posts : 889
Join date : 2019-06-21
Location : Leicester, me duck...
 Re: Scott Generating Set Restoration (Continues)
Thanks all for your suggestions and offers of assistance. If I have difficulties acquiring anything suitable then I will take up the offer from Stuart but if possible I would prefer to get something in stock, so it's there when I need it.
mattblack I was brought up using self amalgamating tape (SAM tape) during my training with Post Office Telecoms, (1972 - 1979), and it is really useful. However in this application I would be concerned about using it due to the strain I might have to put on the wires, to stretch the tape to 1/3 of its width, to make it adhere and amalgamate properly. Also I wonder if it would cause the carbon dust to stick to it as, if I remember correctly, it remains sticky for a long time after application.
Once again thanks for all the help and advice,
Neil
neil (LE)- A credit to the forum

- Posts : 399
Join date : 2012-03-21
Age : 68
Location : N/W Kent
 Re: Scott Generating Set Restoration (Continues)
I'm all for giving the tired cables some extra (sound) insulation but I have always been cautious about stressing the point where the cable enters the windings, where the extra insulation/protection ends.
I have in the past added insulation and where it finishes I have 'potted' the area in a medium viscosity silicone potting solution.
I feel this will then seal the point of entry and add additional support.
(Just my two penneth!)
Alan
I have in the past added insulation and where it finishes I have 'potted' the area in a medium viscosity silicone potting solution.
I feel this will then seal the point of entry and add additional support.
(Just my two penneth!)
Alan
Alanengine- A credit to the forum

- Posts : 461
Join date : 2020-11-21
 Re: Scott Generating Set Restoration (Continues)
Thanks Alan for your input, a good suggestion. Unfortunately in this situation I'm unable to access the point where the wires enter the coil windings, as they are at the far end of the blind casting. This makes them inaccessible, without removing the complete coil set, which I don't intend doing unless absolutely necessary.
Neil

Wires disappearing into the blind end of the casting, to enter the windings.
Neil

Wires disappearing into the blind end of the casting, to enter the windings.
neil (LE)- A credit to the forum

- Posts : 399
Join date : 2012-03-21
Age : 68
Location : N/W Kent
 Re: Scott Generating Set Restoration (Continues)
Alternator type M.W. Woods Model No. 2Z1A
Clean and preparation. (Boring but necessary!)
Having managed to separate the alternator into its component parts, the time came to clean everything up ready for painting. Not an exciting activity but necessary and once done it all looks so much better and you feel like you are making progress. I also find you learn a lot about the the equipment that is being restored, as you strip away the years of paint and reveal some of the history.
Nothing very informative about the process, I'll just let the pictures tell the story of the latest activity.
More alternator progress to follow...
Neil.

Alternator serial number revealed during the preparation process.

Initial wash and brush up of the bell housing.

Cleaned up showing remnants of the original paint.


Inside and outside, prepared for primer.


Primed bell housing awaiting the better weather before the top coat is applied.


Paint being removed from the main casting. Being aluminium alloy it was better to gently scrape the old paint off with a blade and other flat edge tools rather than a wire wheel.


A few hours of scrapping and brushing later and it's all ready for paint!

Bell housing temporarily fitted onto alternator, to protect the wiring.

Bearing greaser as removed from set.

Old grease being extruded from the greaser tube, using a piece of flex.

The two bearing greasers in primer.
Clean and preparation. (Boring but necessary!)
Having managed to separate the alternator into its component parts, the time came to clean everything up ready for painting. Not an exciting activity but necessary and once done it all looks so much better and you feel like you are making progress. I also find you learn a lot about the the equipment that is being restored, as you strip away the years of paint and reveal some of the history.
Nothing very informative about the process, I'll just let the pictures tell the story of the latest activity.
More alternator progress to follow...
Neil.

Alternator serial number revealed during the preparation process.

Initial wash and brush up of the bell housing.

Cleaned up showing remnants of the original paint.


Inside and outside, prepared for primer.


Primed bell housing awaiting the better weather before the top coat is applied.


Paint being removed from the main casting. Being aluminium alloy it was better to gently scrape the old paint off with a blade and other flat edge tools rather than a wire wheel.


A few hours of scrapping and brushing later and it's all ready for paint!

Bell housing temporarily fitted onto alternator, to protect the wiring.

Bearing greaser as removed from set.

Old grease being extruded from the greaser tube, using a piece of flex.

The two bearing greasers in primer.
neil (LE)- A credit to the forum

- Posts : 399
Join date : 2012-03-21
Age : 68
Location : N/W Kent
 Re: Scott Generating Set Restoration (Continues)
According to this, Plasti Dip can be brushed on. Any good for your wiring?
https://www.amazon.co.uk/Plasti-Dip-Mulit-Purpose-Rubber-Coating/dp/B0114Z42F8/ref=asc_df_B0114Z42F8/?tag=bingshoppinga-21&linkCode=df0&hvadid=&hvpos=&hvnetw=o&hvrand=&hvpone=&hvptwo=&hvqmt=e&hvdev=c&hvdvcmdl=&hvlocint=&hvlocphy=&hvtargid=pla-4584207578760634&psc=1
https://www.amazon.co.uk/Plasti-Dip-Mulit-Purpose-Rubber-Coating/dp/B0114Z42F8/ref=asc_df_B0114Z42F8/?tag=bingshoppinga-21&linkCode=df0&hvadid=&hvpos=&hvnetw=o&hvrand=&hvpone=&hvptwo=&hvqmt=e&hvdev=c&hvdvcmdl=&hvlocint=&hvlocphy=&hvtargid=pla-4584207578760634&psc=1
_________________
Specialist in precision guesswork.

mattblack- Life Member

- Posts : 889
Join date : 2019-06-21
Location : Leicester, me duck...
 Re: Scott Generating Set Restoration (Continues)
I've never seen this product before but it does look interesting. I might invest in some, just to see what it is actually like and how useful it could be.
Thanks,
Neil..
Thanks,
Neil..
neil (LE)- A credit to the forum

- Posts : 399
Join date : 2012-03-21
Age : 68
Location : N/W Kent
 Re: Scott Generating Set Restoration (Continues)
10/10 for your photographic coverage! I find I've moved on to the next stage before I realise I haven't taken a photo.
Rewarding work and coming along well.
Alan
Rewarding work and coming along well.
Alan
Alanengine- A credit to the forum

- Posts : 461
Join date : 2020-11-21
 Re: Scott Generating Set Restoration (Continues)
Alternator type M.W. Woods Model No. 2Z1A
Electrical Wiring Review and Repairs.
Having got to the stage where the alternator had been cleaned up ready for painting, attention turned to the state of the wiring and what could be achieved in terms of improving the condition of it. As I have mentioned, I do not intend to remove the actual stator coils from the alternator housing, due to the risk of damage to the wiring, which is directly connected to the coils. Also I'm concerned that the alignment of the coils may have been adjusted with shims to suit the armature, to ensure the appropriate air gap is maintained between the armature and the field coils. If the coils are disturbed, I may have difficulty ensuring all the shims are replaced exactly as they were, to guarantee it all goes back together again with the correct gap and alignment. As I'm not willing to risk doing more damage than good, any repairs will be limited to what can be achieved with the coils in situ. As previously mentioned I intend to provide protection to the exposed wiring insulation, as the initial inspection revealed that it seemed to be in a perished and damaged condition. My initial thoughts were that the wiring had suffered from overheating, causing the insulation to melt, however looking closer I'm not certain. The issue which was cause for concern was what looked like melted insulation over the terminal block and along the wiring. However if this had melted away from the wires themselves, I would have expected to see areas of missing insulation exposing bare wire, along the length of the wiring but no breaks were visible. In fact the insulation actually seemed to be in reasonable condition but had what looked like a melted coating over it. I am wondering if some form of sealer, rather like letter sealing wax, had been applied to hold the wiring in place and stable during use. Possibly in an attempt to reduce the risk of vibration stress fractures and or chaffing of the wiring against the metal housing. Taking a positive approach, I decided to assume that no major damage was hiding below the exterior coating and took the decision to continue with the remedial repairs which I had previously planned. As mentioned in an earlier post I wanted to apply some form of overlay protection on the wiring where it was accessible. To attempt this would require the terminal blocks to be disconnected and removed, one task which I was rather concerned about, as the wires felt very hard and brittle. It would not have been possible with the terminal block still connected, to even attempt to wrap insulating tape around the wires without possibly stressing the wires even more and with less probability of a successful outcome. With this in mind the wiring was marked up and gently teased out of the terminal blocks, ready for some heat shrink sleeves to be applied. The heat shrink was pushed down as far as possible into the housing to the point where it attaches into the windings. In total the three output phase wires and the two input field wires were treated the same way. This just leaves the brush pick up wires to deal with, as these have the connectors crimped and soldered onto the ends, the heat shrink I currently have will not fit. What I’ve been using is a 2:1 ratio, I will need to use something more like 4:1 to allow the tube to slide over the terminal whilst still shrinking down far enough to adhere to the wires.
So this is as far as I’ve got to, more to come…
Neil

Initial inspection of the wiring, when first revealed.

Closer examination on the bench, reveals some cause for concern.


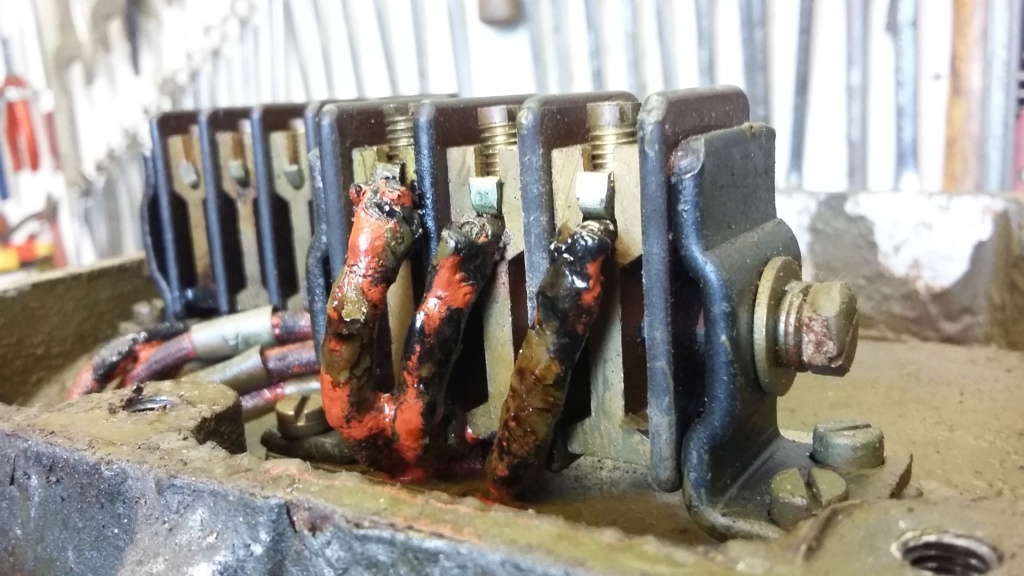
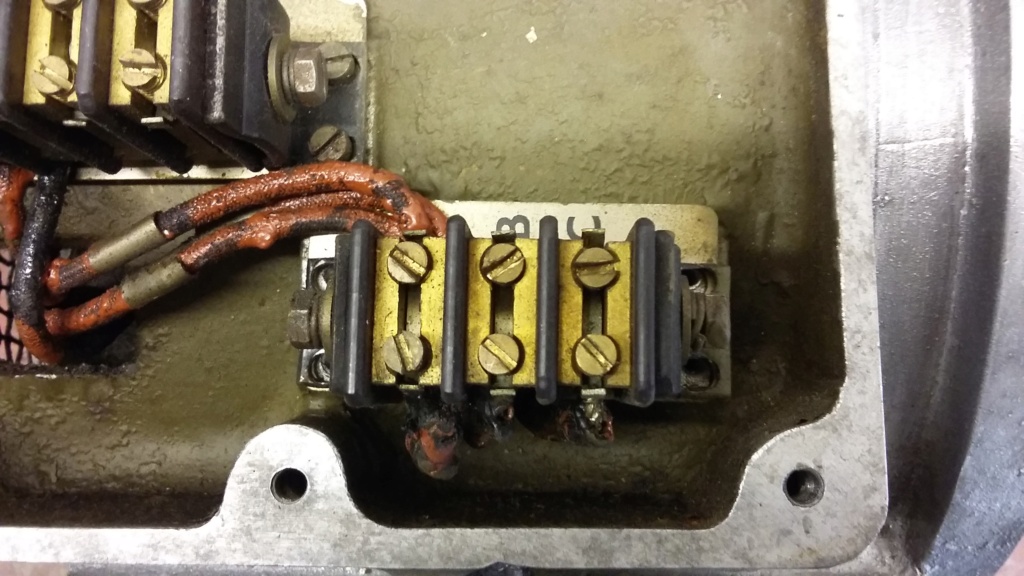
Close up of the wiring to the terminal blocks, identifying the condition of the outer sheathing which has either melted, deteriorated or is coated with sealant?


Wiring carefully removed from terminal blocks.


Heat shrink tubing applied to the coil wiring.

The brush wiring that will require a larger diameter heat shrink tube with a greater shrink ratio, as I do not want to remove the connectors.
Electrical Wiring Review and Repairs.
Having got to the stage where the alternator had been cleaned up ready for painting, attention turned to the state of the wiring and what could be achieved in terms of improving the condition of it. As I have mentioned, I do not intend to remove the actual stator coils from the alternator housing, due to the risk of damage to the wiring, which is directly connected to the coils. Also I'm concerned that the alignment of the coils may have been adjusted with shims to suit the armature, to ensure the appropriate air gap is maintained between the armature and the field coils. If the coils are disturbed, I may have difficulty ensuring all the shims are replaced exactly as they were, to guarantee it all goes back together again with the correct gap and alignment. As I'm not willing to risk doing more damage than good, any repairs will be limited to what can be achieved with the coils in situ. As previously mentioned I intend to provide protection to the exposed wiring insulation, as the initial inspection revealed that it seemed to be in a perished and damaged condition. My initial thoughts were that the wiring had suffered from overheating, causing the insulation to melt, however looking closer I'm not certain. The issue which was cause for concern was what looked like melted insulation over the terminal block and along the wiring. However if this had melted away from the wires themselves, I would have expected to see areas of missing insulation exposing bare wire, along the length of the wiring but no breaks were visible. In fact the insulation actually seemed to be in reasonable condition but had what looked like a melted coating over it. I am wondering if some form of sealer, rather like letter sealing wax, had been applied to hold the wiring in place and stable during use. Possibly in an attempt to reduce the risk of vibration stress fractures and or chaffing of the wiring against the metal housing. Taking a positive approach, I decided to assume that no major damage was hiding below the exterior coating and took the decision to continue with the remedial repairs which I had previously planned. As mentioned in an earlier post I wanted to apply some form of overlay protection on the wiring where it was accessible. To attempt this would require the terminal blocks to be disconnected and removed, one task which I was rather concerned about, as the wires felt very hard and brittle. It would not have been possible with the terminal block still connected, to even attempt to wrap insulating tape around the wires without possibly stressing the wires even more and with less probability of a successful outcome. With this in mind the wiring was marked up and gently teased out of the terminal blocks, ready for some heat shrink sleeves to be applied. The heat shrink was pushed down as far as possible into the housing to the point where it attaches into the windings. In total the three output phase wires and the two input field wires were treated the same way. This just leaves the brush pick up wires to deal with, as these have the connectors crimped and soldered onto the ends, the heat shrink I currently have will not fit. What I’ve been using is a 2:1 ratio, I will need to use something more like 4:1 to allow the tube to slide over the terminal whilst still shrinking down far enough to adhere to the wires.
So this is as far as I’ve got to, more to come…
Neil

Initial inspection of the wiring, when first revealed.

Closer examination on the bench, reveals some cause for concern.


Close up of the wiring to the terminal blocks, identifying the condition of the outer sheathing which has either melted, deteriorated or is coated with sealant?


Wiring carefully removed from terminal blocks.


Heat shrink tubing applied to the coil wiring.

The brush wiring that will require a larger diameter heat shrink tube with a greater shrink ratio, as I do not want to remove the connectors.
neil (LE)- A credit to the forum

- Posts : 399
Join date : 2012-03-21
Age : 68
Location : N/W Kent
 Re: Scott Generating Set Restoration (Continues)
Quick update, I managed to find some other heat shrink sleeving in my stock of possibly useful stuff. I tested it and found that it would just slip over the end terminals and more importantly, it would shrink down sufficiently to seal around the old wiring sheath. I also applied an additional short section of tubing at each end of the wire, providing a double layer at the potentially weak points. I will do the same to the output and the field winding supply wires, to provide that additional degree of mechanical strength.
Neil.

First layer of sleeving applied to each brush wire.

Additional collar of tubing attached at the coil end for added strength.
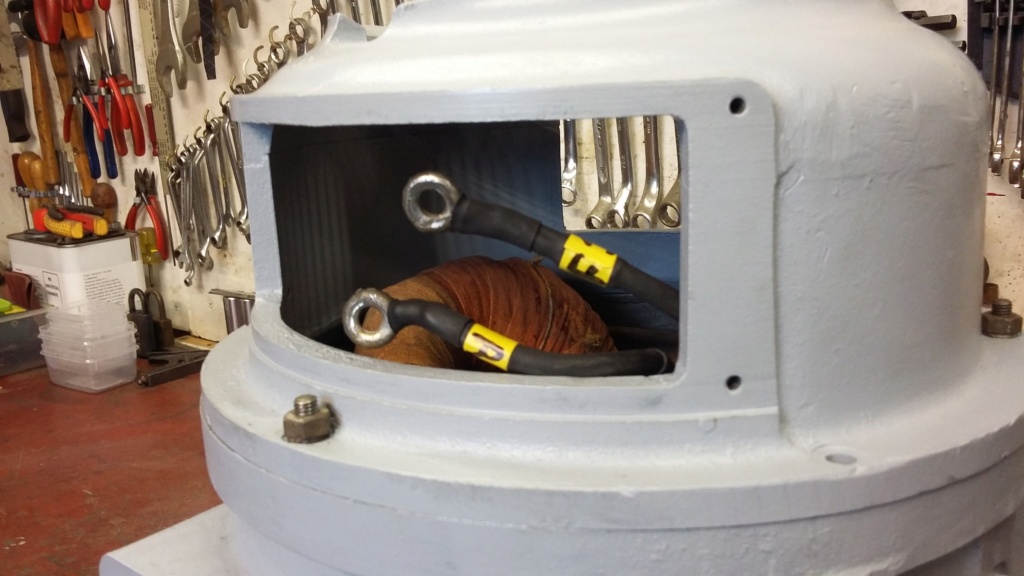

Then applied to the brush connection end.
Neil.

First layer of sleeving applied to each brush wire.

Additional collar of tubing attached at the coil end for added strength.


Then applied to the brush connection end.
neil (LE)- A credit to the forum

- Posts : 399
Join date : 2012-03-21
Age : 68
Location : N/W Kent
 Re: Scott Generating Set Restoration (Continues)
Top work Neil I have been watching your
restoration and you have a lot of work put
in to it coming along nicely
its amazing when you start a project how much
time and effort goes in I discovered this when I started my lister d
a lot of time and effort goes in
RichieR
restoration and you have a lot of work put
in to it coming along nicely
its amazing when you start a project how much
time and effort goes in I discovered this when I started my lister d
a lot of time and effort goes in
RichieR
RichieR- Expert

- Posts : 68
Join date : 2020-11-15
Age : 57
Location : Waterford Southern Ireland
 Re: Scott Generating Set Restoration (Continues)
RichieR, yes there is always more to do than you imagine when you start. I am fortunate that I have been allowed, or in fact encouraged, to undertake these projects during the various lock down periods, by my wife. I think she understands that I need something to do, to keep me out of trouble!
During the first lock down, I undertook the renovations of an H4 pump just to keep me occupied. This ended up with the scope of work being extended to include the Lister D which is used to power it. If you've not seen that thread you might like to take a look. It demonstrates how what was meant to be just a "splash and dash" as I called it, turned out to be a complete strip down, repaint and trolley build.
Lister D restoration thread
First attempt to include a link, I hope it works,
Neil.
neil (LE)- A credit to the forum

- Posts : 399
Join date : 2012-03-21
Age : 68
Location : N/W Kent
 Re: Scott Generating Set Restoration (Continues)
Thanks Neil will have a look
RichieR
RichieR
RichieR- Expert

- Posts : 68
Join date : 2020-11-15
Age : 57
Location : Waterford Southern Ireland
 Re: Scott Generating Set Restoration (Continues)
Having completed the repairs to the wiring on the alternator, I thought I would take the opportunity to clean up the terminal blocks, prior to refitting them and reconnecting the wiring to them. I was interested to find that the construction of these terminal strips was such that it is possible to completely take them apart. As I had time, due to the weather interrupting other more constructive activities, including the final painting of the alternator which will need to be completed before the wiring is finished, I decided to completely strip the terminal blocks down as part of the cleaning exercise. Although it was not strictly necessary to undertake this process, I was glad I did. I mentioned previously, you can learn a lot about the history of the equipment, through a thorough examination of the individual parts as you proceed, which proved to be the case here.
The history of the Scott generating sets is somewhat limited. It is believed that they were constructed between c1939 - 1945, although this is purely a guesstimation. Possibly built to a contract dated 1936, as shown on the alternator build plate, although this would have been three years before the war actually commenced. Any additional clues to the actual year of manufacture would certainly be of interest and very unexpectedly the terminal blocks may provide some clues. Markings on the terminal strip insulating separators, may provide an indication as to the time frame of the build date.

Specification plate identifying alternator built to BSS 168/1936. Does 1936 refer to the date of the contract or is it just a coincident of numbers?

Scott specification plate with serial WD No. B 5755 but what build date would this indicate?


Terminal block as removed from alternator housing, in need of a thorough clean up, to prevent tracking. Note the clamped up construction, facilitating full disassembly.

Terminal block as striped down, ready to be cleaned up.

Components cleaned up ready for reassembly.


Impressed markings on insulators. If they were all marked with the same number, it may have been a part identifier but with both 1939 and 1940 being used for the identical part, this might more possibly indicate this is a production date stamp. Hopefully providing a clue as to the actual build date of the generator set itself.


Terminal block rebuilt ready to be reinstalled in the alternator. Hiding away the possible dating information, until the next enthusiast takes it apart again.
The history of the Scott generating sets is somewhat limited. It is believed that they were constructed between c1939 - 1945, although this is purely a guesstimation. Possibly built to a contract dated 1936, as shown on the alternator build plate, although this would have been three years before the war actually commenced. Any additional clues to the actual year of manufacture would certainly be of interest and very unexpectedly the terminal blocks may provide some clues. Markings on the terminal strip insulating separators, may provide an indication as to the time frame of the build date.

Specification plate identifying alternator built to BSS 168/1936. Does 1936 refer to the date of the contract or is it just a coincident of numbers?

Scott specification plate with serial WD No. B 5755 but what build date would this indicate?


Terminal block as removed from alternator housing, in need of a thorough clean up, to prevent tracking. Note the clamped up construction, facilitating full disassembly.

Terminal block as striped down, ready to be cleaned up.

Components cleaned up ready for reassembly.


Impressed markings on insulators. If they were all marked with the same number, it may have been a part identifier but with both 1939 and 1940 being used for the identical part, this might more possibly indicate this is a production date stamp. Hopefully providing a clue as to the actual build date of the generator set itself.


Terminal block rebuilt ready to be reinstalled in the alternator. Hiding away the possible dating information, until the next enthusiast takes it apart again.
neil (LE)- A credit to the forum

- Posts : 399
Join date : 2012-03-21
Age : 68
Location : N/W Kent
 Re: Scott Generating Set Restoration (Continues)
I'm guessing E.I Ltd is Ellison Insulations of Tufnol fame.

nickh- Expert

- Posts : 56
Join date : 2019-04-14
 Re: Scott Generating Set Restoration (Continues)
Thanks for that, all information gladly received. It certainly looks like a Tufnol material.
Neil.
Neil.
neil (LE)- A credit to the forum

- Posts : 399
Join date : 2012-03-21
Age : 68
Location : N/W Kent
 Re: Scott Generating Set Restoration (Continues)
Up to about a year ago, the company I work for was under the same ownership as and shared a managing director with Tufnol. The factory in Birmingham could almost have been an industrial museum!

nickh- Expert

- Posts : 56
Join date : 2019-04-14
 Re: Scott Generating Set Restoration (Continues)
Alternator bits and bobs.
Work continues, with some of the smaller jobs being dealt with, in between the bigger elements of the restoration. Preparation of the alternator proceeded up to the point where the primer was applied, before it was set aside to await the top coat application phase. Hopefully this painting phase is getting closer for all elements currently on hold until conditions improve. One of the final alternator items to be dealt with, was the belt tensioner idler wheel which is bolted to the alternator casing. The tensioner was a simple task, with everything coming apart reasonably easily. The only obvious damage was to the adjuster screw which was bent but was soon restored to a usable condition, with the thread being recut once the straightening had been achieved. The only other item that might need to be considered is the idler wheel bearing itself. This initially felt smooth, although having been flushed through with degreasing fluid to clean out the old grease, it does now exhibit some grittiness. Hopefully this is due to some residual grit which still needs to be flushed out and will improve with further cleaning. If not, then I might need to consider a replacement, although I don't know the the bearing type and would need to remove it to determine what it is. Looking at the bearing, it seems as though there are three separate parts, making up the complete item, so it might be something special. As the bearing(s) is pressed into a recess, it would need to be driven out using the inner race to press against. This is something I wouldn't want to do unless I knew I had a replacement available, due to the high risk of damage. So a bit of a quandary, as I would prefer to know the bearing type before removing it but need to remove it to confirm the type!
The other items associated with the alternator requiring attention, were the fan blade and the exciter pulley. These just needed cleaning, prepping and priming, which was simply achieved and joined the pile of parts waiting for top coat application. The only point of note was on the fan blade, I was surprised to find what I assume to be a balance weight on the circumference of the blade. I appreciate that the fan rotates at 3800 rpm but it is made from aluminium alloy and is only 7" diameter so does not have a great mass. The other interesting point is the balance weight is nearly opposite a cut-out used to access the grub screw and the keyway, logically I would have thought the out of balance would have been at the area where the material had been removed.
That's all for now....
Neil.


Alternator housing primed and ready!


Belt tensioner as removed. Note the bent adjusting bolt.


Then disassembled.


Now primed, complete with a straightened bolt.


Idler bearing, which looks like it might be constructed in three sections? The grooves are parallel, not spiral as a grease retainer would use.


Alternator fan, ready to be prepped.


Then prepped. Note the opening in the casting to access the grub screw in the boss.


Balance weight affixed to fan blade. Note the positioning, in relationship to the grub screw access hole.


Primed, ready to join the pile for top coat!


And the exciter pulley.
Work continues, with some of the smaller jobs being dealt with, in between the bigger elements of the restoration. Preparation of the alternator proceeded up to the point where the primer was applied, before it was set aside to await the top coat application phase. Hopefully this painting phase is getting closer for all elements currently on hold until conditions improve. One of the final alternator items to be dealt with, was the belt tensioner idler wheel which is bolted to the alternator casing. The tensioner was a simple task, with everything coming apart reasonably easily. The only obvious damage was to the adjuster screw which was bent but was soon restored to a usable condition, with the thread being recut once the straightening had been achieved. The only other item that might need to be considered is the idler wheel bearing itself. This initially felt smooth, although having been flushed through with degreasing fluid to clean out the old grease, it does now exhibit some grittiness. Hopefully this is due to some residual grit which still needs to be flushed out and will improve with further cleaning. If not, then I might need to consider a replacement, although I don't know the the bearing type and would need to remove it to determine what it is. Looking at the bearing, it seems as though there are three separate parts, making up the complete item, so it might be something special. As the bearing(s) is pressed into a recess, it would need to be driven out using the inner race to press against. This is something I wouldn't want to do unless I knew I had a replacement available, due to the high risk of damage. So a bit of a quandary, as I would prefer to know the bearing type before removing it but need to remove it to confirm the type!
The other items associated with the alternator requiring attention, were the fan blade and the exciter pulley. These just needed cleaning, prepping and priming, which was simply achieved and joined the pile of parts waiting for top coat application. The only point of note was on the fan blade, I was surprised to find what I assume to be a balance weight on the circumference of the blade. I appreciate that the fan rotates at 3800 rpm but it is made from aluminium alloy and is only 7" diameter so does not have a great mass. The other interesting point is the balance weight is nearly opposite a cut-out used to access the grub screw and the keyway, logically I would have thought the out of balance would have been at the area where the material had been removed.
That's all for now....
Neil.


Alternator housing primed and ready!


Belt tensioner as removed. Note the bent adjusting bolt.


Then disassembled.


Now primed, complete with a straightened bolt.


Idler bearing, which looks like it might be constructed in three sections? The grooves are parallel, not spiral as a grease retainer would use.


Alternator fan, ready to be prepped.


Then prepped. Note the opening in the casting to access the grub screw in the boss.


Balance weight affixed to fan blade. Note the positioning, in relationship to the grub screw access hole.


Primed, ready to join the pile for top coat!


And the exciter pulley.
neil (LE)- A credit to the forum

- Posts : 399
Join date : 2012-03-21
Age : 68
Location : N/W Kent
 Re: Scott Generating Set Restoration (Continues)
Nice one, coming along well!
I wonder if some heat applied to the idler pulley might help release the bearing if further washouts don't help?
Alan
I wonder if some heat applied to the idler pulley might help release the bearing if further washouts don't help?
Alan
Alanengine- A credit to the forum

- Posts : 461
Join date : 2020-11-21
 Re: Scott Generating Set Restoration (Continues)
Alan, I will certainly be attempting that if it becomes necessary. In its favour is the fact that the bearing(s) is recessed below the rim of the housing, so I should be able knock the bearing out against a hard surface, hopefully!
Neil.
Neil.
neil (LE)- A credit to the forum

- Posts : 399
Join date : 2012-03-21
Age : 68
Location : N/W Kent
 Re: Scott Generating Set Restoration (Continues)
Some lovely work happening here.
StuartTurnerSteve- Life Member

- Posts : 534
Join date : 2020-01-02
 Re: Scott Generating Set Restoration (Continues)
Thanks all for the supportive comments, hopefully it will all be worth the effort when it is up and running!
Wiring issues revisited.
In the absence of other activities, I took the opportunity to revisit the condition of the wiring and some of the renovation options. To start with I completed the exciter generator wiring repairs, with the application of some heat shrink tubing, as per the alternator. I will also need to replace the output wiring, once I have sourced some suitable cable, then hopefully that will be as much as I need to do on the generator, apart from the final paint job.
I had previously mentioned, that I had presumed the wiring would need to be replaced, with a complete rewire being envisaged. However having taken a detailed review of the actual condition of the wiring, I might now reconsider and could end up reusing some, if not all, of the original wiring. The reason for this potential change in approach, was due to finding that the majority of the individual wires were actually in good condition. The initial observation had been that the wiring felt very stiff and some of the insulation did display cracking, especially if bent. Overall though, there was only a few individual wires which were damaged in a potentially dangerous way. The vast majority seemed to be in good order, without exhibiting any breaks in the insulation. All the wires have taken up the form that they were held in and the insulation would most probably crack, if forced into a different position. However as the wiring was all marked up as it was removed, it will be able to go back exactly as it came out, therefore there will be no need to disturb the position of the wires. This will minimise the risk of causing any additional damage as the wiring is refitted into the set. Any wiring that has any insulation cracks will be repaired by using the heat shrink treatment as utilised so far on the exciter generator and the alternator. I had considered treating all the wires with heat shrink, as a precaution, however I think this might cause issues with the routing of the wiring through the flexible conduits and grommets, as the overall size of the loom will be increased and may not fit. Instead I intend to use the spot repair approach and hope that will prove successful. So far I have cleaned up the wires and undertaken an examination of condition of the wiring associated with the alternator umbilical connector and the alternator internal connector wiring. This leave the main terminal block and the wiring to the breaker unit, still to be undertaken.
That's it for now, I hope to continue with the rest of the wiring preparation....
Neil.
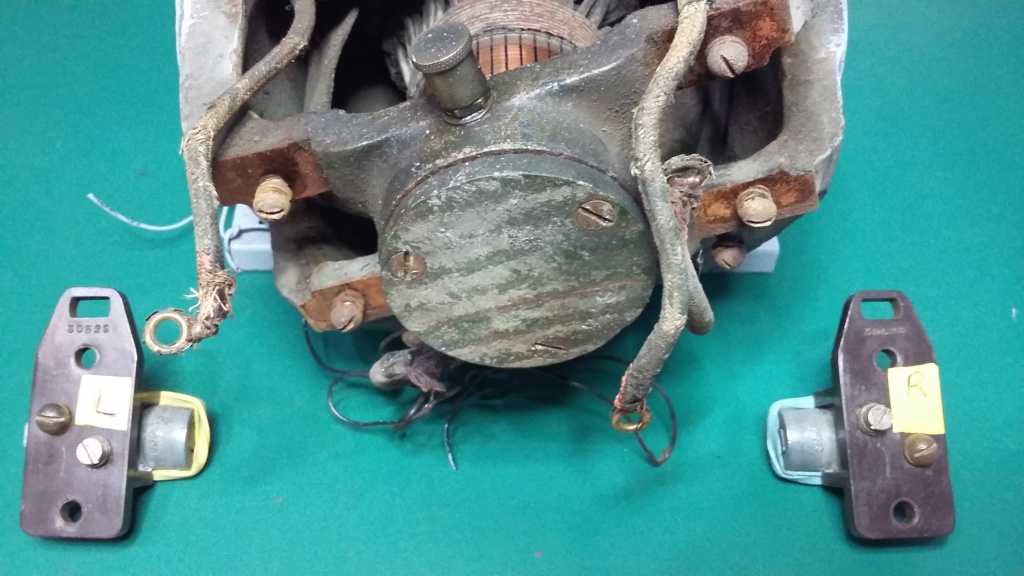
Exciter generator with the brush carriers removed, to access the wiring for repairs.

All the wires are in need of a protective covering repair.

Heat shrink being applied to the last wire, using a draw string to allow the wire to be gently pulled through the sleeve down to the coil. To enable the terminal to pass through the sleeve, a large diameter tube is used which has an increased reduction ratio of 4 : 1 (or 6 : 1) which still has the ability to shrink down to the wire size.

Exciter generator wiring repairs finished, just the replacement output cable required to complete the job.


Umbilical connector as removed, looking in need of attention.


Wiring cleaned up and heat shrink applied to the terminal ends, plus some sleeve utilised along the length of the wires to cover cracking.

Alternator internal connection wiring, as revealed. Note the single cut wire, this is believed to be part of the voltage output modification, for 230 volt working.

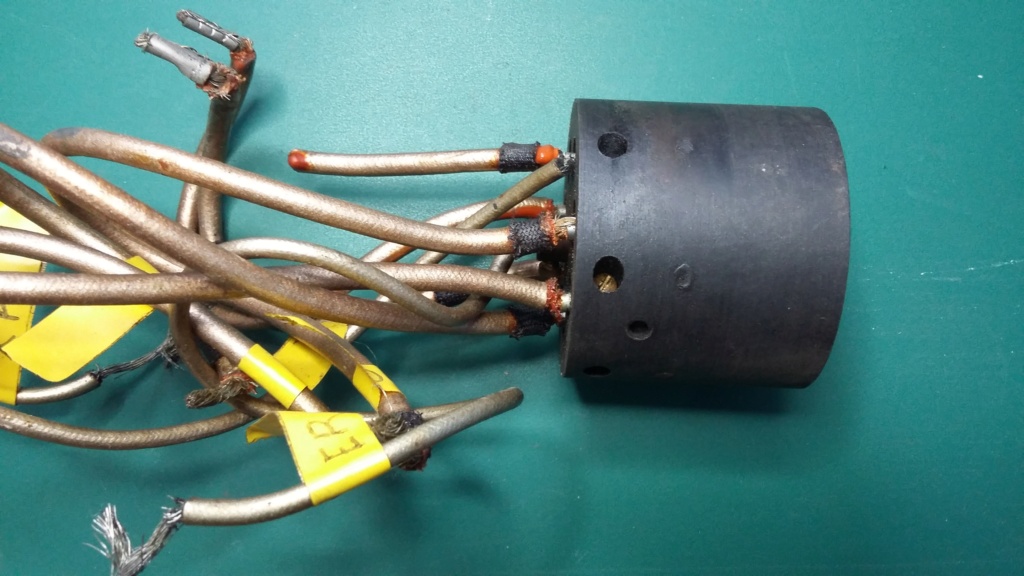
Socket as removed from alternator terminal housing. Note the presence of the red sealing wax like material as seen on the other terminal blocks.

All marked up ready to be taken apart.

Individual wires laid out as they were removed, with no attempt to straighten them, to reduce the risk of cracking the insulation.

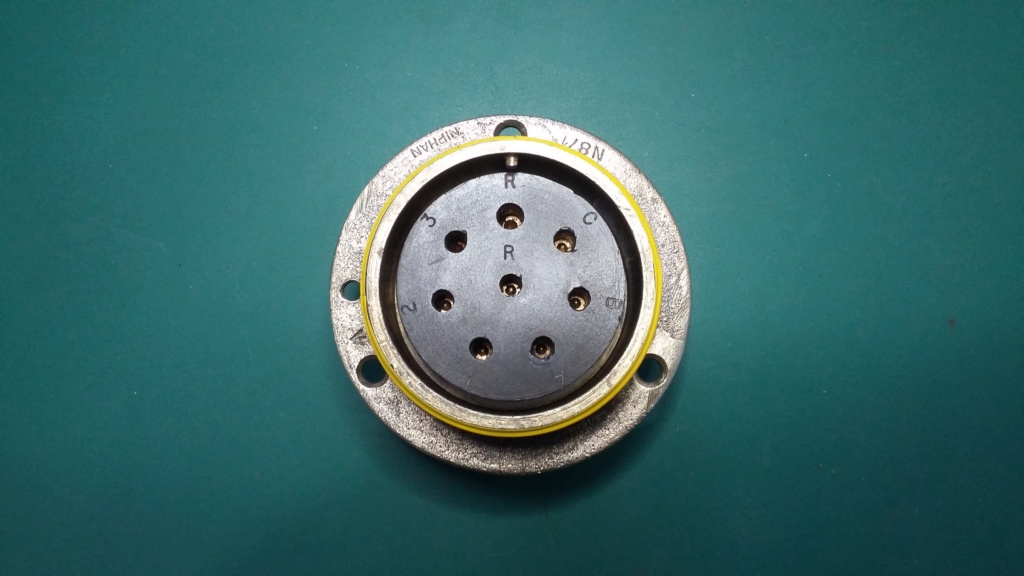
Socket cleaned up ready for painting. Tape protecting thread.
Wiring issues revisited.
In the absence of other activities, I took the opportunity to revisit the condition of the wiring and some of the renovation options. To start with I completed the exciter generator wiring repairs, with the application of some heat shrink tubing, as per the alternator. I will also need to replace the output wiring, once I have sourced some suitable cable, then hopefully that will be as much as I need to do on the generator, apart from the final paint job.
I had previously mentioned, that I had presumed the wiring would need to be replaced, with a complete rewire being envisaged. However having taken a detailed review of the actual condition of the wiring, I might now reconsider and could end up reusing some, if not all, of the original wiring. The reason for this potential change in approach, was due to finding that the majority of the individual wires were actually in good condition. The initial observation had been that the wiring felt very stiff and some of the insulation did display cracking, especially if bent. Overall though, there was only a few individual wires which were damaged in a potentially dangerous way. The vast majority seemed to be in good order, without exhibiting any breaks in the insulation. All the wires have taken up the form that they were held in and the insulation would most probably crack, if forced into a different position. However as the wiring was all marked up as it was removed, it will be able to go back exactly as it came out, therefore there will be no need to disturb the position of the wires. This will minimise the risk of causing any additional damage as the wiring is refitted into the set. Any wiring that has any insulation cracks will be repaired by using the heat shrink treatment as utilised so far on the exciter generator and the alternator. I had considered treating all the wires with heat shrink, as a precaution, however I think this might cause issues with the routing of the wiring through the flexible conduits and grommets, as the overall size of the loom will be increased and may not fit. Instead I intend to use the spot repair approach and hope that will prove successful. So far I have cleaned up the wires and undertaken an examination of condition of the wiring associated with the alternator umbilical connector and the alternator internal connector wiring. This leave the main terminal block and the wiring to the breaker unit, still to be undertaken.
That's it for now, I hope to continue with the rest of the wiring preparation....
Neil.

Exciter generator with the brush carriers removed, to access the wiring for repairs.

All the wires are in need of a protective covering repair.

Heat shrink being applied to the last wire, using a draw string to allow the wire to be gently pulled through the sleeve down to the coil. To enable the terminal to pass through the sleeve, a large diameter tube is used which has an increased reduction ratio of 4 : 1 (or 6 : 1) which still has the ability to shrink down to the wire size.

Exciter generator wiring repairs finished, just the replacement output cable required to complete the job.


Umbilical connector as removed, looking in need of attention.


Wiring cleaned up and heat shrink applied to the terminal ends, plus some sleeve utilised along the length of the wires to cover cracking.

Alternator internal connection wiring, as revealed. Note the single cut wire, this is believed to be part of the voltage output modification, for 230 volt working.


Socket as removed from alternator terminal housing. Note the presence of the red sealing wax like material as seen on the other terminal blocks.

All marked up ready to be taken apart.

Individual wires laid out as they were removed, with no attempt to straighten them, to reduce the risk of cracking the insulation.


Socket cleaned up ready for painting. Tape protecting thread.
neil (LE)- A credit to the forum

- Posts : 399
Join date : 2012-03-21
Age : 68
Location : N/W Kent

Robotstar5- Life Member

- Posts : 1109
Join date : 2018-09-25
 Re: Scott Generating Set Restoration (Continues)
Once again, nice work! Was there life before heat shrink?
We used to use Hellerman sleeving were I used to work (Gilbarco, petrol pumps) and I still have a small quantity of the silicone sleeves which come in handy on occasion.
Alan
We used to use Hellerman sleeving were I used to work (Gilbarco, petrol pumps) and I still have a small quantity of the silicone sleeves which come in handy on occasion.
Alan
Alanengine- A credit to the forum

- Posts : 461
Join date : 2020-11-21
Page 4 of 13 •  1, 2, 3, 4, 5 ... 11, 12, 13
 Similar topics
» Scott PAB Restoration
» Kubota diesel KND3
» Trolley for Villiers Mk15 wooden toolbox new pics 5-9-2016
» Petter generating set - might turn into a project
» Douglas FT35 generating set
» Kubota diesel KND3
» Trolley for Villiers Mk15 wooden toolbox new pics 5-9-2016
» Petter generating set - might turn into a project
» Douglas FT35 generating set
Page 4 of 13
Permissions in this forum:
You cannot reply to topics in this forum