Trolley for Villiers Mk15 wooden toolbox new pics 5-9-2016
+2
StewartH
Woodsman
6 posters
Page 1 of 2
Page 1 of 2 • 1, 2 
 Trolley for Villiers Mk15 wooden toolbox new pics 5-9-2016
Dear forum members,
In this topic I want to post the building of a trolley for my Villiers Mk 15.
First stage is a "brain storm session"
Which material to be used?
- I have 44mm x 44mm wood available (is this strong enough to withstand the forces of the engine?)
- How to connect the wood at the edges? (I'm thinking to drill holes in the longitudinal direction of
the wood and mount threaded rods M8; however my concern is that the wood will crack.)
- Is it necessary to use rubber vibration damping between engine and frame
or does this influence the belt connection in a negative way?
Wheels:
Want to have wheels which represents the timeframe when the engine was build. (beginning 1960)
Does anyone know a supplier of these wheels? I've seen many websites of suppliers with only modern style wheels
Driven component.
- Want to drive a vacuumpump for a milking unit. which RPM ratio is necessary.
Where can I find this information?
- Needed capacity of the vacuumpump for a milking unit.
I've seen milking units with a kind of air storage tank. Is this always necessary?
Hoping to get some answers on the questions above.
I'm not so familiar with timberwork.
P.S. December 27th there is a swap meet for old tractor and stationairy engine parts
in Reusel (Noord Brabant Holland) Adress: Hulselsedijk 6a, 5541 RP Reusel.
Info. jacwerts-HMT@kpnmail.nl
See Website: www.hmtklep.nl
Last edited by Mark15 user on Mon Sep 05 2016, 13:19; edited 13 times in total

Mark15 user- A true Stationary engine owner

- Posts : 137
Join date : 2014-09-06
Age : 54
Location : Holland
 Re: Trolley for Villiers Mk15 wooden toolbox new pics 5-9-2016
Theres a great thread here;
http://www.stationaryengineforum.net/t3309-witte-saw-engine-trolley-taking-shape
and cast iron wheels can be found here (I'm sure other members will know more suppliers)
http://www.bilcastors.co.uk/cast-iron-ductile-steel-wheels-cast-iron-wheels-c-54_57.html
http://www.stationaryengineforum.net/t3309-witte-saw-engine-trolley-taking-shape
and cast iron wheels can be found here (I'm sure other members will know more suppliers)
http://www.bilcastors.co.uk/cast-iron-ductile-steel-wheels-cast-iron-wheels-c-54_57.html
_________________
Regards Paul
Tha can alus tell a Yorkshireman - but tha can't tell him much.

Woodsman- Admin
- Posts : 2819
Join date : 2014-08-24
Age : 73
Location : God's own county
 Re: Trolley for Villiers Mk15 wooden toolbox new pics 5-9-2016
Hello Woodsman,
Thanks for the usefull links.
Best regards,
Steef
Thanks for the usefull links.
Best regards,
Steef

Mark15 user- A true Stationary engine owner

- Posts : 137
Join date : 2014-09-06
Age : 54
Location : Holland
 Re: Trolley for Villiers Mk15 wooden toolbox new pics 5-9-2016
Hi Steef.
Cast iron wheels here
http://www.ebay.co.uk/itm/4-off-CAST-IRON-WHEELS-STATIONARY-ENGINE-Lister-Petter-etc/151520792010?_trksid=p2047675.c100010.m2109&_trkparms=aid%3D555012%26algo%3DPW.MBE%26ao%3D1%26asc%3D20140221143405%26meid%3D26174e05e56f4802ab51d746eb7700f2%26pid%3D100010%26prg%3D20140221143405%26rk%3D5%26rkt%3D24%26sd%3D161520887116
_________________
Regards Paul
Tha can alus tell a Yorkshireman - but tha can't tell him much.

Woodsman- Admin
- Posts : 2819
Join date : 2014-08-24
Age : 73
Location : God's own county
 Trolley for Villiers Mk15 story continues
Dear Forum members,
Finally I can post some new developments
Saturday I will go and look for a vacuum milking pump.
I have no idea of a brandname yet; but will see. Price is 30 Euro and distance is not too far away.
Need some TLC and seems to be a good next project

Meanwhile I've been able to startup my old CAD design programm and made a wild sketch of the trolley.
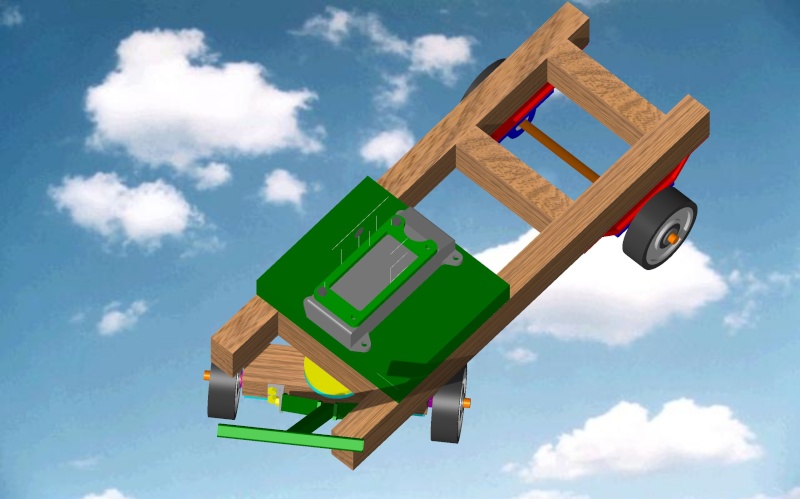


The drawbar will be detachable and the position of the vacuumpump has to be be determined.
A toolbox at the backside will be added; depends on the the remaining space.
Will keep you updated when I have the vacuumpomp. This will be after the weekend I guess
Best regards,
Steef Pronk
Finally I can post some new developments
Saturday I will go and look for a vacuum milking pump.
I have no idea of a brandname yet; but will see. Price is 30 Euro and distance is not too far away.
Need some TLC and seems to be a good next project

Meanwhile I've been able to startup my old CAD design programm and made a wild sketch of the trolley.


The drawbar will be detachable and the position of the vacuumpump has to be be determined.
A toolbox at the backside will be added; depends on the the remaining space.
Will keep you updated when I have the vacuumpomp. This will be after the weekend I guess
Best regards,
Steef Pronk

Mark15 user- A true Stationary engine owner

- Posts : 137
Join date : 2014-09-06
Age : 54
Location : Holland
 Re: Trolley for Villiers Mk15 wooden toolbox new pics 5-9-2016
Good grief ! Not only is Steef a meticulous engine restorer, turns out he's a dab hand with CAD software. Nice work Steef.
By some strange coincidence I've just returned from my workshop having started making a trolley for my latest project (more later).
It's not going to be what you would call exhibition standard but it will do to drag the engine around the workshop.
Where would we be without pallets?

By some strange coincidence I've just returned from my workshop having started making a trolley for my latest project (more later).
It's not going to be what you would call exhibition standard but it will do to drag the engine around the workshop.
Where would we be without pallets?

_________________
Regards Paul
Tha can alus tell a Yorkshireman - but tha can't tell him much.

Woodsman- Admin
- Posts : 2819
Join date : 2014-08-24
Age : 73
Location : God's own county
 Re: Trolley for Villiers Mk15 wooden toolbox new pics 5-9-2016
Nice peg work Paul - but I guess your ID of Woodsman gives away the fact you're also a dab hand! - Steef - if you are not too far down this route of making the trolley have you condsidered using 'Ackerman' steering? Its more stable... as the axle is fixed - its the wheels that move...
Keep us informed either way - liking the CAD!
Best
Hamish
Keep us informed either way - liking the CAD!
Best
Hamish

StewartH- A credit to the forum

- Posts : 410
Join date : 2013-07-04
Location : Hampshire
 Re: Trolley for Villiers Mk15 wooden toolbox new pics 5-9-2016
Hi Hamish, thanks for you kind compliments -encouraged by which I've posted in Other Hobbies.
It's just occurred to me that starting handles which come up on ebay are often missing the wooden hand grip - I'd be happy to knock one up for members if needed.
It's just occurred to me that starting handles which come up on ebay are often missing the wooden hand grip - I'd be happy to knock one up for members if needed.
_________________
Regards Paul
Tha can alus tell a Yorkshireman - but tha can't tell him much.

Woodsman- Admin
- Posts : 2819
Join date : 2014-08-24
Age : 73
Location : God's own county
 pictures of the vacuumpump
Dear Forum members
Last saturday I've picked up the vacuuumpump
The vacuumpump was still mounted and luckily I've taken a toolbox with me.
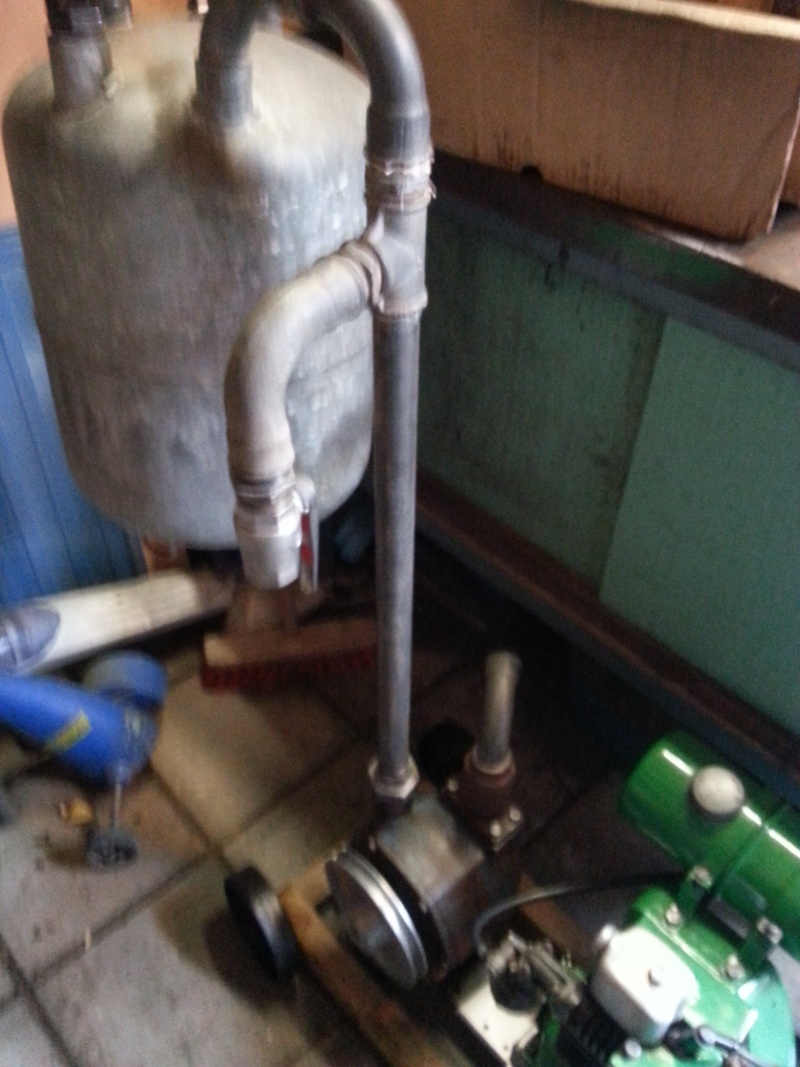
I've salvaged the pump, the vessel and a mounting table.
The brandname is Benco from Malmo Sweden.
The balvalve is temporary mounted to keep dirt away from the internal
See some pictures below


Best regards,
Steef Pronk
Last saturday I've picked up the vacuuumpump
The vacuumpump was still mounted and luckily I've taken a toolbox with me.
I've salvaged the pump, the vessel and a mounting table.
The brandname is Benco from Malmo Sweden.
The balvalve is temporary mounted to keep dirt away from the internal
See some pictures below


Best regards,
Steef Pronk

Mark15 user- A true Stationary engine owner

- Posts : 137
Join date : 2014-09-06
Age : 54
Location : Holland
 Cleaning components and changed design of trolley
Dear forum members,
Spend some time to clean the components and ad the pump and vessel (moisture catch can) to my 3d file.
It seems that the old pressure gauge is working
See some pictures below


I'm thinking about to change the front axle into an Ackerman variant; still not sure if I should look for steering parts or make it myself.
Added the pump and vessel to my 3D sketch. Now I have to ad the Villiers engine in the 3D drawing and see where I have to make changes.
Best regards,
Steef pronk
Spend some time to clean the components and ad the pump and vessel (moisture catch can) to my 3d file.
It seems that the old pressure gauge is working
See some pictures below


I'm thinking about to change the front axle into an Ackerman variant; still not sure if I should look for steering parts or make it myself.
Added the pump and vessel to my 3D sketch. Now I have to ad the Villiers engine in the 3D drawing and see where I have to make changes.
Best regards,
Steef pronk

Mark15 user- A true Stationary engine owner

- Posts : 137
Join date : 2014-09-06
Age : 54
Location : Holland
 3D design of trolley new pictures
Hello Forum members,
I'm still working on the design of the trolley.
See the updated pictures where I've addded the Villiers engine


Best regards,
Steef Pronk
I'm still working on the design of the trolley.
See the updated pictures where I've addded the Villiers engine


Best regards,
Steef Pronk

Mark15 user- A true Stationary engine owner

- Posts : 137
Join date : 2014-09-06
Age : 54
Location : Holland
 cast spoke wheels found on local market
Dear forum members,
Visited a local parts market this morning.
Found a set of 4 spokewheels for my trolley
Just what I was looking for
See the picture after a quick clean and a spray with WD40

Best regards,
Steef Pronk
Visited a local parts market this morning.
Found a set of 4 spokewheels for my trolley
Just what I was looking for
See the picture after a quick clean and a spray with WD40

Best regards,
Steef Pronk

Mark15 user- A true Stationary engine owner

- Posts : 137
Join date : 2014-09-06
Age : 54
Location : Holland
 Wheel cleaning
Hello forum members,
Today I've started to free the wheels from a thick layer of rust.
I've used a brush on my grinder. Unfortunately I don't have a sandblasting unit available
Many brushing sanding and cleaning later it looks much better.
To protect the metal surface I've sprayed several layers of a rust protector.

Best regards,
Steef Pronk
Today I've started to free the wheels from a thick layer of rust.
I've used a brush on my grinder. Unfortunately I don't have a sandblasting unit available
Many brushing sanding and cleaning later it looks much better.
To protect the metal surface I've sprayed several layers of a rust protector.

Best regards,
Steef Pronk

Mark15 user- A true Stationary engine owner

- Posts : 137
Join date : 2014-09-06
Age : 54
Location : Holland
 Re: Trolley for Villiers Mk15 wooden toolbox new pics 5-9-2016
Hello Steef - you had good luck with your wheels! - a nice set. Like you I am without a good sand blasting set - i have seen those portable kits on ebay for about 30 Euros. All it needs is air - so if you already have a compressor it may suit you in the future... I used a friends - and as long as you have good pressure and a good supply of beads it worked well - but not for a heavy duty application - your wheels would have been fine... CAD looks good Sir!
Search for a ...
30lb Portable Air Sandblasting Kit Shot Grit Sand Blasting Blaster Sandblaster
Best
Hamish
Search for a ...
30lb Portable Air Sandblasting Kit Shot Grit Sand Blasting Blaster Sandblaster
Best
Hamish

StewartH- A credit to the forum

- Posts : 410
Join date : 2013-07-04
Location : Hampshire
 Re: Trolley for Villiers Mk15 wooden toolbox new pics 5-9-2016
your good on the CAD, - you might need a couple of stops underneath to stop the axle from turning to far.

steve w- Life Member

- Posts : 503
Join date : 2012-09-15
Age : 52
Location : Nr Wolverhampton
 woodworking a first start
Hello forum members,
Today I've made a start to practice some woodworking on old pieces of wood.
Main goal was to see if I was able to make a dowel connection.
After some trials I got a first result. See the picture


Best regards,
Steef Pronk
Today I've made a start to practice some woodworking on old pieces of wood.
Main goal was to see if I was able to make a dowel connection.
After some trials I got a first result. See the picture


Best regards,
Steef Pronk
Last edited by Mark15 user on Tue Apr 07 2015, 13:14; edited 1 time in total

Mark15 user- A true Stationary engine owner

- Posts : 137
Join date : 2014-09-06
Age : 54
Location : Holland
 Re: Trolley for Villiers Mk15 wooden toolbox new pics 5-9-2016
Hi Steef - ooops you forgot the picture 
_________________
Regards Paul
Tha can alus tell a Yorkshireman - but tha can't tell him much.

Woodsman- Admin
- Posts : 2819
Join date : 2014-08-24
Age : 73
Location : God's own county
 Re: Trolley for Villiers Mk15 wooden toolbox new pics 5-9-2016
Woodsman wrote:Hi Steef - ooops you forgot the picture
@Woodsman,
Struggled with the smartphone to get the pictures uploaded.
Goes better with the computer
Did not make a splint in the dowel.
Noticed that the broomstick causes some torque. ( Cheap broomstick; I know
In the real situation I will make some cutouts to fix the beams and avoid rotation
Best regards,
Steef

Mark15 user- A true Stationary engine owner

- Posts : 137
Join date : 2014-09-06
Age : 54
Location : Holland
 Re: Trolley for Villiers Mk15 wooden toolbox new pics 5-9-2016
Hi Steef - very good first attempt.
You will often get a bit of creep when trying to glue several joints in one go. Try clamping to the bench with temporary battens or drop the whole thing on the floor and put something heavy on top to hold it still whilst the glue sets - bag of sand or some bricks.
You will often get a bit of creep when trying to glue several joints in one go. Try clamping to the bench with temporary battens or drop the whole thing on the floor and put something heavy on top to hold it still whilst the glue sets - bag of sand or some bricks.
_________________
Regards Paul
Tha can alus tell a Yorkshireman - but tha can't tell him much.

Woodsman- Admin
- Posts : 2819
Join date : 2014-08-24
Age : 73
Location : God's own county
 Re: Trolley for Villiers Mk15 wooden toolbox new pics 5-9-2016
Hi Woodsman,
Thanks for your helpfull advises.
I've clamped the beams on a plate of plywood to get a straight connection.
To get a square kerf on all sides of the beam was the biggest challenge up till now.
Investment in a good saw bench is a good plan.
For the frame I will use wood without radius on the edges.
This has a more straight look.
Keep trying and of course posting my progress.
See also a quick set up how the trolley will look like in real life.
The beams under the vessel will be extend a litte bit to create a platform where the miliking set can be placed.
Toolbox will be moved to the side.
Best regards,
Steef Pronk
Thanks for your helpfull advises.
I've clamped the beams on a plate of plywood to get a straight connection.
To get a square kerf on all sides of the beam was the biggest challenge up till now.
Investment in a good saw bench is a good plan.
For the frame I will use wood without radius on the edges.
This has a more straight look.
Keep trying and of course posting my progress.
See also a quick set up how the trolley will look like in real life.

The beams under the vessel will be extend a litte bit to create a platform where the miliking set can be placed.
Toolbox will be moved to the side.
Best regards,
Steef Pronk

Mark15 user- A true Stationary engine owner

- Posts : 137
Join date : 2014-09-06
Age : 54
Location : Holland
 Re: Trolley for Villiers Mk15 wooden toolbox new pics 5-9-2016
Hi Steef,
You might want to invest in a cheap mitre box, something like this...
http://www.wickes.co.uk/Wickes-Impact-Resistant-Mitre-Box-14in/p/500079
Yes, it surprises a lot of people that wood working requires just as much precision as metal. Sometimes more so, as it tends to move as you cut and shape because you relieve the tension in the timber and the direction of the grain influences the movement - hence my suggestion of using Meranti - very uniform grain.
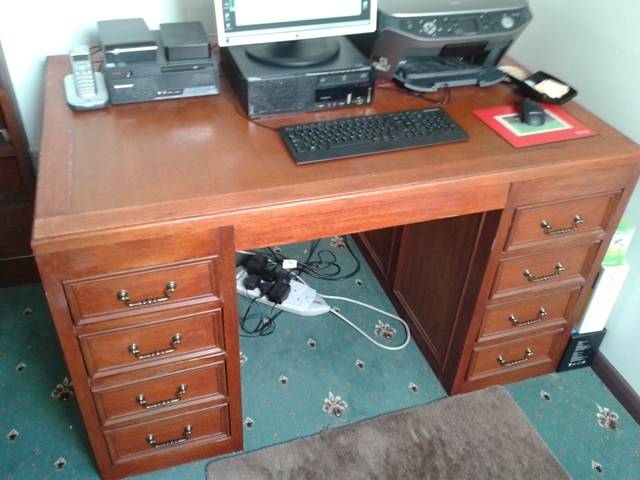
Another hint - store your timber in the same environment as it's final resting place i.e don't keep it in the house if you intend the finished product to end up in the shed. Let it season for a few weeks so that the moisture content of the wood becomes stable. Nothing makes wooden items wiggle more than moving from a cool, moist environment to a warm, dry one. The top of this desk moved about 5mm after about eight weeks inside the house.

_________________
Regards Paul
Tha can alus tell a Yorkshireman - but tha can't tell him much.

Woodsman- Admin
- Posts : 2819
Join date : 2014-08-24
Age : 73
Location : God's own county
 Trolley frame made from Bankirai
Dear Forum members,
Finally an update on the trolley. After the finishing of the vacuumpump I started the woodworking.
I've used some old wood to continue the made of a wooden connection.(mortise joint)
However the straightness and movement in the connection were not at the level as I had in mind.
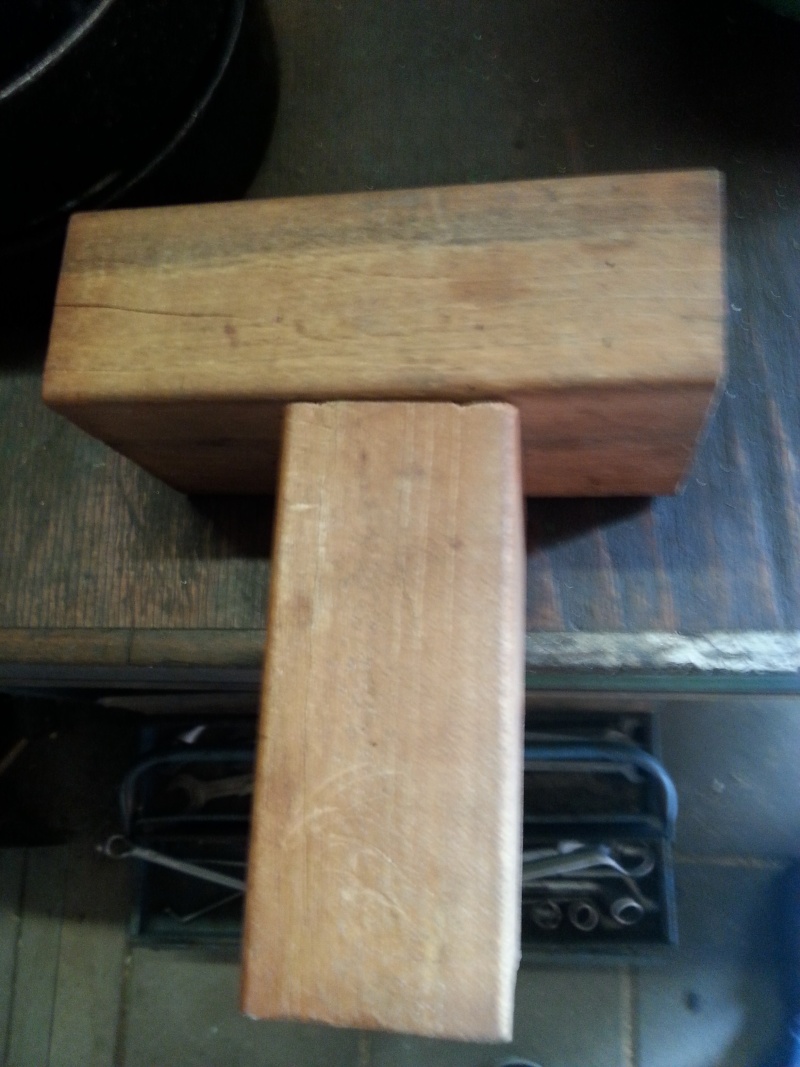


To keep the project going I've decided to use screw connections now and keep practising my woodworking scales.
I've found a local woodshop in my hometown which has an attick filled with a varity of wooden pieces in all kind of grades.
I never realised that there are so many different wood grades.
The people over there are friendly and willing to help.
For this trolley I've decided to use Bankirai wood (45x70mm) beams.
Compared with the wood beams I saw at the local shops like Gamma; the straightness is very good.
The pictures below are showing how I've made the frame.
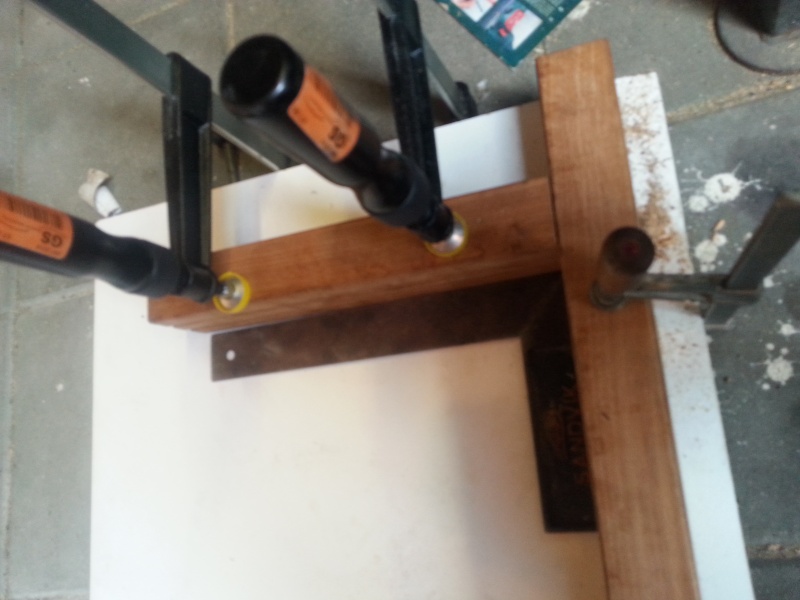

The screws are stainless steel 6x100mm
Hope this is strong enough to keep the frame together.

See also the temporary mock up I've made with the new frame.

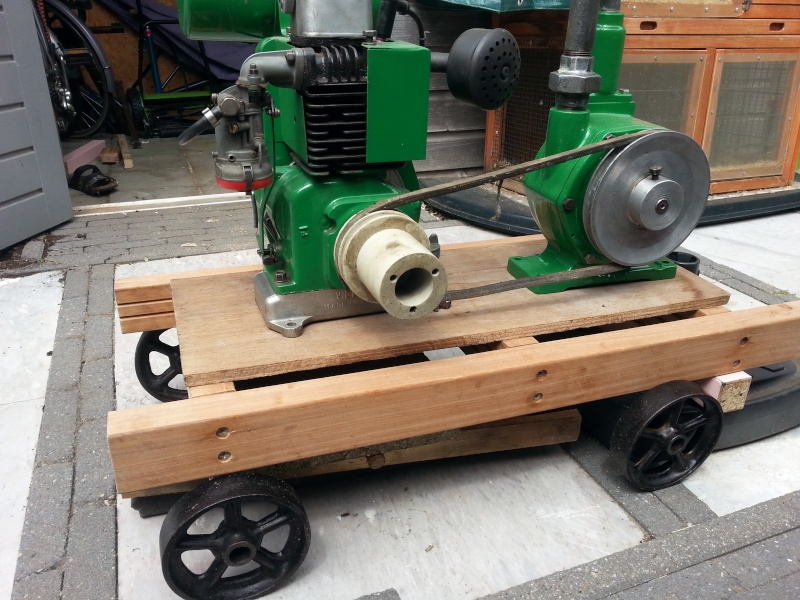
The plywood plate is only for a quick fit. It will be replaced by a more decent one from the woodshop.
The next step is to assemble the "wheel suspension".
Keep you updated!
Best regards,
Steef Pronk
Finally an update on the trolley. After the finishing of the vacuumpump I started the woodworking.
I've used some old wood to continue the made of a wooden connection.(mortise joint)
However the straightness and movement in the connection were not at the level as I had in mind.


To keep the project going I've decided to use screw connections now and keep practising my woodworking scales.
I've found a local woodshop in my hometown which has an attick filled with a varity of wooden pieces in all kind of grades.
I never realised that there are so many different wood grades.
The people over there are friendly and willing to help.
For this trolley I've decided to use Bankirai wood (45x70mm) beams.
Compared with the wood beams I saw at the local shops like Gamma; the straightness is very good.
The pictures below are showing how I've made the frame.


The screws are stainless steel 6x100mm
Hope this is strong enough to keep the frame together.

See also the temporary mock up I've made with the new frame.


The plywood plate is only for a quick fit. It will be replaced by a more decent one from the woodshop.
The next step is to assemble the "wheel suspension".
Keep you updated!
Best regards,
Steef Pronk

Mark15 user- A true Stationary engine owner

- Posts : 137
Join date : 2014-09-06
Age : 54
Location : Holland
 Wheel suspension sketches with Ackermann
Dear forum members,
After finishing of the wood support. I will continue with the wheel suspension.
First I´ve made some sketches in 3D.
The width of the frame is a little bit wider than originally planned, therefore I want to narrow the track of the wheels.
Goals is that the wheels don´t extend from the frame
See the pictures below.

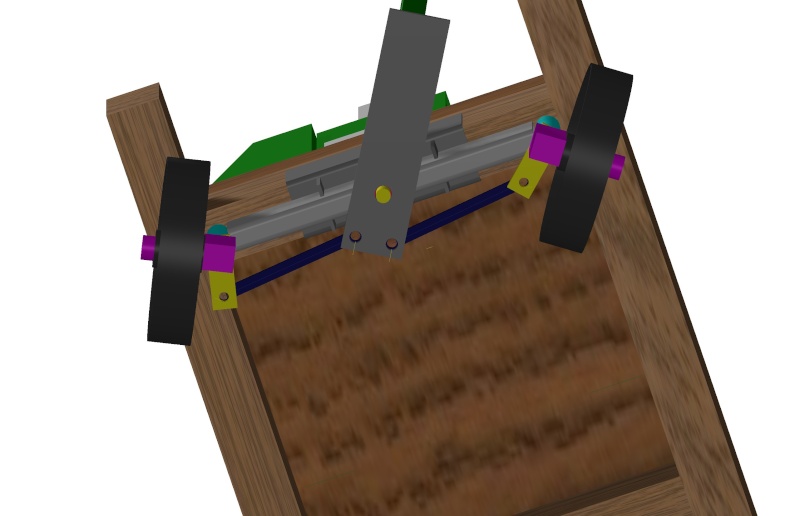
Also the rear wheel suspension should be changed in this case.
I´ve seen a kind of `A` suspension on an old 4 wheel Miedema trailer.
Plan is to use squaretube 25mm x2,5mm or similar for the frame of the rear wheel suspension.
A 20 mm shaft should fit in for the wheels then.
It seems to be strong enough+ however if the movement in length direction is to much I will ad an extra support to the frame.
As always please let me know your thoughts of comments.
Will keep you updated when I have material available.
Best regards,
Steef Pronk
After finishing of the wood support. I will continue with the wheel suspension.
First I´ve made some sketches in 3D.
The width of the frame is a little bit wider than originally planned, therefore I want to narrow the track of the wheels.
Goals is that the wheels don´t extend from the frame
See the pictures below.


Also the rear wheel suspension should be changed in this case.
I´ve seen a kind of `A` suspension on an old 4 wheel Miedema trailer.
Plan is to use squaretube 25mm x2,5mm or similar for the frame of the rear wheel suspension.
A 20 mm shaft should fit in for the wheels then.
It seems to be strong enough+ however if the movement in length direction is to much I will ad an extra support to the frame.
As always please let me know your thoughts of comments.
Will keep you updated when I have material available.
Best regards,
Steef Pronk

Mark15 user- A true Stationary engine owner

- Posts : 137
Join date : 2014-09-06
Age : 54
Location : Holland
 Re: Trolley for Villiers Mk15 wooden toolbox new pics 5-9-2016
Looking good Steef
_________________
Regards Paul
Tha can alus tell a Yorkshireman - but tha can't tell him much.

Woodsman- Admin
- Posts : 2819
Join date : 2014-08-24
Age : 73
Location : God's own county
 Creating steering axle with Ackermann
Dear forum members,
Finally some news on the building process of the trolley.
After a trip to Canada (see pictures of the Blyth ralley) I've got new inspiration.
My first tought was to outsource the manufacturing of the axles.
However due to the offered price (welding shop €275:ex VAT) I've decided to make the axles myself.
I've bought an old Go-Kart and removed the steering axle and some iron profiles.
A lot of work to adapt the axle However the Go-kart was very cheap and I like a challenge
There are some changes needed;
1.) Shorten the shafts for the wheels.
2.) move the position of the pitmanarms
3.) reduce the total width of the axle
4.) welding on the U profile 50x50x2,5mm
I've started to shorten the length of the shafts.

Position of the pitmanarm moved. To be welded in position.


I've made M10 thread in the center of the shaft and mounted a bolt and a M20 ring to retain the wheels on the shaft.
One wheel mounted; sorry for the bad quality picture.
Next step is to reduce the total width of the shaft.
Best regards,
Steef Pronk
Finally some news on the building process of the trolley.
After a trip to Canada (see pictures of the Blyth ralley) I've got new inspiration.
My first tought was to outsource the manufacturing of the axles.
However due to the offered price (welding shop €275:ex VAT) I've decided to make the axles myself.
I've bought an old Go-Kart and removed the steering axle and some iron profiles.
A lot of work to adapt the axle
There are some changes needed;
1.) Shorten the shafts for the wheels.
2.) move the position of the pitmanarms
3.) reduce the total width of the axle
4.) welding on the U profile 50x50x2,5mm
I've started to shorten the length of the shafts.

Position of the pitmanarm moved. To be welded in position.


I've made M10 thread in the center of the shaft and mounted a bolt and a M20 ring to retain the wheels on the shaft.
One wheel mounted; sorry for the bad quality picture.

Next step is to reduce the total width of the shaft.
Best regards,
Steef Pronk

Mark15 user- A true Stationary engine owner

- Posts : 137
Join date : 2014-09-06
Age : 54
Location : Holland
Page 1 of 2 • 1, 2 
 Similar topics
» Dutch Villiers Mark 15
» Connection Villiers engine MK 15 on trolley floor. How to avoid crack of mounting points engine? Need your advise
» new toy .......Villiers Mk15
» villiers mk15
» which RPM Villiers Mk15?
» Connection Villiers engine MK 15 on trolley floor. How to avoid crack of mounting points engine? Need your advise
» new toy .......Villiers Mk15
» villiers mk15
» which RPM Villiers Mk15?
Page 1 of 2
Permissions in this forum:
You cannot reply to topics in this forum