Dutch Villiers Mark 15
+4
seabar54
tony RA
StewartH
kevjhnsn
8 posters
Page 1 of 2
Page 1 of 2 • 1, 2 
 Dutch Villiers Mark 15
Dear forum members,
Hereby I want to post the repair jobs of my Villiers Mark 15 engine.
I'm new in the stationairy engine world. Therefore I'm open minded for your suggstions of comments.x
Improvement points:
Big end bearings gone
No compression
Exhaust missing
Air filter box missing
Optical attention
Managaged to get the flywheel of without too much problems.
Cleaned the valvs and valve seats and mounted the push rod of the exhaust valve again.
Piston and rings were freed from a severe carbon layer.
Now I managed to get compression again
After that I checked the coil and the HT lead.
First thought was that the coil was gone
After refitting the spark plug cap on the cable and adjusting the points and ignition and yes ...
there was a blue spark on the plug
Cleaned the carburator and put in a small amount of break cleaner.
After a few turns the engine runs

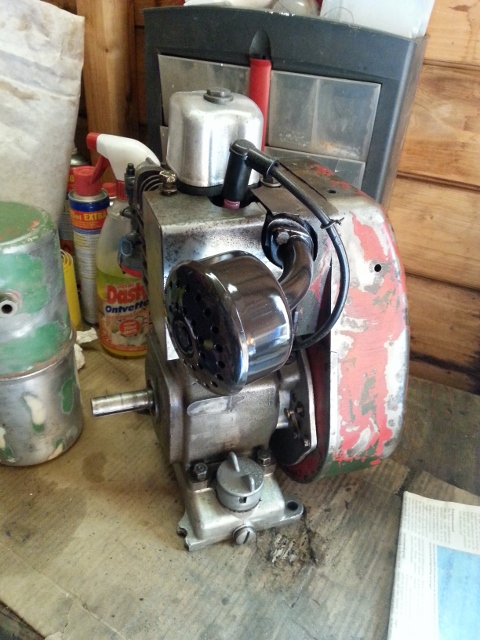
After a good cleaning the engine looks much better now.
See the new exhaust which is temporarly mounted for drying afterthe paint job.
I've used Flexa heat resistant paint. I like the shiny look of it and hope the paint will last.

Hope you like my project
Will keep you updated the coming months.
Next plans are the repair of the fuel tank and the cowl. ( a lot of dents in it )
)
Also the pulley was mistreated by hammer hits
I guess the small locking screws were not noticed by the previous owner.
More pictures will follow.
Greetings from the Netherlands
Steef
Hereby I want to post the repair jobs of my Villiers Mark 15 engine.
I'm new in the stationairy engine world. Therefore I'm open minded for your suggstions of comments.x
Improvement points:
Big end bearings gone
No compression
Exhaust missing
Air filter box missing
Optical attention
Managaged to get the flywheel of without too much problems.
Cleaned the valvs and valve seats and mounted the push rod of the exhaust valve again.
Piston and rings were freed from a severe carbon layer.
Now I managed to get compression again
After that I checked the coil and the HT lead.
First thought was that the coil was gone
After refitting the spark plug cap on the cable and adjusting the points and ignition and yes ...
there was a blue spark on the plug

Cleaned the carburator and put in a small amount of break cleaner.
After a few turns the engine runs

After a good cleaning the engine looks much better now.
See the new exhaust which is temporarly mounted for drying afterthe paint job.
I've used Flexa heat resistant paint. I like the shiny look of it and hope the paint will last.


Hope you like my project
Will keep you updated the coming months.
Next plans are the repair of the fuel tank and the cowl. ( a lot of dents in it
Also the pulley was mistreated by hammer hits
I guess the small locking screws were not noticed by the previous owner.
More pictures will follow.
Greetings from the Netherlands
Steef

Mark15 user- A true Stationary engine owner

- Posts : 137
Join date : 2014-09-06
Age : 54
Location : Holland
 Overhauling part 1
Dear forum members
I've continued the work on my Viliers Mk15 engine
Big end bearings were replaced.
The new bearings were mounted with the assembly lugs towards the camshaft.


The valves were cleaned in an earlier stage.

Paper gasket of the rocker cover seems too thin.
I've seen some Mk15 engines with a rubber gasket.
Where can I purchase such a gasket?
The new cylinderhead gasket was mounted.
Assuming the gasket is mounted correctly on the picture?

(No top marking on the gasket)
After degreasing the cylinderhead and cylinder were painted with heat resistant paint

Next step will be the overhauling of the engine cowl and the fuel tank.
Due to several dents and rust this will be a lot of work to get them shining again.
Keep you updated!
Regards,
Steef Pronk
I've continued the work on my Viliers Mk15 engine
- Replacement big end bearings
Big end bearings were replaced.
The new bearings were mounted with the assembly lugs towards the camshaft.


- Cylinder and Cylinderhead
The valves were cleaned in an earlier stage.

Paper gasket of the rocker cover seems too thin.
I've seen some Mk15 engines with a rubber gasket.
Where can I purchase such a gasket?
The new cylinderhead gasket was mounted.
Assuming the gasket is mounted correctly on the picture?

(No top marking on the gasket)
After degreasing the cylinderhead and cylinder were painted with heat resistant paint

Next step will be the overhauling of the engine cowl and the fuel tank.
Due to several dents and rust this will be a lot of work to get them shining again.
Keep you updated!
Regards,
Steef Pronk

Mark15 user- A true Stationary engine owner

- Posts : 137
Join date : 2014-09-06
Age : 54
Location : Holland
 Re: Dutch Villiers Mark 15
nice work so far  steef
steef
keep the pics coming, and the good work too.
kev
keep the pics coming, and the good work too.
kev
_________________
 " IF YOU DONT DO ANYTHING " "" YOU'LL NEVER MAKES MISTAKES ""

kevjhnsn- Life Member

- Posts : 3596
Join date : 2011-02-10
Age : 46
Location : south cheshire
 Re: Dutch Villiers Mark 15
Hello Steef,
Thanks for sharing your progress - its always an interesting read to see how others restor their projects - and i really like the 'flexa' paint on the exhaust - it suits the engine well in my opinion.
Keep the reports coming and good luck!
Best
Hamish
Thanks for sharing your progress - its always an interesting read to see how others restor their projects - and i really like the 'flexa' paint on the exhaust - it suits the engine well in my opinion.
Keep the reports coming and good luck!
Best
Hamish

StewartH- A credit to the forum

- Posts : 410
Join date : 2013-07-04
Location : Hampshire
 Villiers Mk15 Overhauling fueltank
I've started with the overhauling of the fuel tank.
Many layers of old paint and some rust and dents.

First the inside was cleaned with grid and degreaser (dasty)
Bought car filler to fill up the dents.

Filling - sanding - filling sanding etc.

After a first spray with Motip Spray Putty the looks are much better.
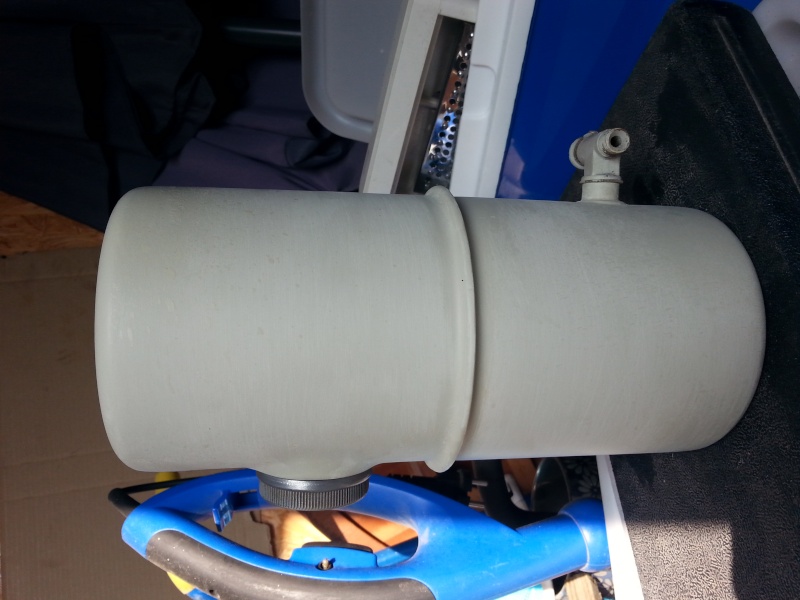
P.s. don't worry about the fuel tap. A new one is already available.
This one is good enough to protect the thread from paint.
More pictures will follow after spraying with the green topcoat.
After that the overhauling of the cowl will be the next step.
The top plate located at the spark plug is seriously damaged by rust and some cracks.
Still looking for a solution; main concern is the deformation of the thin sheet metal caused by welding.
Who has experience with this operation? I'm open minded for your suggestions.
Keep you updated
Many layers of old paint and some rust and dents.

First the inside was cleaned with grid and degreaser (dasty)
Bought car filler to fill up the dents.

Filling - sanding - filling sanding etc.
After a first spray with Motip Spray Putty the looks are much better.

P.s. don't worry about the fuel tap. A new one is already available.
This one is good enough to protect the thread from paint.
More pictures will follow after spraying with the green topcoat.
After that the overhauling of the cowl will be the next step.
The top plate located at the spark plug is seriously damaged by rust and some cracks.
Still looking for a solution; main concern is the deformation of the thin sheet metal caused by welding.
Who has experience with this operation? I'm open minded for your suggestions.
Keep you updated
Last edited by Mark15 user on Wed Oct 01 2014, 17:13; edited 6 times in total (Reason for editing : Work in progress)

Mark15 user- A true Stationary engine owner

- Posts : 137
Join date : 2014-09-06
Age : 54
Location : Holland
 Cowl cosmetic operation
Dear Forum members,
I've started the cosmetic work on the cowl.
The most work was to straighten the top plate near the spark plug.
The cracks where welded by TIG welding.
A local welder helped me with this job.
To get more strength for the bolt connection I've decided to weld on a ring to the plate.
Also a few dents on the radius near the flywheel where filled.

After straightening and removing the rust some filler was added . (See picture)

I've used Motip spray putty which fills up small skratches.
A lot of sanding, and refilling later the original shape came back


I've finally found the right top coat color.
A local car parts shop has made spray cans for me with the right color.
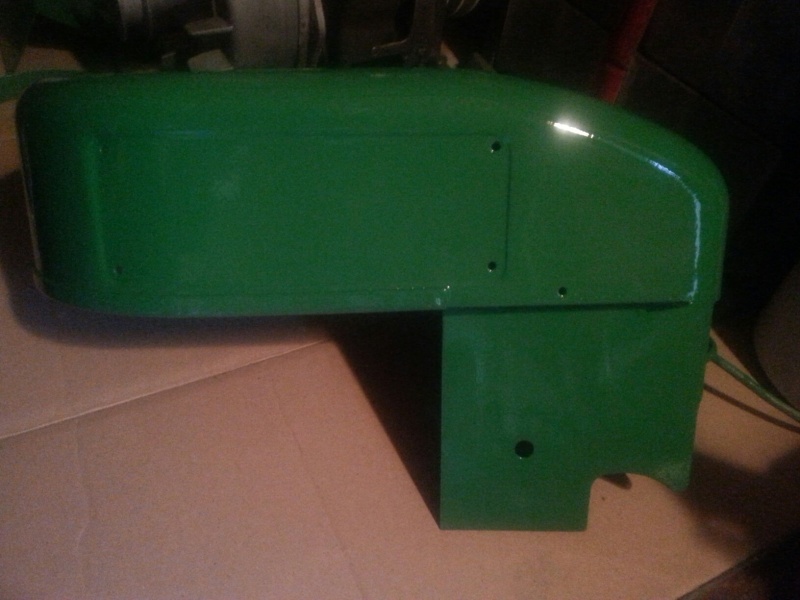
Due to the sunshine the green color looks very bright on the picture.
However the real color comes close to RAL 6001

After all I am confident with the result.
Next part is the top coat for the tank and the engine.
Keep you updated
Best regards,
Steef
I've started the cosmetic work on the cowl.
The most work was to straighten the top plate near the spark plug.
The cracks where welded by TIG welding.
A local welder helped me with this job.
To get more strength for the bolt connection I've decided to weld on a ring to the plate.
Also a few dents on the radius near the flywheel where filled.

After straightening and removing the rust some filler was added . (See picture)

I've used Motip spray putty which fills up small skratches.
A lot of sanding, and refilling later the original shape came back


I've finally found the right top coat color.
A local car parts shop has made spray cans for me with the right color.

Due to the sunshine the green color looks very bright on the picture.
However the real color comes close to RAL 6001

After all I am confident with the result.
Next part is the top coat for the tank and the engine.
Keep you updated
Best regards,
Steef
Last edited by Mark15 user on Tue Oct 14 2014, 21:51; edited 3 times in total (Reason for editing : pictures added)

Mark15 user- A true Stationary engine owner

- Posts : 137
Join date : 2014-09-06
Age : 54
Location : Holland
 Re: Dutch Villiers Mark 15
coming along very well there mate
cant wait for the finished look, and a video of your hard work coming back to life again
thanks for the great post so far
kev
cant wait for the finished look, and a video of your hard work coming back to life again
thanks for the great post so far
kev
_________________
 " IF YOU DONT DO ANYTHING " "" YOU'LL NEVER MAKES MISTAKES ""

kevjhnsn- Life Member

- Posts : 3596
Join date : 2011-02-10
Age : 46
Location : south cheshire
 Update fit the cowl (Pictures)
Hello forummembers,
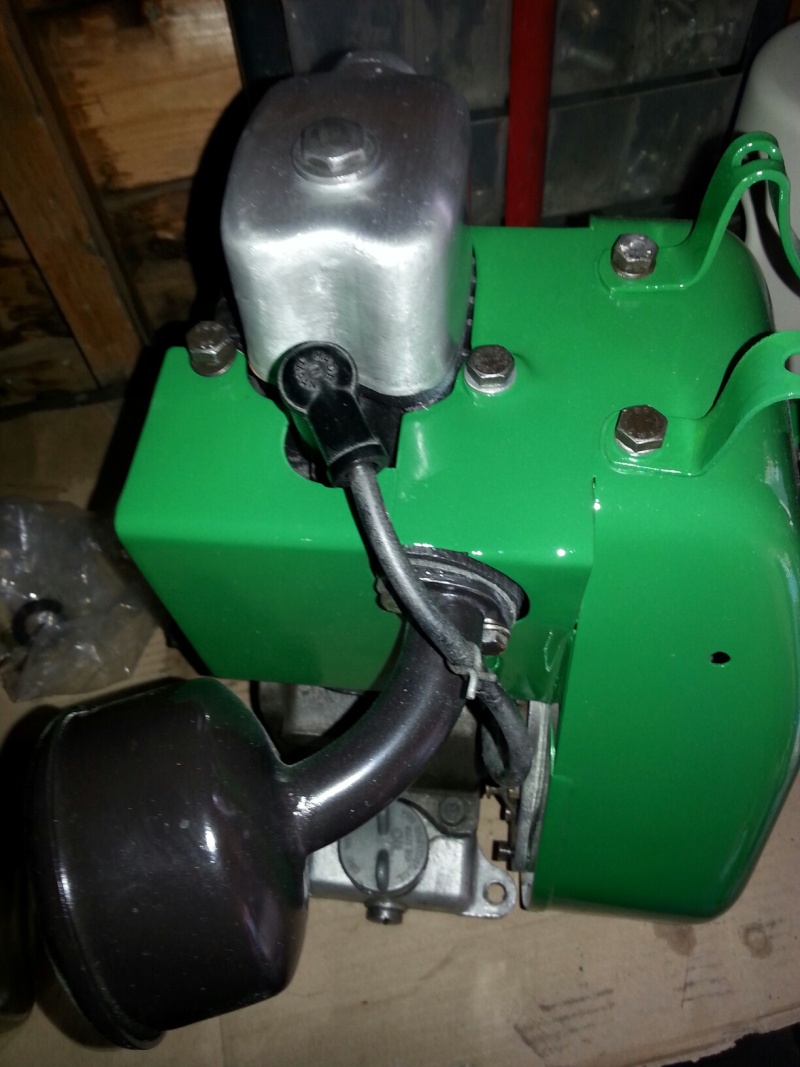
After the paint job I've mounted the cowl on the engine to see if it has the right fit.
I've made a few pictures.
Next job is painting the tank and engine.
Building a trolley will showed in a saparate chapter at a later stage


Keep you posted.
Best regards, Steef Pronk
After the paint job I've mounted the cowl on the engine to see if it has the right fit.
I've made a few pictures.
Next job is painting the tank and engine.
Building a trolley will showed in a saparate chapter at a later stage


Keep you posted.
Best regards, Steef Pronk

Mark15 user- A true Stationary engine owner

- Posts : 137
Join date : 2014-09-06
Age : 54
Location : Holland
 Re: Dutch Villiers Mark 15
Hello Steef - great progress - and i am very interested in the Motip spray putty - you are having some first class results with that method - I think i may have to do the same on an old motor body.... just shows that by reading these threads that you can learn something new!
Best
Hamish
Best
Hamish

StewartH- A credit to the forum

- Posts : 410
Join date : 2013-07-04
Location : Hampshire
 Motip Spray putty
]StewartH wrote:Hello Steef - great progress - and i am very interested in the Motip spray putty - you are having some first class results with that method - I think i may have to do the same on an old motor body.... just shows that by reading these threads that you can learn something new!
Best
Hamish
Hi Stewart,
Thanks for your compliments.
Sanding and spraying is an interesting learning curve for me.
First time that I did this. Realising it is not a "car finish"
Spray putty is a very different way of spraying than the top coat.
After filling I've used rust stop as a first layer and then sprayed several layers of spray putty.
The users guide tells you that you can sand after an hour; however the layer is than too soft.
I've started to sand with 180 grainsize; than 320 grainsize; than 600 grainsize. (wet)
Before the topcoat I've rubbed carefully with scotchbrite.
Be carefull if you want to degrease with brake cleaner. This is too aggressive for the spray putty.
Hope this will help you a little bit.
Best regards, Steef

Mark15 user- A true Stationary engine owner

- Posts : 137
Join date : 2014-09-06
Age : 54
Location : Holland
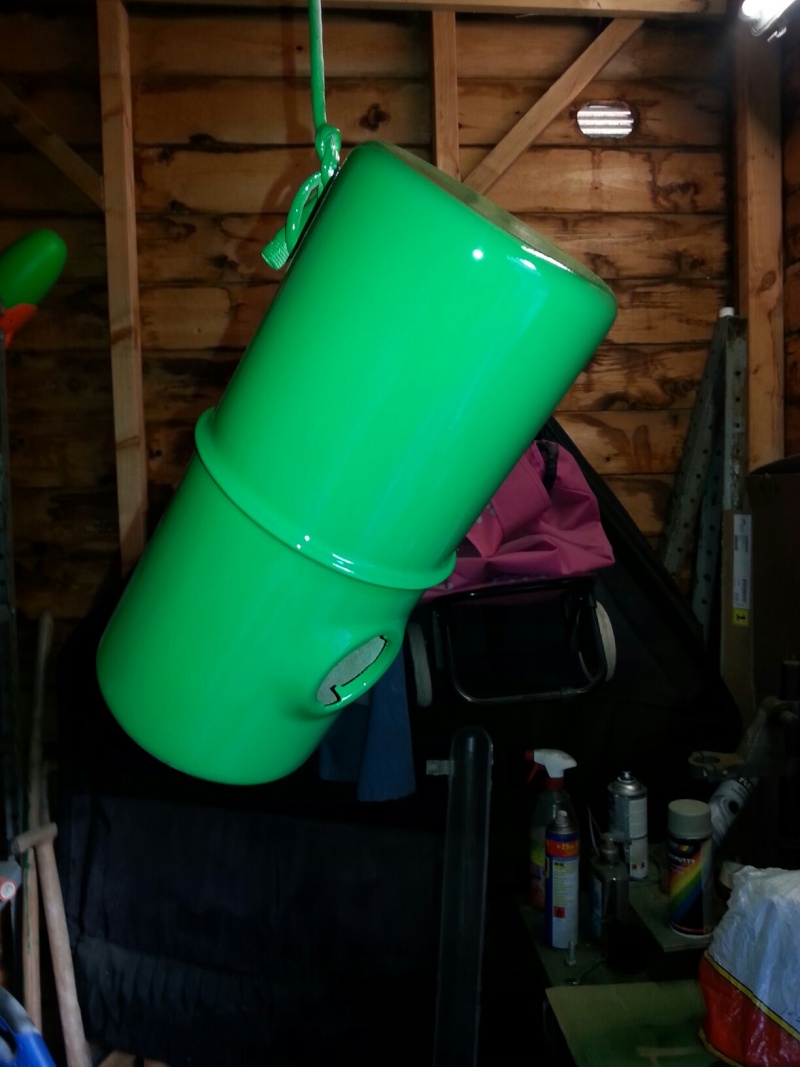
 Paint job update
Hello forum members,
Today I've painted the tank and the engine block.
Due to the unusual high temperature the painting conditions where almost perfect.
See some pictures below.
Also a new seal for the pulley drivingg shaft was mounted
Next step is the overhauling of the pulley




Best regards,
Steef Pronk
Today I've painted the tank and the engine block.
Due to the unusual high temperature the painting conditions where almost perfect.
See some pictures below.
Also a new seal for the pulley drivingg shaft was mounted
Next step is the overhauling of the pulley


Best regards,
Steef Pronk

Mark15 user- A true Stationary engine owner

- Posts : 137
Join date : 2014-09-06
Age : 54
Location : Holland
 Re: Dutch Villiers Mark 15
Hi Steef,
Fantastic work! I have been taking pictures of my renovation of a Villiers MK10 but I hesitate to publish them as your efforts put mine to shame.
Fantastic work! I have been taking pictures of my renovation of a Villiers MK10 but I hesitate to publish them as your efforts put mine to shame.
_________________
Regards Paul
Tha can alus tell a Yorkshireman - but tha can't tell him much.

Woodsman- Admin
- Posts : 2818
Join date : 2014-08-24
Age : 73
Location : God's own county
 Re: Dutch Villiers Mark 15
Hello Woodsman,
Please publish your pictures.
Don' t worry about the results.
We are all in a learning curve.
Looking forward to see your pictures
Steef
Please publish your pictures.
Don' t worry about the results.
We are all in a learning curve.
Looking forward to see your pictures
Steef

Mark15 user- A true Stationary engine owner

- Posts : 137
Join date : 2014-09-06
Age : 54
Location : Holland
 Re: Dutch Villiers Mark 15
What a first class restoration you've done Steef, something to be proud of. I don't think they looked that good out of the factory. 

Stu.
Stu.
Guest- Guest
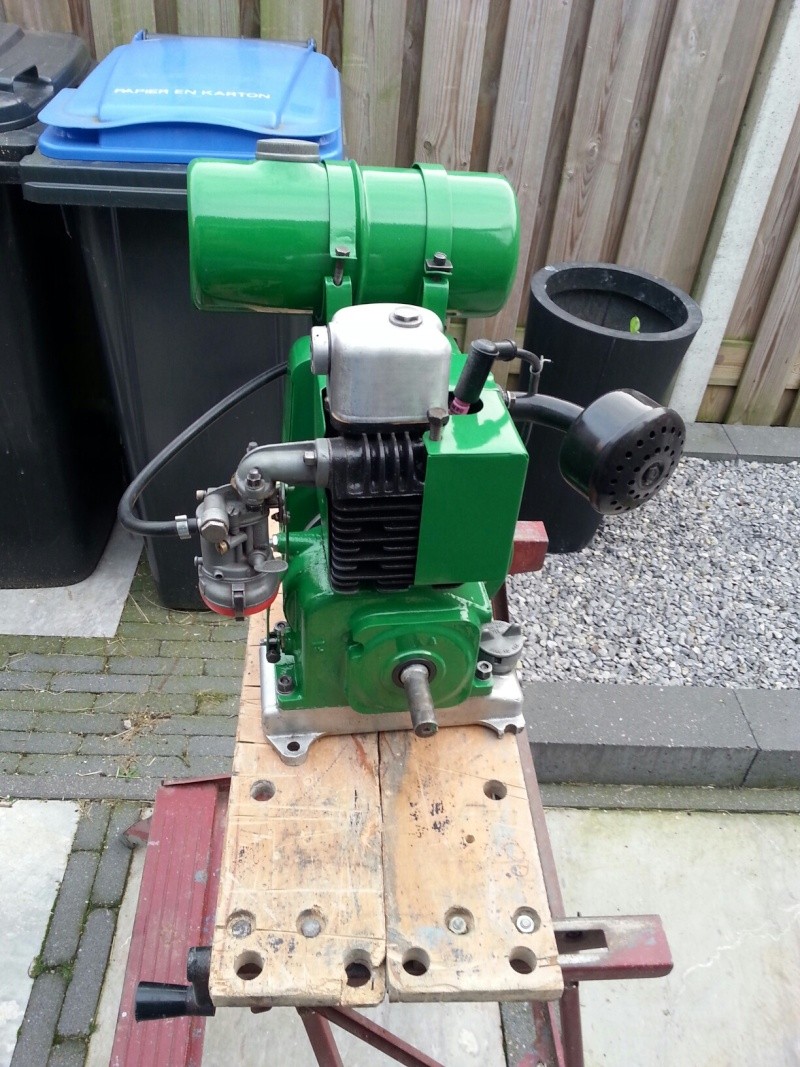
 Tank mounted pictures
Hello forum members,
Tank is meanwhile mounted.
See pictures of the current state


Best regards,
Steef Pronk
Tank is meanwhile mounted.
See pictures of the current state


Best regards,
Steef Pronk

Mark15 user- A true Stationary engine owner

- Posts : 137
Join date : 2014-09-06
Age : 54
Location : Holland
 Villiers Mk15 video
Hello forum members,
I've posted a video on the facebook group Villiers JAP ad BSA
https://www.facebook.com/groups/1381308768756377/
Hope this will work. I'm struggling to get the video direct on the forum.
Best regards,
Steef Pronk
I've posted a video on the facebook group Villiers JAP ad BSA
https://www.facebook.com/groups/1381308768756377/
Hope this will work. I'm struggling to get the video direct on the forum.
Best regards,
Steef Pronk

Mark15 user- A true Stationary engine owner

- Posts : 137
Join date : 2014-09-06
Age : 54
Location : Holland
 Re: Dutch Villiers Mark 15
Hi Steef.
Not so good for those of us who do not have a facebook account
What about using Photobucket or similar.
Not so good for those of us who do not have a facebook account
What about using Photobucket or similar.
_________________
Regards Paul
Tha can alus tell a Yorkshireman - but tha can't tell him much.

Woodsman- Admin
- Posts : 2818
Join date : 2014-08-24
Age : 73
Location : God's own county
 Re: Dutch Villiers Mark 15
@Woodsman,
Link to photobucket.
https://email.photobucket.com/wf/click?upn=k3sgmW4WdFsRhq6oJqnwmdiFZ90cADyoVBGY0E-2B1JtlTuIqjG62vozKb8XN4hZE-2Bz-2FKid2BA4d1YWPlwwssfHtG34a7Sre8UQVDK84iqt24FhTrAiae8JTEBB0Ho62g1_LgWh18haW-2Fa6dEoSu1Gqo2Ptr3hYqw5zQzFRUm5PaviVB90qooDXk4K4BlDGmB3RltA-2FynFIF0aiaCytwmkRdRghLbacpQwRzZ1vn64pbb9lBtUT9pB1T-2B1f1FHpSgJMou3-2B9tfgdFd4Jj8nK2jx4Z5iY4TWintEVk1SFs5kmhiLgLpnyFlzi3nhpmTEMCfOsFoU1tCDocBwFwewu2BbCKcUAlWAbvSAVC-2F6G2TOOcVgq-2BHxJ-2FnHXeXuCcfNV0Iz
Hope this will work
Best regards,
Steef Pronk

Mark15 user- A true Stationary engine owner

- Posts : 137
Join date : 2014-09-06
Age : 54
Location : Holland
 Villiers Mk 15 evaluation
Hello forum members,
Now the engine is running and painted, I want to evaluate the overhauling and make some remarks.
The overhauling was an interesting project and I've learned a lot.
Besides that the overhauling has resulted in a running engine.
I've enjoyed your replies on my posts.
Never thought that so many people should look at it.
Some points of improvement remain and will be solved step by step.
Will share some thoughts with you.
See some gray polution on the paintwork. which is difficult to remove.
Do you have the same experience with modern fuel?
What is the best solution?
Originally the fuel tank cap shouldn't have a rubber gasket; correct?
Due to vibrations the fuel cap comes of during running.
How to solve this?
Please let me know your thoughts
Best regards,
Steef Pronk

Mark15 user- A true Stationary engine owner

- Posts : 137
Join date : 2014-09-06
Age : 54
Location : Holland
 Re: Dutch Villiers Mark 15
Hi Steef,
Thanks for Photobucket post - looks good. I use regular BP unleaded.
Fuel tap - you could try soaking in warm water to see if the cork will swell- if not there are loads on ebay for vintage British motorcycles. Otherwise try George at http://www.villiersparts.co.uk
My Mk10 originally had a fibre washer on the fuel tank - but it was perished so I replaced it with a nitrile rubber one.
Keep up the good work
_________________
Regards Paul
Tha can alus tell a Yorkshireman - but tha can't tell him much.

Woodsman- Admin
- Posts : 2818
Join date : 2014-08-24
Age : 73
Location : God's own county
 Re: Dutch Villiers Mark 15
Better than the factory ever did! - lovely job.

StewartH- A credit to the forum

- Posts : 410
Join date : 2013-07-04
Location : Hampshire
 Re: Dutch Villiers Mark 15
I have made a die to make fuel tank cap seals from leather and one to make fuel tap corks from a wine bottle cork and both seem to work well
tony RA- A credit to the forum

- Posts : 279
Join date : 2013-11-16
Age : 77
Location : newtown powys
 Jap coil part number
Hi all, does anyone know the part no to order a new coil for a Jap 80 engine, this engine was driving a small rootavtor. Its the round type coil with square center hole. Thanks
seabar54- I really need to post more

- Posts : 5
Join date : 2018-12-28
 Re: Dutch Villiers Mark 15
Great result on the MK15 restoration!
I have not tried this, but it could be the answer for petrol damaging the paint: https://www.amazon.co.uk/Autotek-AT00PRL500-Petrol-Resistant-Lacquer/dp/B004ZJIMXY/ref=sr_1_1?keywords=fuel+resistant+lacquer&qid=1580028372&sr=8-1
As for the fuel tap, I found that boiling the plunger for 10 minutes and applying a smear of petroleum jelly to the cork worked on my Tarpen generator. A new seal for the petrol cap is easy to make from thin cork sheet.
_________________
Specialist in precision guesswork.

mattblack- Life Member

- Posts : 889
Join date : 2019-06-21
Location : Leicester, me duck...
 Re: Dutch Villiers Mark 15
seabar54 wrote:Hi all, does anyone know the part no to order a new coil for a Jap 80 engine, this engine was driving a small rootavtor. Its the round type coil with square center hole. Thanks
I hesitate to show my ignorance but what type of magneto is it?
A long shot, but you could try https://www.themowercentrehailsham.com/
_________________
Regards Paul
Tha can alus tell a Yorkshireman - but tha can't tell him much.

Woodsman- Admin
- Posts : 2818
Join date : 2014-08-24
Age : 73
Location : God's own county
Page 1 of 2 • 1, 2 
 Similar topics
» Villiers mark 12/2.
» New Guy with Villiers Mark 15
» villiers mark 25
» Villiers Mark 8C
» Villiers Mark 15 Restoration
» New Guy with Villiers Mark 15
» villiers mark 25
» Villiers Mark 8C
» Villiers Mark 15 Restoration
Page 1 of 2
Permissions in this forum:
You cannot reply to topics in this forum