Lister H4 Pump Disassembly
+8
chrismac
neil (LE)
Foden
Robotstar5
oldgit
tony RA
68jcb
matthew92
12 posters
Page 2 of 6
Page 2 of 6 •  1, 2, 3, 4, 5, 6
 Re: Lister H4 Pump Disassembly
Hi all, no major strides forward over the last couple of days. Most activity has been around applying the final top coat of paint on the main casting, the gear drive assembly, the loose pulley and the valve and end cover plates. I have also prepared the fixed pulley for painting, whilst it is still on the shaft. I have decided there is no real reason to separate them. Not sure how much more I will be able to achieve until I can get out and about, as there is little point in reassembling the pump, until I have built the trolley frame for it, to be built up on. Once the pump is assembled, there will be no way that I would be able to move it, even if I had the assistance of my currently socially separated son. With the announcement that the restrictions will be extended by at least another three weeks, I might just have to start on the Lister D restoration, to ensure I'm not found jobs to do around the house. Isn't it great to have an all consuming hobby that stationary engines provide. At least she knows where to find me. Hope you are all keeping safe and well.
Neil
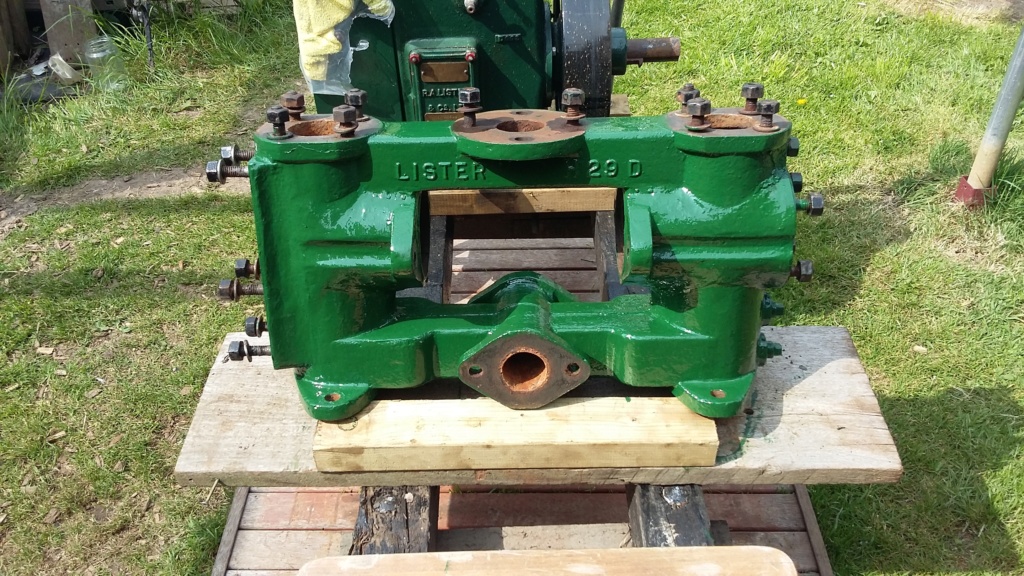
Main casting resplendent in its final coat of paint.

Gear drive also finished.
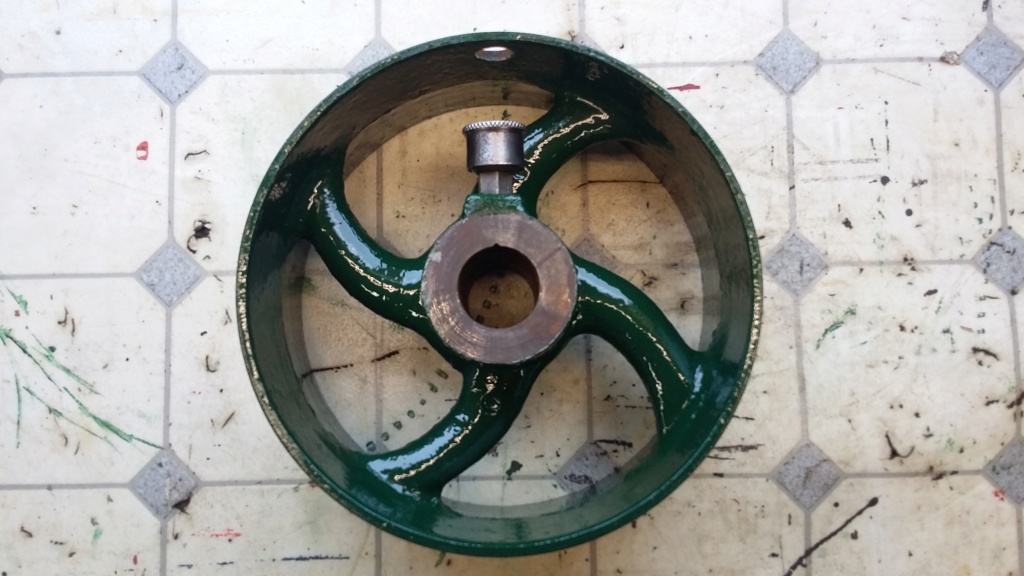
Loose pulley, painted ready to be fitted. Looking rather like the Manx flag symbol but with an extra leg!

Fixed pulley being prepared for painting, the final part to be finished prior to assembly.
Neil

Main casting resplendent in its final coat of paint.

Gear drive also finished.

Loose pulley, painted ready to be fitted. Looking rather like the Manx flag symbol but with an extra leg!

Fixed pulley being prepared for painting, the final part to be finished prior to assembly.
neil (LE)- A credit to the forum

- Posts : 399
Join date : 2012-03-21
Age : 68
Location : N/W Kent
 Re: Lister H4 Pump Disassembly
This is where I bought mine from, although I used their eBay store. They don’t list 19mm as you would need, but perhaps a phone call would turn something up.
Seal Extrusions
Seal Extrusions

matthew92- Born to be wild

- Posts : 25
Join date : 2019-09-30
 Re: Lister H4 Pump Disassembly
Hi as I suggested, I am getting to the limit of what I can achieve on the pump restoration, until I'm able to get out and about to buy what is needed to build a new trolley. To make sure I don't loose any parts and to clear the workshop, to allow me to work on something else, I have loosely put most of the parts back together. I ran out of time and puff, so the gear drive is still to be attached, hopefully I'll be able to do that tomorrow.
I'm still uncertain as to what actual size and type of gland packing to use, I think I'll have to resort to a little bit of trial and error, hopefully not too much error. I do know that when my son and I use to exhibit the pump, we found it difficult to tighten the glands up sufficiently to achieve a seal. One of the issues was the gland fixing / adjusting bolts would foul on the gear wheel, which would suggest the packing was not deep enough. This leads me to think I need to achieve a 3/4 " x 3/4" seal rather than the current 3/4" x 3/8".
There is one item on the pump which is in need of repair and has been since we first owned it. The flange on the outlet pipe attached to the air vessel is broken. The two pieces are there and were just clamped under the fixing bolt. This has worked up until now but I thought it was about time I attempted a repair. Being a casting I don't want to attempt to weld it. Instead I was thinking about JB Weld or equivalent, I have no experience of this type of product, so I am hoping to get some advise as to the suitability of these products for this type of repair.
One last question I would like to ask at this time, is about the age of the pump. Is there any way to identify the approximate year of manufacture, from the specification plate and the serial number. The serial number on this plate is 6790 and the pump capacity is rated at 1110 GPH at 600 RPM. Any information to assist with the age and history of this pump would be very welcome.
Thanks Neil.

Overall view of the loosely assembled Pump, minus gear drive assembly.

Front end view.

Drive end view, less the drive assembly.

Overhead view.
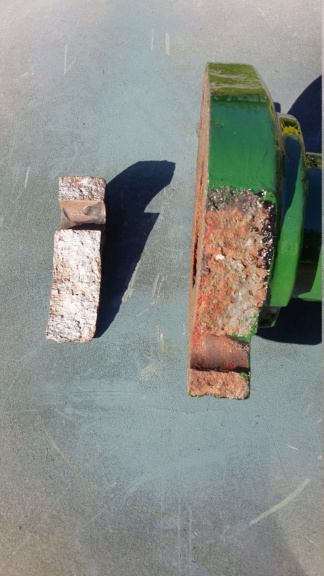
Broken flange piece.
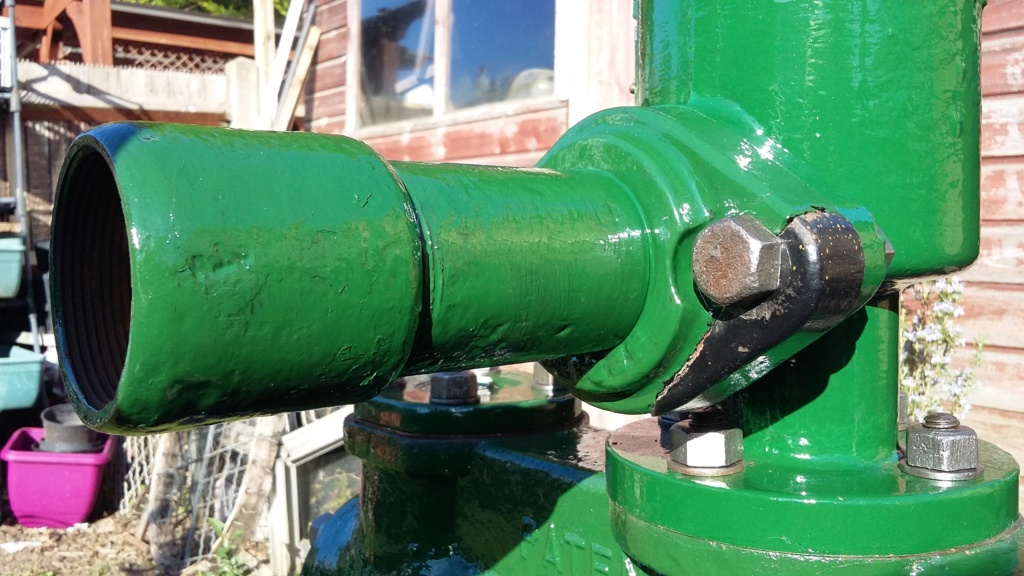
Broken piece in position.
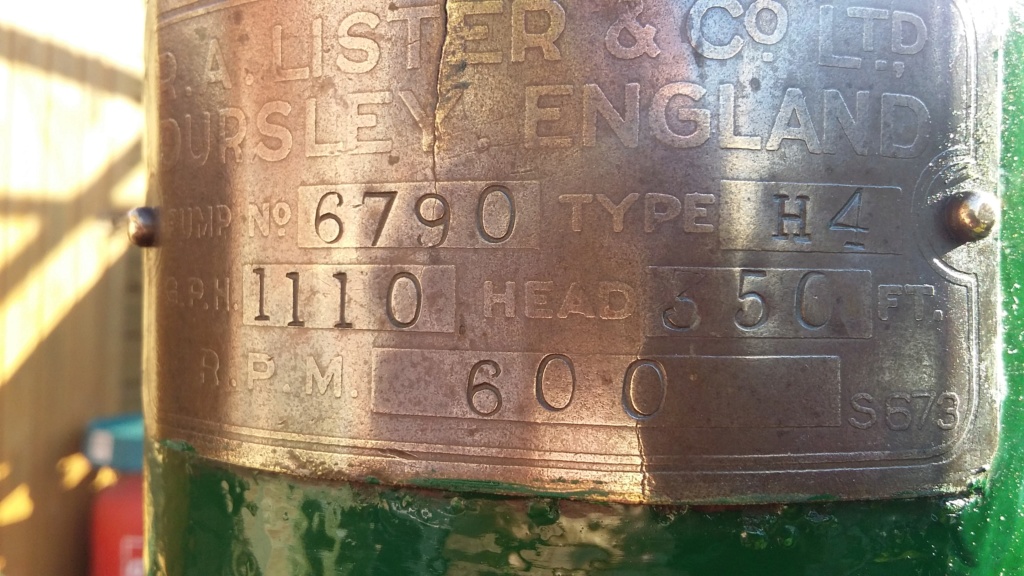
Specification plate identifying the pump as Type H4 and Pump Number 6790. Hopefully this might help to date the pump.
I'm still uncertain as to what actual size and type of gland packing to use, I think I'll have to resort to a little bit of trial and error, hopefully not too much error. I do know that when my son and I use to exhibit the pump, we found it difficult to tighten the glands up sufficiently to achieve a seal. One of the issues was the gland fixing / adjusting bolts would foul on the gear wheel, which would suggest the packing was not deep enough. This leads me to think I need to achieve a 3/4 " x 3/4" seal rather than the current 3/4" x 3/8".
There is one item on the pump which is in need of repair and has been since we first owned it. The flange on the outlet pipe attached to the air vessel is broken. The two pieces are there and were just clamped under the fixing bolt. This has worked up until now but I thought it was about time I attempted a repair. Being a casting I don't want to attempt to weld it. Instead I was thinking about JB Weld or equivalent, I have no experience of this type of product, so I am hoping to get some advise as to the suitability of these products for this type of repair.
One last question I would like to ask at this time, is about the age of the pump. Is there any way to identify the approximate year of manufacture, from the specification plate and the serial number. The serial number on this plate is 6790 and the pump capacity is rated at 1110 GPH at 600 RPM. Any information to assist with the age and history of this pump would be very welcome.
Thanks Neil.

Overall view of the loosely assembled Pump, minus gear drive assembly.

Front end view.

Drive end view, less the drive assembly.

Overhead view.

Broken flange piece.

Broken piece in position.

Specification plate identifying the pump as Type H4 and Pump Number 6790. Hopefully this might help to date the pump.
neil (LE)- A credit to the forum

- Posts : 399
Join date : 2012-03-21
Age : 68
Location : N/W Kent
 Re: Lister H4 Pump Disassembly
Very little dating info in these pumps, if you are lucky and have a matched set then you might get a date for the engine,
As for your gland packing, I reckon you need 3/8 square and wrap it round twice per layer and maybe 2 or 3 layers then go from there, just make sure your joints don't line up.
As for your gland packing, I reckon you need 3/8 square and wrap it round twice per layer and maybe 2 or 3 layers then go from there, just make sure your joints don't line up.

Appletop- Life Member

- Posts : 1483
Join date : 2010-01-02
Age : 56
Location : Just outside Diss
 Re: Lister H4 Pump Disassembly
Villiers, thanks you for your reply. Unfortunately the pump wasn't originally paired with the Lister D which now drives it, so there is no way to compare the age of the pump to the engine. In the absence of actual dating information, is there a known date range for this series of pumps. It would be nice to know if the age of the pump and the engine are at least within the same era. I will continue to try and identify some suitable 3/8" square gland packing and layer it as you suggest. Also you may have noted that I have replaced the cross shaft in the main pump shaft. Having cleaned everything up, both the external surface of the cross shaft and the inside of the hole through the pump shaft, I was able to press the two pieces together without difficulty, or the need to freeze the shaft.
Neil
Neil
neil (LE)- A credit to the forum

- Posts : 399
Join date : 2012-03-21
Age : 68
Location : N/W Kent
 Re: Lister H4 Pump Disassembly
Jules (A Lister) might know more but alas I am a Petter man so can't offer any dates

Appletop- Life Member

- Posts : 1483
Join date : 2010-01-02
Age : 56
Location : Just outside Diss
 Re: Lister H4 Pump Disassembly
The 'Lister' H series pumps weren't actually made by R A Lister & Co, they were made for them by Goodwin Ltd, of Quenington, Gloucestershire. Lister had the exclusive marketing rights to sell H series pumps though.
As far as I know, there aren't any records to date these pumps by their serial number, but if there's a Lister Plant Number stated on the spec plate then I think this may be able to be dated. If it's an original pump set and there's a Lister engine still coupled to the pump that has a serial number, then that should enable a date to be traced for the engine, and might give an idea of date for the pump... providing, of course, that the engine (or its spec plate) hasn't been swapped!
I believe the H series pumps were made from the early 1930s to around the mid 1950s, apart from the H4H pump, which I read was still supplied to 'special customers' (probably one or two of Lister's valued commercial customers who still needed this type of high pressure pump for a specialist application?). Hope this is useful.
_________________
Jules.

A Lister- A true Stationary engine owner

- Posts : 166
Join date : 2013-01-04
Location : South Cheshire
 Re: Lister H4 Pump Disassembly
Hi all, thanks for your interest and input during the quick refurbishment of my H4 pump. It looks like I won't be able to accurately date the pump. However from the information received from Jules (A Lister) at least it seems like the pump is contemporary to either the 1951 Lister D it is currently paired with, or my mid 30's Lister A. I thought I had got as far as I could until the end of isolation restrictions. However I wanted to put as much back together as possible but I couldn't do that on the old trolley, as that needs a total rebuild and once the pump was built it would not be possible to move it around. Luckily I dug out an old trolley frame I had, fitted some lockable swivel wheels and some cross pieces and was able to mount the pump on that. At least I can move the pump around and not worry about the weight of it breaking the back of the old trolley. If I want to use the pump on this trolley, then I will need to make brackets for the pulley outrigger steady and the fast and loose belt slide, possibly cantilevered out from the frame. The only other things to do, is the repair to the flange, final coat of paint on a few items, cut and fit gaskets and of course, acquire and fit the gland packing material.
I hope this series of post has been of interest to some and gave you something to view, especially whilst we are all unable to enjoy any time away, at our favourite stationary engine events. Hope we are all able to get to some engine rally's before too long.
All the best, Neil.

Pump mounted on temporary trolley.
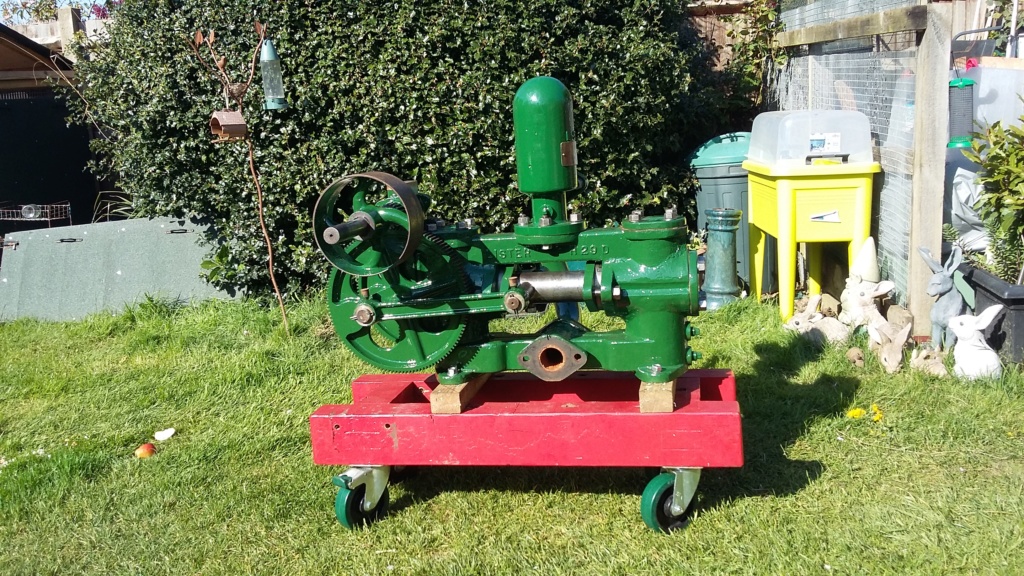
Drive side view
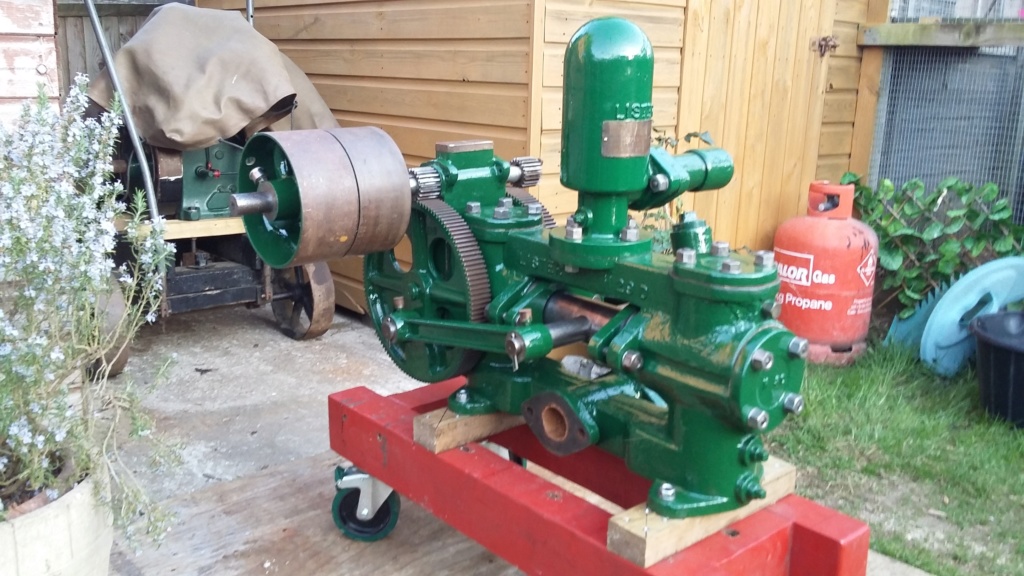
Showing fast and loose pulleys. The small drive gear is still to be fully fitted, this will be one of the last things to do.
Finally a couple of "Before" and "After" pictures.

Before

After
I hope this series of post has been of interest to some and gave you something to view, especially whilst we are all unable to enjoy any time away, at our favourite stationary engine events. Hope we are all able to get to some engine rally's before too long.
All the best, Neil.

Pump mounted on temporary trolley.

Drive side view

Showing fast and loose pulleys. The small drive gear is still to be fully fitted, this will be one of the last things to do.
Finally a couple of "Before" and "After" pictures.

Before

After
neil (LE)- A credit to the forum

- Posts : 399
Join date : 2012-03-21
Age : 68
Location : N/W Kent
Robotstar5- Life Member

- Posts : 1110
Join date : 2018-09-25
 Re: Lister H4 Pump Disassembly
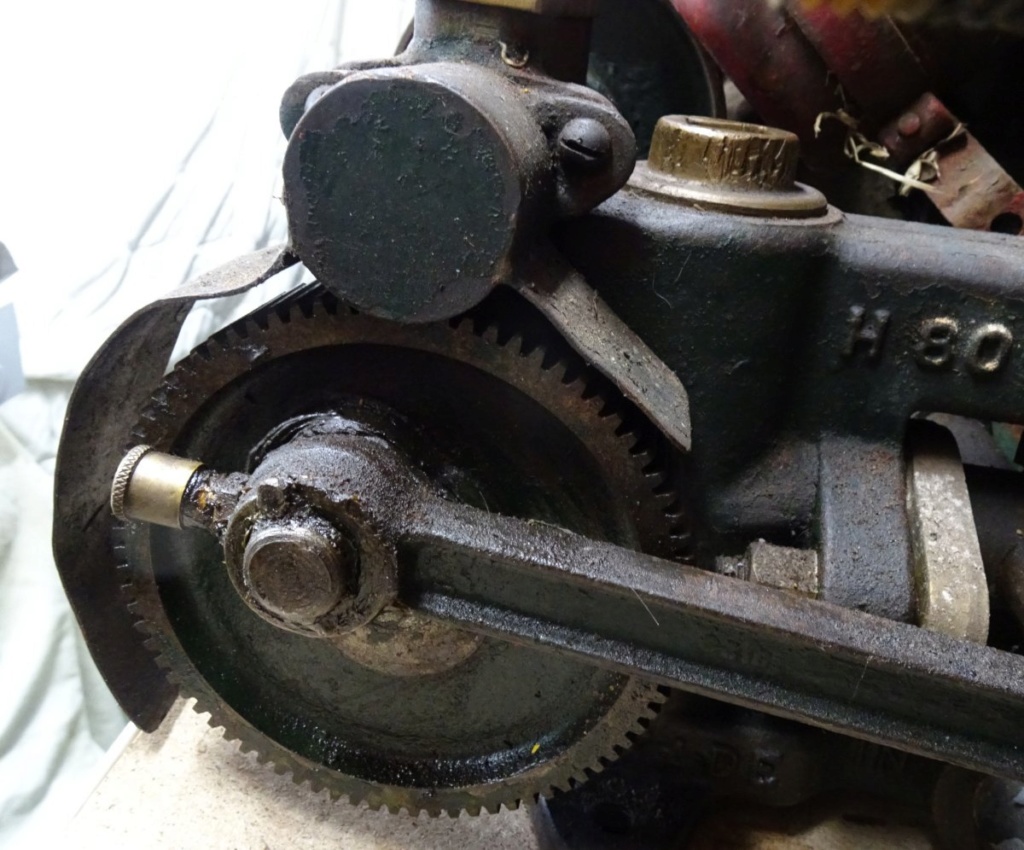
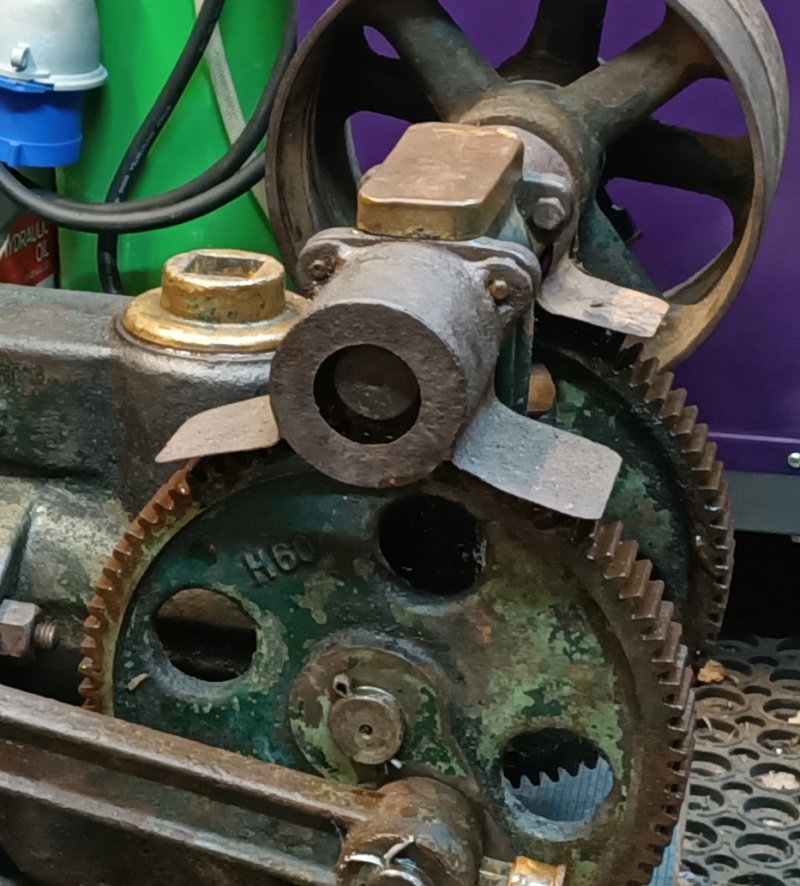
Hi Stuart, don't know about pumping water, I think it might have a few leaks, if I tried! Yes there should be guards over the gear wheels. Unfortunately these were missing when we acquired the pump many years ago. If anybody has a drawing, sketch or a clear picture of the actual guards, that would be great. I don't know if these were originally cast items or fabricated from sheet metal but I'm sure given an idea of what they looked like, something could be produced to look and act the part. I would be keen to do this, as there is currently a risk of trapping fingers or clothing in the gears, also the covers would help to keep water off the gears and reduce the levels of corrosion. Any assistance to help produce these covers would be really helpful, unless someone has a pair of genuine guards for sale, then that would be absolutely fantastic.
Regards, Neil.

Close up of what I assume are the fixing points for the missing gear wheel guards.
Regards, Neil.

Close up of what I assume are the fixing points for the missing gear wheel guards.
neil (LE)- A credit to the forum

- Posts : 399
Join date : 2012-03-21
Age : 68
Location : N/W Kent
 Re: Lister H4 Pump Disassembly
I imagine they would be similar to the H3, which are fairly simple things. The two mounting lugs are separate pieces, the main cover is one piece bent around and the end cover is another piece all just tack welded together. The only difference between the two is the one on the pulley end is slotted at the bottom so you can remove it. It's all thin tin except the mounts which are slightly thicker as they are threaded for the bolts.


matthew92- Born to be wild

- Posts : 25
Join date : 2019-09-30
 Re: Lister H4 Pump Disassembly
_________________
Stuart

Robotstar5- Life Member

- Posts : 1110
Join date : 2018-09-25
 Re: Lister H4 Pump Disassembly
Thank you both for your feedback on the gear guards. It seems as though these really are quite simple items. It is interesting that the H1 type wraps around the circumference of the gear wheel at the rear, whilst the H3 and presumably the H4, have short wings facing backwards and forwards. I assume the fact they are made from sheet tin, is why mine are missing, as I imagine they rust through quite easily. Now I know what I'm looking for, I will keep an eye out for some but I don't hold out much hope. Once we get through this current situation, I will look to see if I can get a pair made up.
The other item I noted in the H3 picture, is the cover for the oil reservoir. I thought the one on my pump was a home made replacement item but it seems as though it is original, as it looks identical to the one in the H3 picture. See the picture in my last post, of the close up of the guard mounting points, the cover is clearly seen and looks the same.
Stuart it seems as though we had the same idea. I was given a couple of these grocery skids a few years ago, I didn't actually know what they were until you said. When I took my Lister A off its trolley, I needed to be able to move it around. I had to rescue one of the skids from the garden, as they were being used for moving large planters around. I'm not certain if the wife stole it from me or I stole it from her but it is too useful to go back. However I must say your "proper trolley" looks very smart.
Regards, Neil

My part disassembled Lister A, on same type of delivery trolley. Really useful.
The other item I noted in the H3 picture, is the cover for the oil reservoir. I thought the one on my pump was a home made replacement item but it seems as though it is original, as it looks identical to the one in the H3 picture. See the picture in my last post, of the close up of the guard mounting points, the cover is clearly seen and looks the same.
Stuart it seems as though we had the same idea. I was given a couple of these grocery skids a few years ago, I didn't actually know what they were until you said. When I took my Lister A off its trolley, I needed to be able to move it around. I had to rescue one of the skids from the garden, as they were being used for moving large planters around. I'm not certain if the wife stole it from me or I stole it from her but it is too useful to go back. However I must say your "proper trolley" looks very smart.
Regards, Neil

My part disassembled Lister A, on same type of delivery trolley. Really useful.
neil (LE)- A credit to the forum

- Posts : 399
Join date : 2012-03-21
Age : 68
Location : N/W Kent
 Re: Lister H4 Pump Disassembly
Hi Neil
if you still need Gland Packing PM me you/r address and post code I have rolls of different sizes the black one or the white one or phone 01686 951617
if you still need Gland Packing PM me you/r address and post code I have rolls of different sizes the black one or the white one or phone 01686 951617
tony RA- A credit to the forum

- Posts : 279
Join date : 2013-11-16
Age : 77
Location : newtown powys
 Re: Lister H4 Pump Disassembly
Hi all,
Contact made with Tony RA and gland packing is on its way. It's great to be part of a helpful and friendly forum. Stay safe and well everybody. Cheers, Neil.
Contact made with Tony RA and gland packing is on its way. It's great to be part of a helpful and friendly forum. Stay safe and well everybody. Cheers, Neil.
neil (LE)- A credit to the forum

- Posts : 399
Join date : 2012-03-21
Age : 68
Location : N/W Kent
 Re: Lister H4 Pump Disassembly
Hi all, sorry I'm back again. I thought I would share with you an issue I had with the temporary trolley I utilised to be able to move the pump around and possibly use short term, to display it on. I was moving it around the garden, which is not bowling green flat, when, as all four wheels swivel, it went sideways down a slight hollow and slowly fell over. As it weighs in at over 20st (around 130kgs), there was no way to stop it going over. Luckily it went over slowly without me being in the way and without causing any damage to me or the pump. If this had happened on a hard surface, rather than grass, then I'm fairly certain serious damage to the pump would have been caused. Having had this lucky escape, I have taken a look at the issue and it is obviously very top heavy and with the wheels under the frame the centre of gravity is far too high to be safe. I am fortunate that many years ago I acquired a set of four trolley wheels, although not perfect I have managed to fit these instead of the swivel ones. Overall I think the end result is worth the near disaster and the additional effort to rectify the situation. As they say every day is a school day, even if the schools are closed!
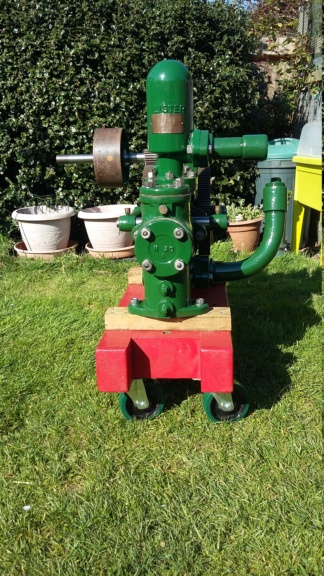
Original swivel wheels tucked in under the trolley, making it unstable.

The replacement wheels being fitted. The main pump block was left on the frame as it was easier, due to the way it is fitted.

All wheels fitted to the frame, ready to be turned over.

Up the right way and all back together again, on its new wheels. Far more stable and better looking!

End view showing the wider stance, providing the stability.
While I was at it, I looked out a trolley ready for the Lister D to be temporarily mounted on. This was originally for my Lister A, which is currently being rebuilt.

Trolley being prepared for the Lister D.
Everyone's a critic!

I told you that wouldn't work, bird brain.

Original swivel wheels tucked in under the trolley, making it unstable.

The replacement wheels being fitted. The main pump block was left on the frame as it was easier, due to the way it is fitted.

All wheels fitted to the frame, ready to be turned over.

Up the right way and all back together again, on its new wheels. Far more stable and better looking!

End view showing the wider stance, providing the stability.
While I was at it, I looked out a trolley ready for the Lister D to be temporarily mounted on. This was originally for my Lister A, which is currently being rebuilt.

Trolley being prepared for the Lister D.
Everyone's a critic!

I told you that wouldn't work, bird brain.
neil (LE)- A credit to the forum

- Posts : 399
Join date : 2012-03-21
Age : 68
Location : N/W Kent
 Re: Lister H4 Pump Disassembly
neil (LE) wrote:Thank you both for your feedback on the gear guards. It seems as though these really are quite simple items. It is interesting that the H1 type wraps around the circumference of the gear wheel at the rear, whilst the H3 and presumably the H4, have short wings facing backwards and forwards. I assume the fact they are made from sheet tin, is why mine are missing, as I imagine they rust through quite easily. Now I know what I'm looking for, I will keep an eye out for some but I don't hold out much hope. Once we get through this current situation, I will look to see if I can get a pair made up.
The other item I noted in the H3 picture, is the cover for the oil reservoir. I thought the one on my pump was a home made replacement item but it seems as though it is original, as it looks identical to the one in the H3 picture. See the picture in my last post, of the close up of the guard mounting points, the cover is clearly seen and looks the same.
I just went out and checked my H4, it has the same as the H3 but with no holes in the centre of the small gear cover. my H1's also have the full length guard.
Chris
chrismac- A true Stationary engine owner

- Posts : 164
Join date : 2013-07-12
Age : 48
Location : Wick, Caithness
 Re: Lister H4 Pump Disassembly
Chris thanks for checking the details of the gear guards. I wonder why the difference between the range of H series pumps, I can't think why the H3 guard would have an opening over the centre of the small gear and the H4 not to have one. Perhaps we will never know, unless someone knows different.
As I'm here, I thought I might as well give a quick update on overall progress today. Having finished with the pump for the time being, I have turned my attention to the Lister D, that powered it. I have concluded that the old trolley frame is beyond repair and is to be consigned to the scrap, once anything salvageable has been recovered. The Lister D has temporarily been mounted on the Lister A trolley, so I can give the D a coat of paint to match the pump. So far the D has been given a de-grease and will be rubbed over and prepped ready for its initial application of paint. I imagine it will require at least two coats, to cover the existing incorrect green that was applied previously. To move the D around and to enable the painting to take place, I decided to attempt to remove the flywheel, even though I didn't have the normal key extraction tools. Instead I successfully managed to utilise some hand tools, in lieu of the normal method.

Flywheel key removal method.
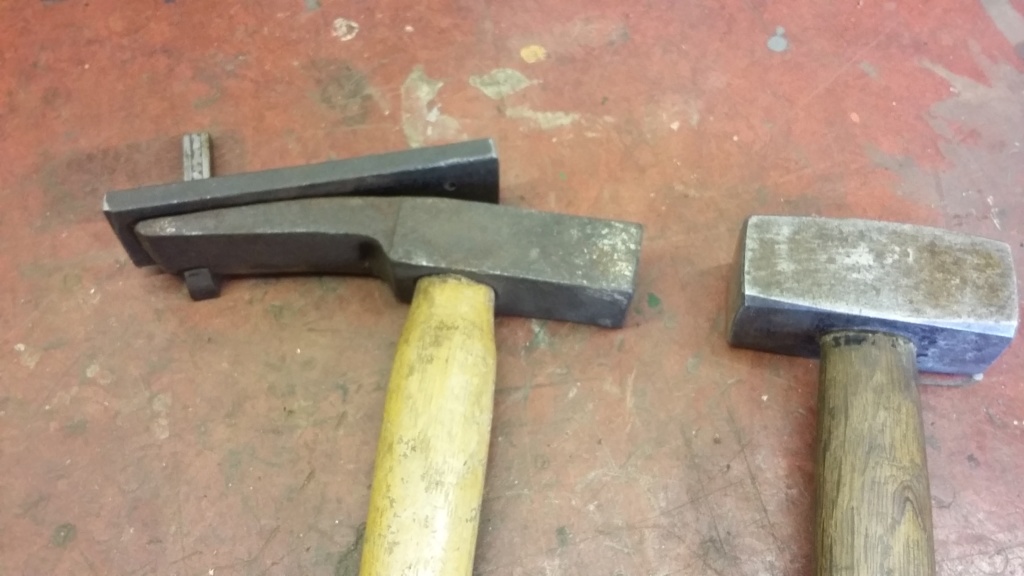
Key extraction set up. I don't know what the curved tool is actually for but it worked. I picked it up at a junk stall for a £1, a real bargain.

Flywheel removed.
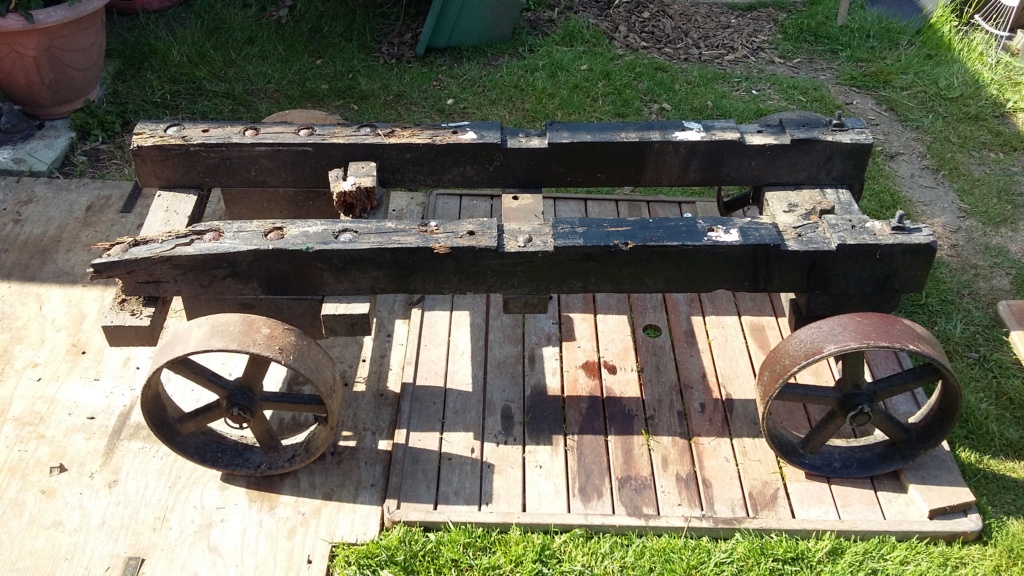
The decaying remains of the trolley exposed, once the pump and the D had been removed.
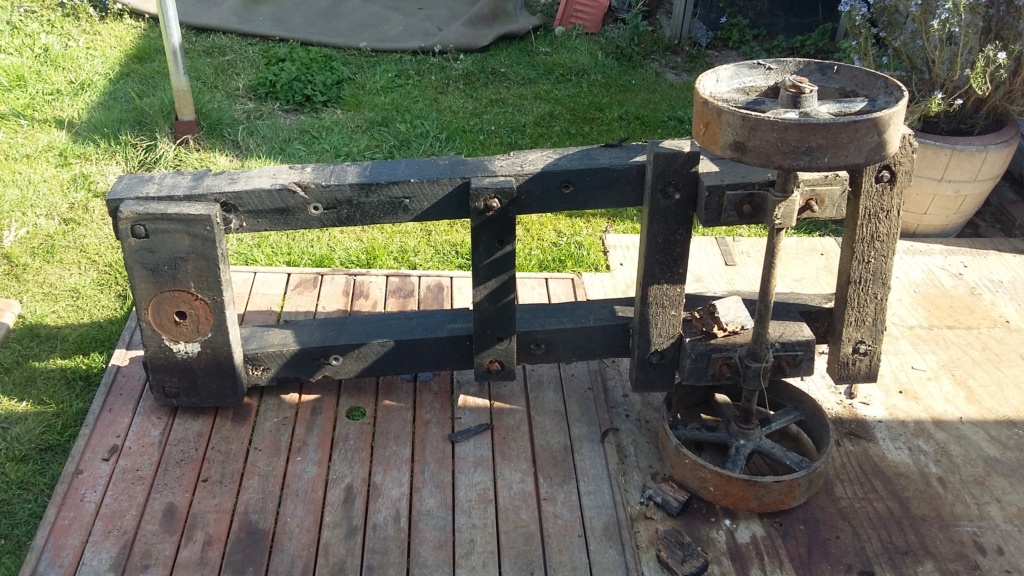
The old trolley being broken up.

The only parts worth salvaging from the trolley!

Lister D temporarily mounted on the Lister A trolley, to allow it to be moved about and to aid its painting. Note the flywheel has been loosely replaced and some of the covers have already had a coat of paint.
As I'm here, I thought I might as well give a quick update on overall progress today. Having finished with the pump for the time being, I have turned my attention to the Lister D, that powered it. I have concluded that the old trolley frame is beyond repair and is to be consigned to the scrap, once anything salvageable has been recovered. The Lister D has temporarily been mounted on the Lister A trolley, so I can give the D a coat of paint to match the pump. So far the D has been given a de-grease and will be rubbed over and prepped ready for its initial application of paint. I imagine it will require at least two coats, to cover the existing incorrect green that was applied previously. To move the D around and to enable the painting to take place, I decided to attempt to remove the flywheel, even though I didn't have the normal key extraction tools. Instead I successfully managed to utilise some hand tools, in lieu of the normal method.

Flywheel key removal method.

Key extraction set up. I don't know what the curved tool is actually for but it worked. I picked it up at a junk stall for a £1, a real bargain.

Flywheel removed.

The decaying remains of the trolley exposed, once the pump and the D had been removed.

The old trolley being broken up.

The only parts worth salvaging from the trolley!

Lister D temporarily mounted on the Lister A trolley, to allow it to be moved about and to aid its painting. Note the flywheel has been loosely replaced and some of the covers have already had a coat of paint.
neil (LE)- A credit to the forum

- Posts : 399
Join date : 2012-03-21
Age : 68
Location : N/W Kent
 Re: Lister H4 Pump Disassembly
Regarding the gear guards, here are some photos of the ones on my H2 pump. They include threaded lugs, which bolts screw into to mount them, so if you want any guards you fabricate to look authentic then you'll have to drill holes in the mounting lugs and tap threads in them, and find bolts the right length to fit them. I hope these photos from different angles are useful to you.


_________________
Jules.

A Lister- A true Stationary engine owner

- Posts : 166
Join date : 2013-01-04
Location : South Cheshire
 Re: Lister H4 Pump Disassembly
Many years ago I had a H2 and MY covers were bolted through the cover into the casting, totally opposite to any of these ones I've seen

Appletop- Life Member

- Posts : 1483
Join date : 2010-01-02
Age : 56
Location : Just outside Diss
 Re: Lister H4 Pump Disassembly
Hi all, thanks for all your help and assistance. The series of photos by Jules of the gear guards and all the other information, should enable me to get a pair of guards made for my pump, once things return to some form of normality. Although I must remember not to get the ends pierced, if I want them to look original. Until then, I shall just have to make sure I keep my fingers and clothing well clear, if I operate the pump.
I must admit that I keep thinking I've got as far on the restoration of the pump, as I'm going to at this time. However when I looked at the set up today, I could not accept the faded red, which is looking more like pink, on the trolley frame. I know that the trolley is only meant to be temporary but it just looked wrong. So once again I have stripped the pump down and removed everything from the trolley. Once in the workshop, the trolley was wiped over to de-grease it, sanded down and prepped for painting. As I was applying green over red, I have opted to use a green undercoat, prior to the top coat, to give the best chance of avoiding the red bleeding through. This will obviously take longer to finish but I'm not going anywhere for the foreseeable future!
All the best and stay safe everybody, Neil.
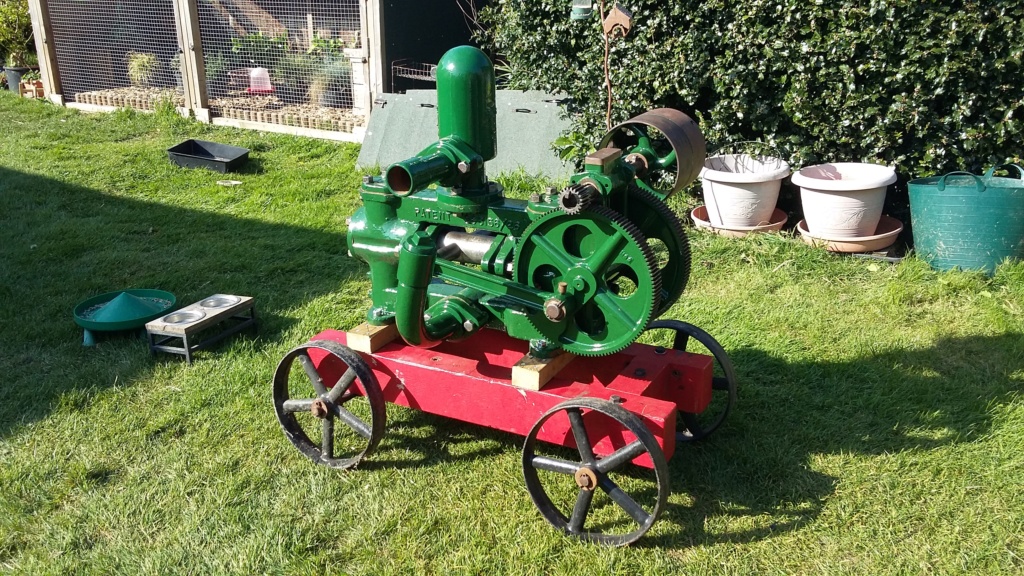
The offending red (pink) trolley and unpainted bearers!

Frame stripped, just the wheels to be removed. Note the wheel brackets overlap, I did not want to cut these down at this time, in case I need them long for future use.
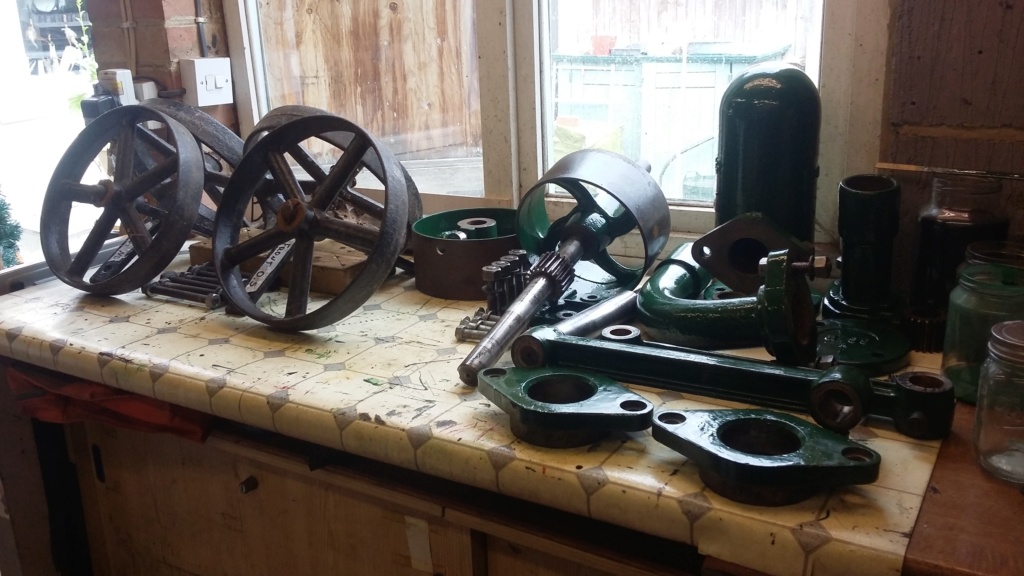
A bench full of parts again!

Frame sanded down, awaiting undercoat.

Frame drying after an application of undercoat, top coat to follow tomorrow.
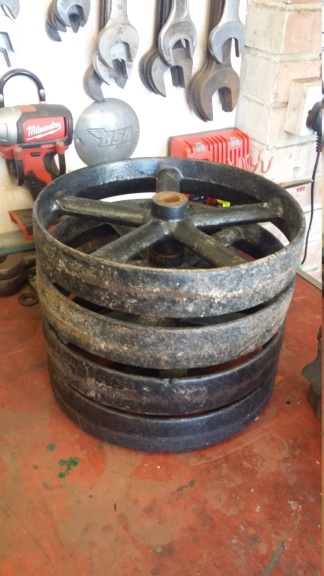
Trolley wheels will also be given a fresh coat of paint.
I must admit that I keep thinking I've got as far on the restoration of the pump, as I'm going to at this time. However when I looked at the set up today, I could not accept the faded red, which is looking more like pink, on the trolley frame. I know that the trolley is only meant to be temporary but it just looked wrong. So once again I have stripped the pump down and removed everything from the trolley. Once in the workshop, the trolley was wiped over to de-grease it, sanded down and prepped for painting. As I was applying green over red, I have opted to use a green undercoat, prior to the top coat, to give the best chance of avoiding the red bleeding through. This will obviously take longer to finish but I'm not going anywhere for the foreseeable future!
All the best and stay safe everybody, Neil.

The offending red (pink) trolley and unpainted bearers!

Frame stripped, just the wheels to be removed. Note the wheel brackets overlap, I did not want to cut these down at this time, in case I need them long for future use.

A bench full of parts again!

Frame sanded down, awaiting undercoat.

Frame drying after an application of undercoat, top coat to follow tomorrow.

Trolley wheels will also be given a fresh coat of paint.
neil (LE)- A credit to the forum

- Posts : 399
Join date : 2012-03-21
Age : 68
Location : N/W Kent
 Re: Lister H4 Pump Disassembly
You'll have to get the centre cut out of one of your gear covers, or the shaft that has the pulley on it won't go through it! You'll also have to take the pulley off the shaft to put the gear cover on.
_________________
Jules.

A Lister- A true Stationary engine owner

- Posts : 166
Join date : 2013-01-04
Location : South Cheshire
 Re: Lister H4 Pump Disassembly
Jules, yes of course, I didn't think that one through. If I have to take the pulley off, I might have to try the same method as I used to get the flywheel off the D, hopefully it will work just as well, Neil.
neil (LE)- A credit to the forum

- Posts : 399
Join date : 2012-03-21
Age : 68
Location : N/W Kent
 Re: Lister H4 Pump Disassembly
Hi jules a angle grinder with super thin cutting disc cuts it good
tony RA- A credit to the forum

- Posts : 279
Join date : 2013-11-16
Age : 77
Location : newtown powys
 Re: Lister H4 Pump Disassembly
matthew92 wrote:I imagine they would be similar to the H3, which are fairly simple things. The two mounting lugs are separate pieces, the main cover is one piece bent around and the end cover is another piece all just tack welded together. The only difference between the two is the one on the pulley end is slotted at the bottom so you can remove it. It's all thin tin except the mounts which are slightly thicker as they are threaded for the bolts.
I think I now understand the full meaning of what Matthew92 was explaining. I had thought he meant the fixing holes were slotted, it now makes more sense if the end piece has a slot in it, so there is no need to remove the pulley to take the guard off. If this was how they were originally made or if this is a later modification, I do not know but I will be considering making any replacement ones in this fashion, to ease the assembly process. Thanks again to all who have provided feedback and helpful information.
Neil.
neil (LE)- A credit to the forum

- Posts : 399
Join date : 2012-03-21
Age : 68
Location : N/W Kent
Page 2 of 6 •  1, 2, 3, 4, 5, 6
 Similar topics
» Lister 'd' to lister domestic pump
» Lister Domestic Pump
» lister h3 pump
» Lister H3 pump
» Lister H1 pump nut
» Lister Domestic Pump
» lister h3 pump
» Lister H3 pump
» Lister H1 pump nut
Page 2 of 6
Permissions in this forum:
You cannot reply to topics in this forum
 you'll have it pumping water tomorrow....


