Lister H4 Pump Disassembly
+8
chrismac
neil (LE)
Foden
Robotstar5
oldgit
tony RA
68jcb
matthew92
12 posters
Page 1 of 6
Page 1 of 6 • 1, 2, 3, 4, 5, 6 
 Lister H4 Pump Disassembly
Hi all, as part of the virtual crank-up idea in the "Shed" section of the forum, I have been looking over my son's Lister D, which hadn't been run for 15 - 20 years. I did manage to get that to fire up and is now running quite well. When my son used to rally this engine it was coupled to a Lister H4 pump, which is quite big for a Lister D to drive but it did work quite well. After all this time I thought the pump might need to be given a bit of a refurbish, also the plywood base that the pump sits on, has rotted and a new base is required. The H4 is a large and very heavy unit. So I decided the best idea was to take the pump apart, to enable me to be able to move it around, especially as due to the current situation, my son cannot help me move it around. During the disassembly I found the cross shaft stuck in the main pump shaft, even with the fixing screw undone. Rather than risk bruising the end of the cross shaft by using a hammer, I fabricated a rig to press the cross shaft out. I thought others might find my solution of interest.
Neil
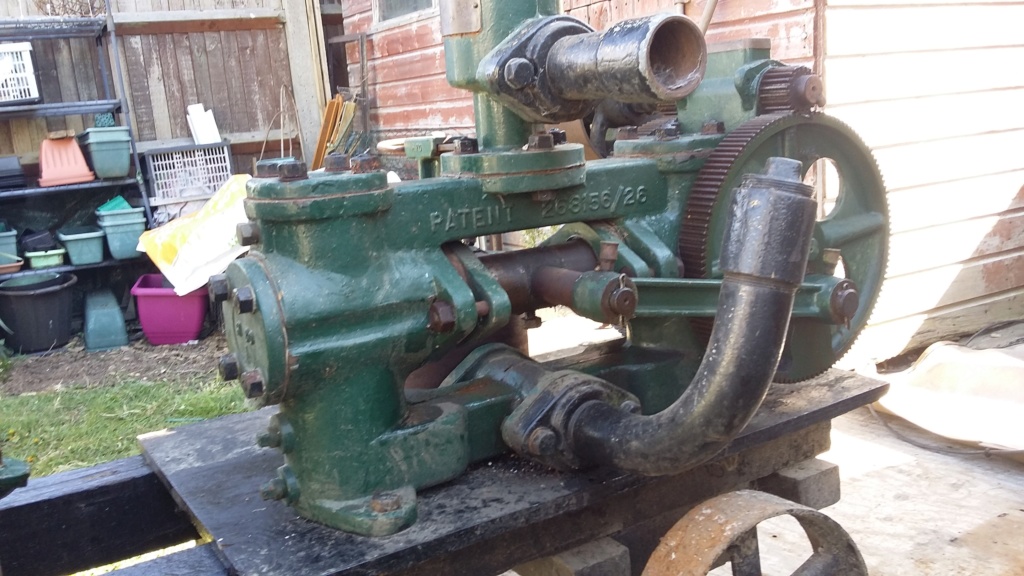
Pump and base in need of renovating.

Press clamp in place.
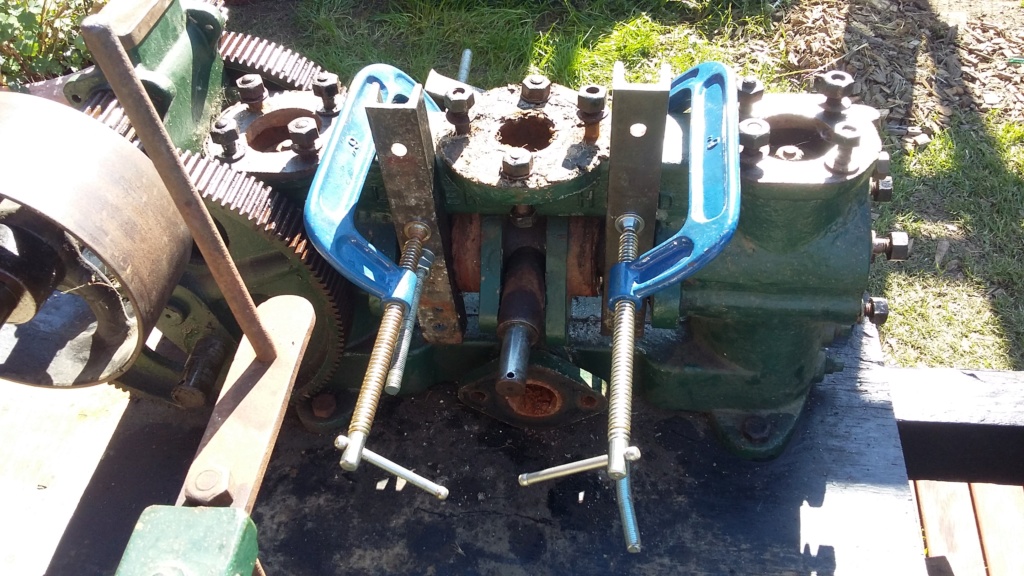
Set up from the other side. The cross pieces are short lengths of signalling point rod. (I volunteer on a preserved railway).

Cross shaft emerging!

Success.

The offending item removed!
Neil

Pump and base in need of renovating.

Press clamp in place.

Set up from the other side. The cross pieces are short lengths of signalling point rod. (I volunteer on a preserved railway).

Cross shaft emerging!

Success.

The offending item removed!
neil (LE)- A credit to the forum

- Posts : 399
Join date : 2012-03-21
Age : 68
Location : N/W Kent
 Re: Lister H4 Pump Disassembly
That'll work. When you put it back in freeze the cross shaft first....

Appletop- Life Member

- Posts : 1483
Join date : 2010-01-02
Age : 56
Location : Just outside Diss
 Re: Lister H4 Pump Disassembly
I also have one of these lumps, it keeps winking at me from under the bench, I can hear it saying, go on then, see if you can get me apart, its in a terrible state but complete,
Some day I'll get at it, I nearly took it out today but didnt.
Nice job removing the cross shaft.
Chris
Some day I'll get at it, I nearly took it out today but didnt.
Nice job removing the cross shaft.
Chris
chrismac- A true Stationary engine owner

- Posts : 164
Join date : 2013-07-12
Age : 48
Location : Wick, Caithness
 Re: Lister H4 Pump Disassembly
Well having got the pump apart, now what should I do, full restoration or quick clean up and reassemble. It's OK I don't expect an answer, but is it just me, or does a simple job always turn into a major undertaking! So far I've given the main body a degrease and clean and I can already feel the need to splash some paint around but do I need to follow that through to the Lister engine as well. Then of course there's the trolley. If I repaint the pump and the engine, I might as well go the whole hog and include the trolley, however the trolley is definitely showing signs of rot, which will need dealing with. Already sounding like a bigger job than I told the wife it would be. Now how long is this self isolation due to last, I wonder.

Main body looking rather tired.

Looking a little better after a scrub up.

And from the other side.
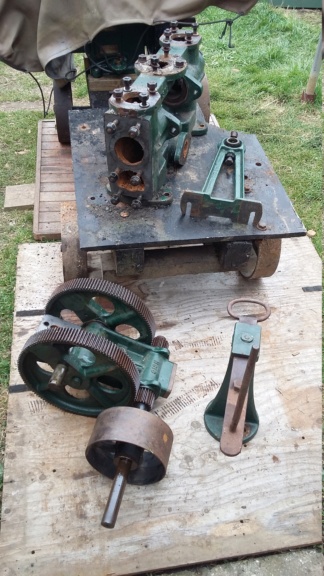
Yet to be undertaken are all the smaller but potentially more difficult items

Main body looking rather tired.

Looking a little better after a scrub up.

And from the other side.

Yet to be undertaken are all the smaller but potentially more difficult items
neil (LE)- A credit to the forum

- Posts : 399
Join date : 2012-03-21
Age : 68
Location : N/W Kent
 Re: Lister H4 Pump Disassembly
youve got as much time as you need to do everything
Mary alice
maryalice- Life Member

- Posts : 1310
Join date : 2010-01-23
Age : 70
Location : Bedfordshire
 Re: Lister H4 Pump Disassembly
In a play on the words of an infamous quiz master, "I've started so I will have to finish". I discovered an old tin of of mid-Brunswick green, engine enamel, in the garage. Therefore I have taken the plunge and have applied a coat of paint to the pump main body. It's not a perfect job, as I have not properly prepared the surface but it has improved the overall look. However having done this part, I am now committed to completing the task, as the colour is totally different to that which is currently on the remaining parts. I seem to remember using some Japlac paint when my son and I first restored the engine and pump and I think the colour used was Dark British Racing Green, which looked good at the time but not quite correct for the Lister range. So I will definitely have to complete the rest of the pump and in all probability the Lister D engine as well! Also I've taken a closer look at the timbers on the frame and these are in very poor condition and will need to be replaced. This could be difficult at this time, as I will not be able to get to a timber yard to find any suitable wood to build a new frame from. This might cause the project to stall until things get back to normal, not to worry though, as I seem to have enough to keep me occupied, without having to resort to home decorating!
Neil
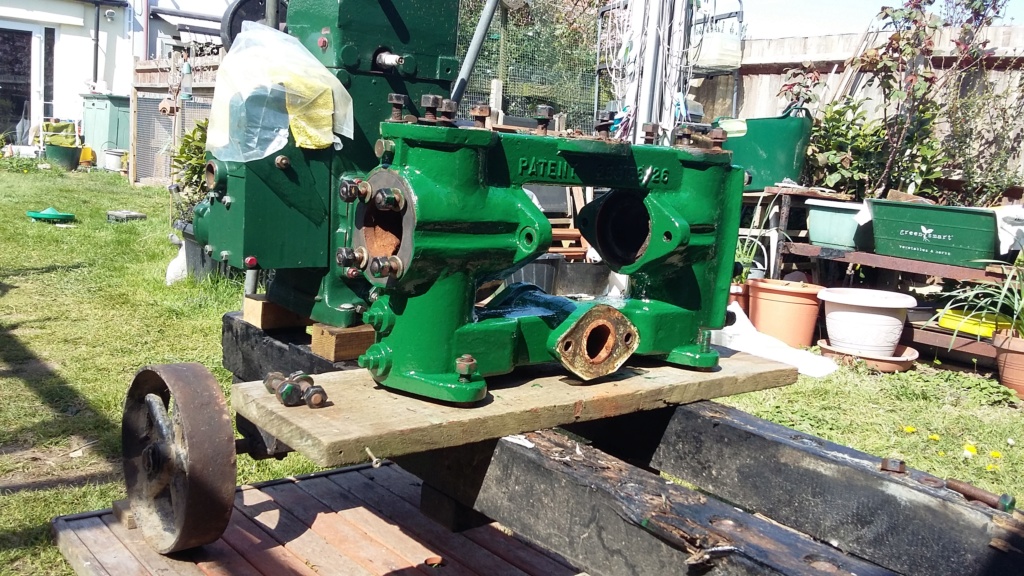
Main pump body sporting a new coat of paint. Notice the colour difference to the Lister D behind.

Extensive rot in the frame main bearers.
Neil

Main pump body sporting a new coat of paint. Notice the colour difference to the Lister D behind.

Extensive rot in the frame main bearers.
neil (LE)- A credit to the forum

- Posts : 399
Join date : 2012-03-21
Age : 68
Location : N/W Kent
 Re: Lister H4 Pump Disassembly
As you've said, the smaller parts can be more difficult, particularly if you can't safely dismantle the gears on the rear assembly. I had to paint the rear assembly in one piece when I restored my H2 pump as, although I could remove the gib keys, the gears wouldn't budge, and because they were in really good condition with no obvious wear it wasn't worth the risk of breaking one or chipping a tooth trying. However, if you can remove the pulley without damaging anything then that should make painting the rear assembly more manageable.
My suggestion would be for you to have a good think about how to tackle the job, then see how you go with primer/undercoat for a practice run, keeping a clean rag and white spirit handy in case it goes pear shaped. Once you've worked out the best way to paint it using primer then you can see how you go with the gloss, hopefully avoiding brush marks and runs (there's nothing worse than the runs! ). Hope this is useful and best of luck.
My suggestion would be for you to have a good think about how to tackle the job, then see how you go with primer/undercoat for a practice run, keeping a clean rag and white spirit handy in case it goes pear shaped. Once you've worked out the best way to paint it using primer then you can see how you go with the gloss, hopefully avoiding brush marks and runs (there's nothing worse than the runs!

_________________
Jules.

A Lister- A true Stationary engine owner

- Posts : 166
Join date : 2013-01-04
Location : South Cheshire
 Re: Lister H4 Pump Disassembly
Hi Jules, thanks for your response. I agree that it would be easier to remove the gears and the pulley, to be able to prep and paint the parts properly. However like you, I think there would be less risk of damage by leaving them in place and as you suggest, use the base coat as a way to practise applying the paint. The other issue with leaving the gears in place though, is you have to be very careful moving the assembly around. If not, there is a risk due to the top heavy nature of the unit, which can cause it to swing around the gears and trap the fingers. Ouch!
Only managed to prep the end cover plates yesterday but hope to achieve a little more today.
Neil
Only managed to prep the end cover plates yesterday but hope to achieve a little more today.
Neil
neil (LE)- A credit to the forum

- Posts : 399
Join date : 2012-03-21
Age : 68
Location : N/W Kent
 Re: Lister H4 Pump Disassembly
Cheers. Look on the bright side, with an H4 you had end cover plates to unbolt, fettle and paint; with an H2 I had large brass bungs to fight every millimetre of the way to unscrew and then polish! So no sympathy from me there! 
_________________
Jules.

A Lister- A true Stationary engine owner

- Posts : 166
Join date : 2013-01-04
Location : South Cheshire
 Re: Lister H4 Pump Disassembly
A Lister wrote:Cheers. Look on the bright side, with an H4 you had end cover plates to unbolt, fettle and paint; with an H2 I had large brass bungs to fight every millimetre of the way to unscrew and then polish! So no sympathy from me there!
So I've got that to look forward to when I get round tuit on my H1 pump

Someone has already had a go with grips, Stilsons etc. by the look of it

I have a square drive adapter so hoping not to do any more damage getting them out.
_________________
Stuart
Robotstar5- Life Member

- Posts : 1110
Join date : 2018-09-25
 Re: Lister H4 Pump Disassembly
Make sure it's well bolted down, heat it really hot and then use a good fitting square bar, 24 inch Stilsons on the bar
and Grunt.
and Grunt.

Appletop- Life Member

- Posts : 1483
Join date : 2010-01-02
Age : 56
Location : Just outside Diss
 Re: Lister H4 Pump Disassembly
after leaving nut to soak overnight.
maryalice- Life Member

- Posts : 1310
Join date : 2010-01-23
Age : 70
Location : Bedfordshire
 Re: Lister H4 Pump Disassembly
[quote="maryalice"]after leaving nut to soak overnight.[/quote]
What you do with your nuts is your business Martin!!!


What you do with your nuts is your business Martin!!!


Appletop- Life Member

- Posts : 1483
Join date : 2010-01-02
Age : 56
Location : Just outside Diss
 Re: Lister H4 Pump Disassembly
Hi, so there is something easier to do on a big old H4 than on an H1/H2. I can only imagine getting those plugs out must be similar to the valve caps, within the water jacket on an A type Lister. I remember them being very tough to remove. Today I've managed to rub back some of the smaller components ready for painting, followed by a quick application of paint. Please note that I'm not going for a full restoration, just a basic refurbishment, so I have not gone back to bear metal. I hope this does not offend the purists!
I also managed to get the gear drive unit into the garage for a clean up and de-grease, ready for a coat of paint. Hopefully this will be done in the next couple of days, before the weather changes and it becomes too cold for painting.
Neil
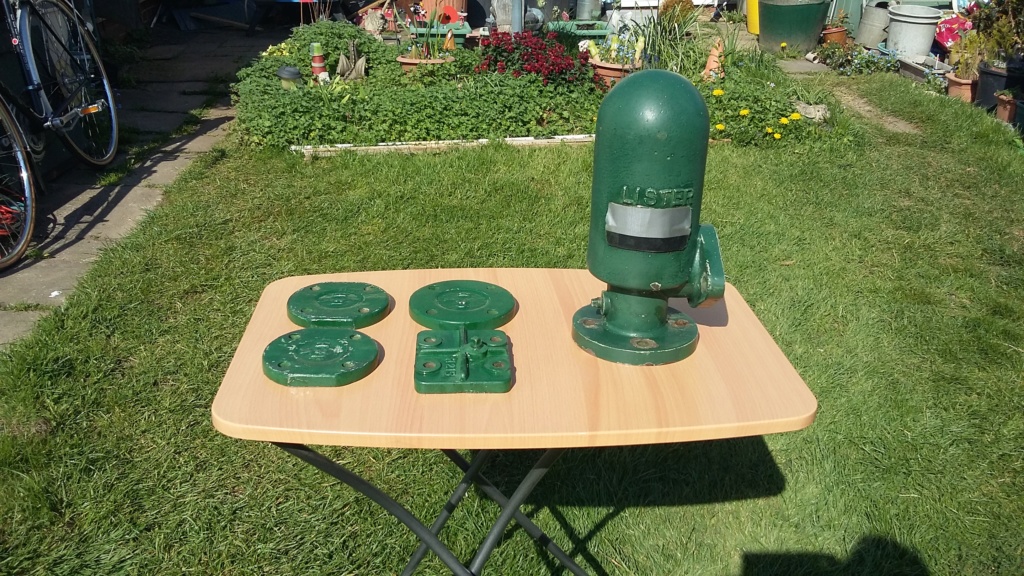
Smaller parts rubbed back ready for painting.
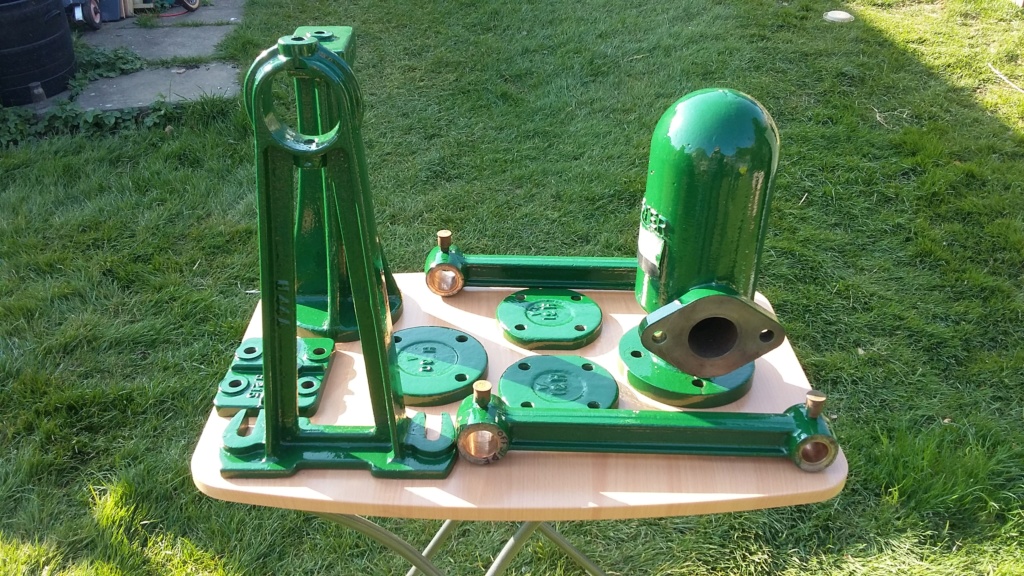
Painted parts drying in the sun, maybe awaiting a second coat?
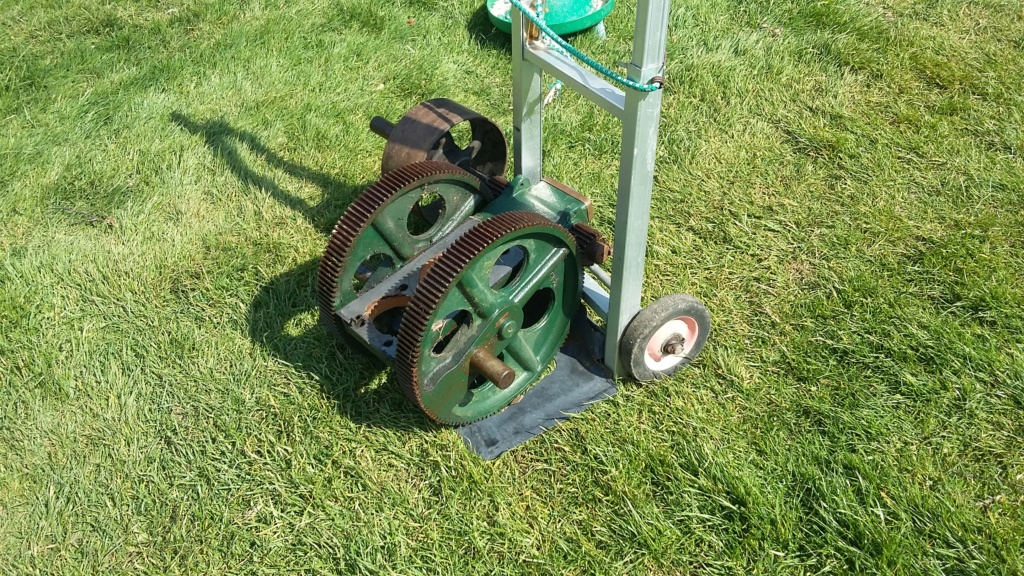
Gear drive unit on its way to the garage, for a bath.
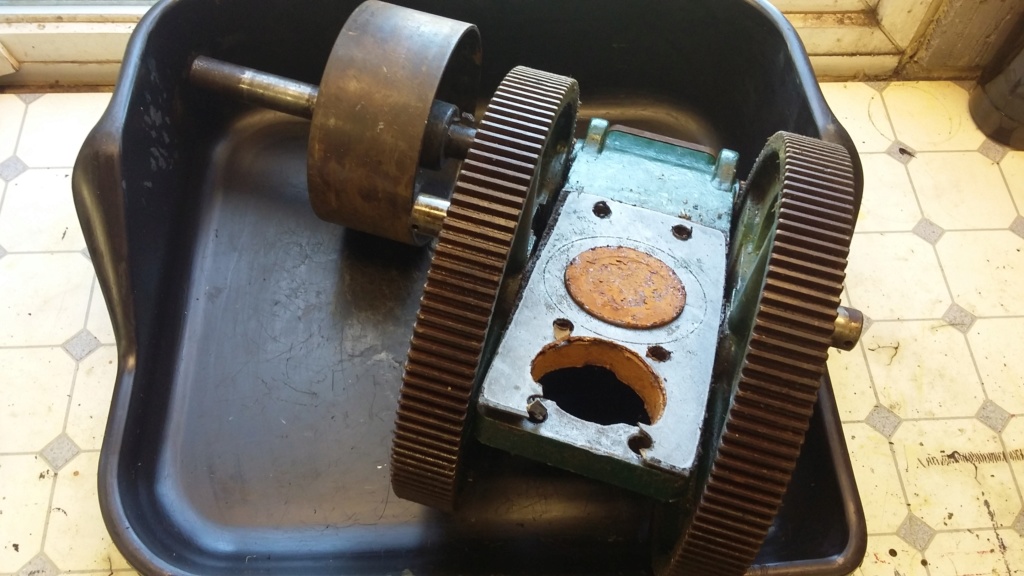
In the tub, ready to be attacked with the scrubbing brush.

All scrubbed up and drying out, awaiting paint.
I also managed to get the gear drive unit into the garage for a clean up and de-grease, ready for a coat of paint. Hopefully this will be done in the next couple of days, before the weather changes and it becomes too cold for painting.
Neil

Smaller parts rubbed back ready for painting.

Painted parts drying in the sun, maybe awaiting a second coat?

Gear drive unit on its way to the garage, for a bath.

In the tub, ready to be attacked with the scrubbing brush.

All scrubbed up and drying out, awaiting paint.
neil (LE)- A credit to the forum

- Posts : 399
Join date : 2012-03-21
Age : 68
Location : N/W Kent
 Re: Lister H4 Pump Disassembly
Robotstar5 wrote:A Lister wrote:Cheers. Look on the bright side, with an H4 you had end cover plates to unbolt, fettle and paint; with an H2 I had large brass bungs to fight every millimetre of the way to unscrew and then polish! So no sympathy from me there!
So I've got that to look forward to when I get round tuit on my H1 pump
Someone has already had a go with grips, Stilsons etc. by the look of it.
I have a square drive adapter so hoping not to do any more damage getting them out.
Yes, they can be a bit of a struggle. Soaking them in penetrating oil will only work if the oil can get into the threads. Quite often they're really well rusted in and the oil doesn't penetrate that well. I used Villers' suggested method and bolted the pump to a railway sleeper (using large coach screws) and used a square bar (a genuine Lister pump tool) and 24 inch Stilsons, with 16 stone behind it!
I still had to use heat on one of the bungs and it fought me every turn. One wouldn't budge at all, but as I could access to the valves by taking the drive train end off I decided to go in that way instead of risking stripping the threads out! Hopefully, now they've got several winds of PTFE tape and copper slip on them they'll be easier to get out next time. If anyone is interested, my H2 pump restoration thread is here: https://ukengineforum.forumotion.com/t7572-lister-h2-pump-restoration
_________________
Jules.

A Lister- A true Stationary engine owner

- Posts : 166
Join date : 2013-01-04
Location : South Cheshire
 Re: Lister H4 Pump Disassembly
Hi I've decided to go to plan "B". I found moving the rear gear assembly around with the pulley shaft attached was difficult and potentially dangerous to my fingers, as the small gear would rapidly rotate around the large gear, rather like a sun and planet unit and risk trapping my hand or fingers. It would also make painting the assembly easier, if the two items were separated. I realised I only needed to be able to extract one of the small gears on the pulley shaft and I would be able to separate the two assemblies. Not having a proper key extraction tool available, I managed to use two square shafted screw drivers to act as drifts, which was unexpectedly successful. Now I was faced with removing the small gear from the shaft. Again I was able to fabricate a small press, to ease the shaft through the pulley. Once that had been successfully achieved, I was able to go on to clean and prep the main rear gear unit and then to apply a coat of paint. Hopefully the pictures show the progress.
These posts originally started in "The Shed" section. Once I started to look at the pump rather than the engine, I started this thread in the "Pumps and Engine Driven Equipment" section but I wondered if it should now really be in the "New Projects/Restoration" section. If so, could one of the Admin move the thread, if they think it appropriate, thank you.
Neil
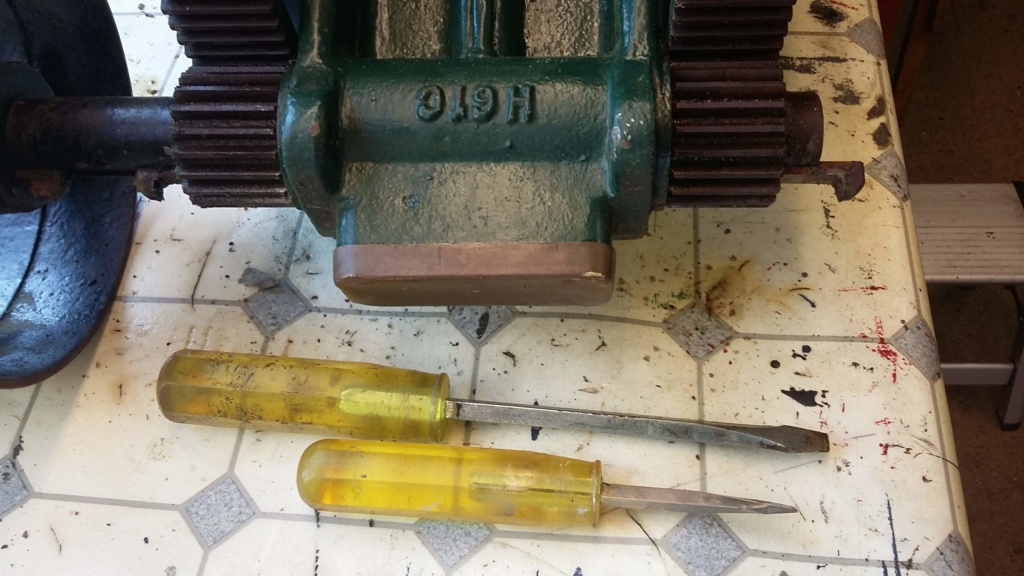
Square shafted screw drivers used to extract key.

Key nearly out.
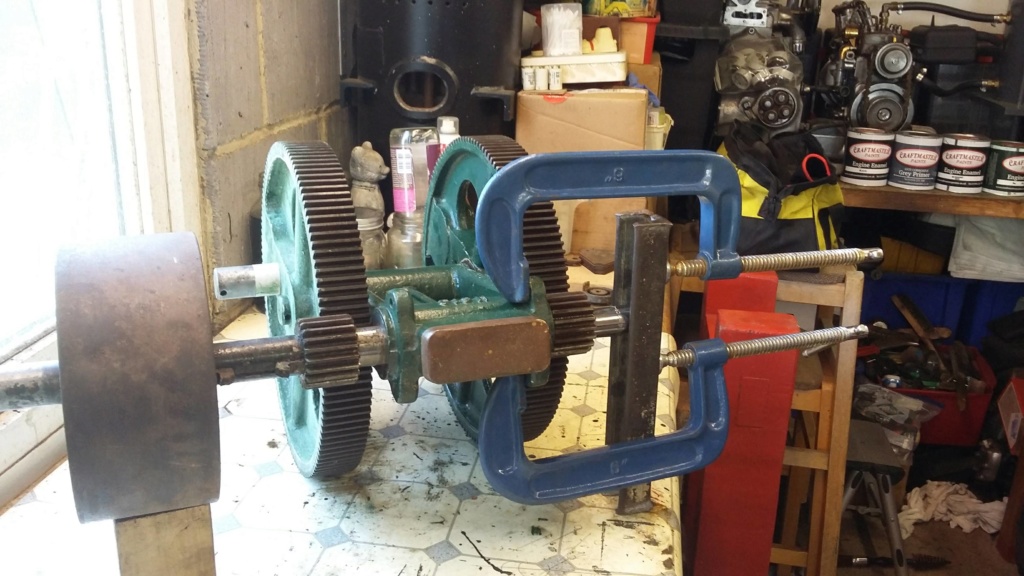
Shaft press in place.

Almost there.

Pulley shaft separated from rear assembly.
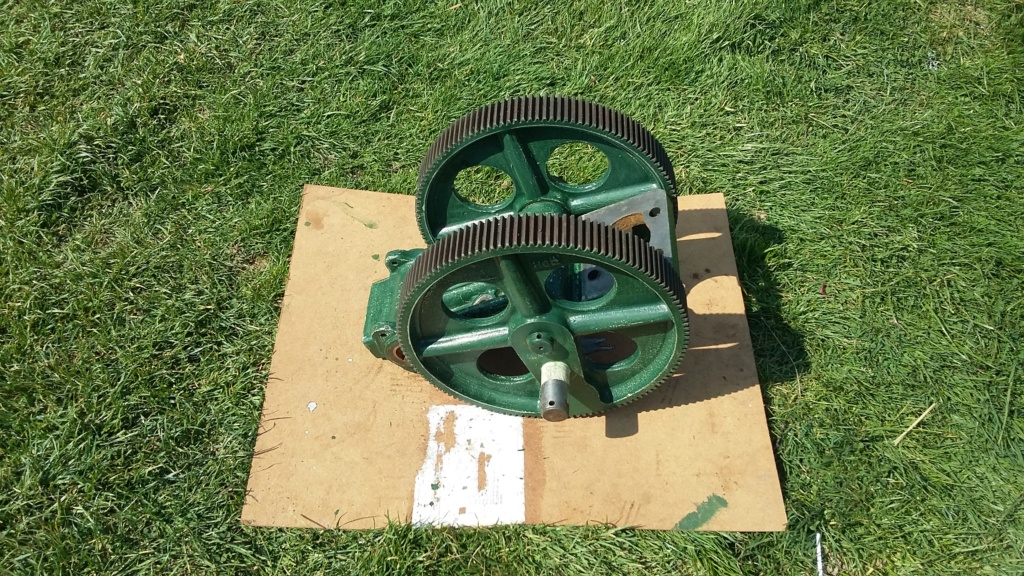
Rear gear assembly rubbed down and prepared for painting.

A coat of paint applied to the gear assembly.
These posts originally started in "The Shed" section. Once I started to look at the pump rather than the engine, I started this thread in the "Pumps and Engine Driven Equipment" section but I wondered if it should now really be in the "New Projects/Restoration" section. If so, could one of the Admin move the thread, if they think it appropriate, thank you.
Neil

Square shafted screw drivers used to extract key.

Key nearly out.

Shaft press in place.

Almost there.

Pulley shaft separated from rear assembly.

Rear gear assembly rubbed down and prepared for painting.

A coat of paint applied to the gear assembly.
neil (LE)- A credit to the forum

- Posts : 399
Join date : 2012-03-21
Age : 68
Location : N/W Kent
 Re: Lister H4 Pump Disassembly
Well done Neil, you're braver than I was, but I had managed to remove the pulley from mine before deciding to leave the gears in situ, and the H2 is quite a bit smaller to handle. It should look smart once it's all back together.
_________________
Jules.

A Lister- A true Stationary engine owner

- Posts : 166
Join date : 2013-01-04
Location : South Cheshire
 Re: Lister H4 Pump Disassembly
Hi Jules, don't know about braver, I think it was a case of self-preservation, especially of fingers. Also I believe it was less likely that I would damage anything. As I assume the casting for the H4, is much bigger and therefore more robust than on the H1/H2's. Any weight reduction on individual parts that I need to lift onto the bench, is also greatly appreciated. Even now, with it stripped down this far, I struggle to move the rear gear drive assembly around, making preparation and painting quite difficult.
Today has been a quieter, less strenuous one. So far I have cleaned up the gland packing plates and as these were in a poor cosmetic state, they have been taken back to bare metal and now need various coats of primer and paint before they will be ready for reassembly. I have also started to clean up the main pump piston, ready to examine it, to see if any additional work needs to be undertaken on it, prior to it being returned to the main body.
In the pictures below, there are some of the packing plates with their gland seals. Could anyone advise me on a good replacement, where to get them and how they are meant to be fitted and adjusted.
Thanks Neil.

Gland packing plate, external.

Gland packing plate internal, with old seals still in place

Plate with seals removed. Replacements will be required.

Cleaned up plate, external.

Cleaned up plates, internal.

Pump piston being cleaned for examination
Today has been a quieter, less strenuous one. So far I have cleaned up the gland packing plates and as these were in a poor cosmetic state, they have been taken back to bare metal and now need various coats of primer and paint before they will be ready for reassembly. I have also started to clean up the main pump piston, ready to examine it, to see if any additional work needs to be undertaken on it, prior to it being returned to the main body.
In the pictures below, there are some of the packing plates with their gland seals. Could anyone advise me on a good replacement, where to get them and how they are meant to be fitted and adjusted.
Thanks Neil.

Gland packing plate, external.

Gland packing plate internal, with old seals still in place

Plate with seals removed. Replacements will be required.

Cleaned up plate, external.

Cleaned up plates, internal.

Pump piston being cleaned for examination
Last edited by neil (LE) on Sun Apr 12 2020, 17:12; edited 1 time in total (Reason for editing : Photo added.)
neil (LE)- A credit to the forum

- Posts : 399
Join date : 2012-03-21
Age : 68
Location : N/W Kent
 Re: Lister H4 Pump Disassembly
Today was weigh in day! As mentioned in my previous posts, I was surprised how I was struggling to move parts of the pump around, even when they were almost fully stripped down. I thought I was loosing my strength. To reassure myself that I wasn't actually getting weaker due to lock-down, I thought I would see what they actually did weigh. As I had a set of bathroom scales in the garage, doesn't everyone, I decided to weigh a couple of the main items and was quite surprised at the results. At least I proved it wasn't all about me being weak, they really are quite heavy, as shown in the pictures below.
Not much else to report today. I managed to put primer on the gland packing plates, cleaned up the large gear wheels with a wire brush, to clean all the gunge out of the teeth, exposing some pitting on the teeth and I removed and cleaned up the valve cages, which will need to have new rubbers.

Rear drive gear unit on the scales.

Scales reading 5st 7lbs that's 77lbs or 35Kgs.
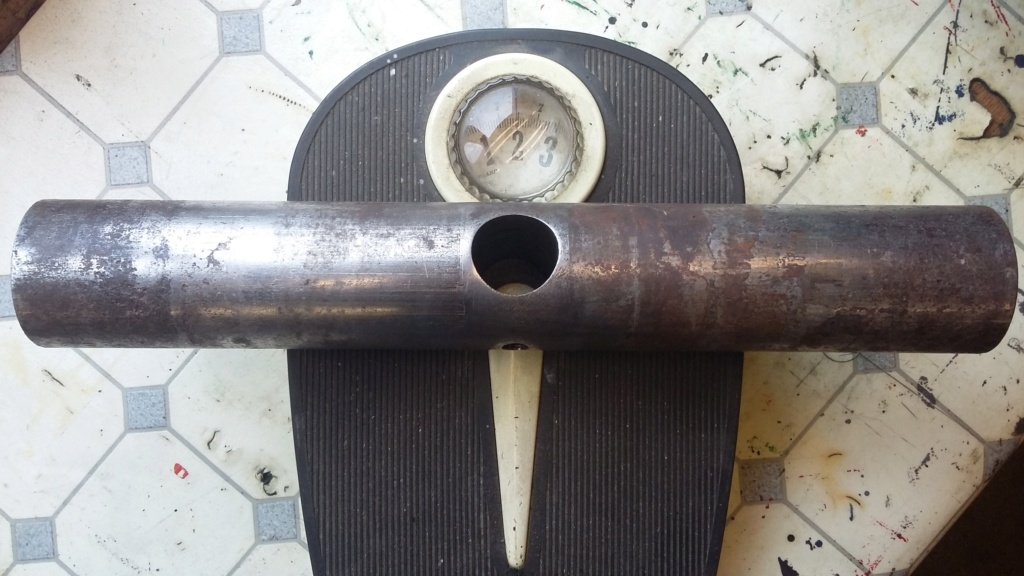
Main pump piston on scales, weighing in at 2st which is 28lbs or 12.7kgs.
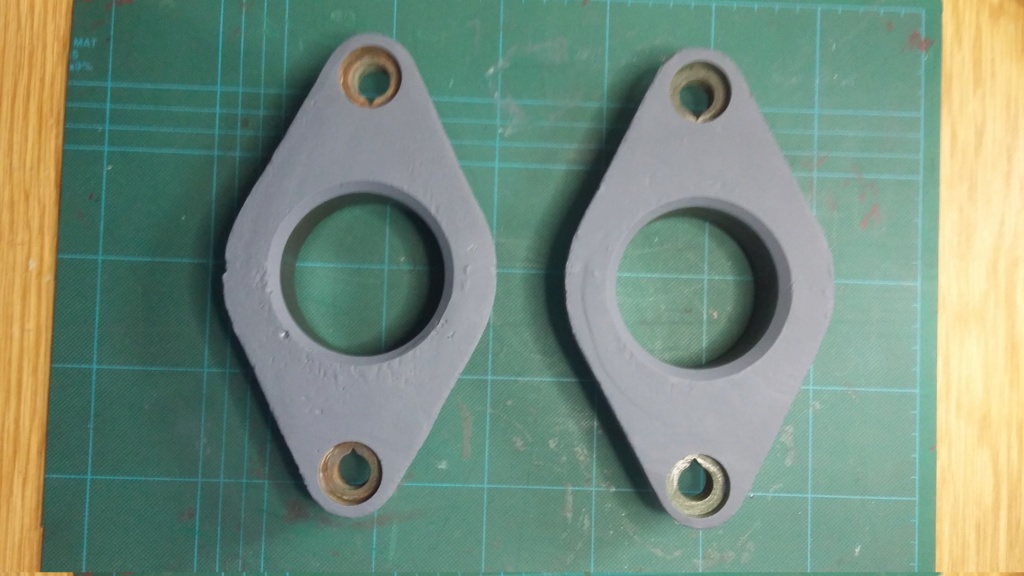
Primed packing plates.

Cleaned up gear wheel teeth.

Pitted gear wheel teeth.

Valve cages and rubbers.
Not much else to report today. I managed to put primer on the gland packing plates, cleaned up the large gear wheels with a wire brush, to clean all the gunge out of the teeth, exposing some pitting on the teeth and I removed and cleaned up the valve cages, which will need to have new rubbers.

Rear drive gear unit on the scales.

Scales reading 5st 7lbs that's 77lbs or 35Kgs.

Main pump piston on scales, weighing in at 2st which is 28lbs or 12.7kgs.

Primed packing plates.

Cleaned up gear wheel teeth.

Pitted gear wheel teeth.

Valve cages and rubbers.
neil (LE)- A credit to the forum

- Posts : 399
Join date : 2012-03-21
Age : 68
Location : N/W Kent
 Re: Lister H4 Pump Disassembly
How did you manage to get the valve cages out? I tried (not very hard) but couldn’t see they would ever come out without damage so just cleaned them in situ.
Packing for the main piston, I got 1/2” square graphite rope, not sure if yours is the same size. If you measure the thickness of the packing plate where it goes into the pump body to compress the packing.
What’s the diameter the main piston? On my H3 it’s 2 1/4” and that was a hefty chunk I haven’t weighed it though. I imagine yours must be bigger.

matthew92- Born to be wild

- Posts : 25
Join date : 2019-09-30
 Re: Lister H4 Pump Disassembly
Hi, the valve cage items you can see in the pictures are the the top sections only, the lower parts I have left in the main casting, as I don't believe there is much to be gained by removing them but could cause a lot of damage if I tried. The top part of the cage is held in place by a brass nut, on what I believe is also a brass stud, it doesn't look brass, as it has blackened but I did test with a magnet and there was no magnetic attraction. So unless someone has swapped the brass nuts for steel ones, with a little care the nuts should be removable.
Thank you for the information with regard to the gland packing material, I will measure up and try to identify what size section I will require. I have seen 1/2" square section packing material available from Stationary Engine Parts, on the net. Has anyone had any experience of using any this on an H4 pump?
Out of interest I did measure up the main piston, which revealed the length of 17 1/4" by 2 3/4" diameter.
Due to the need to deal with my Home Brew and ensure I was able to barrel my latest beer, today's activities were limited to applying a top coat of paint to the gland plates and a second coat of gloss to the rear gear drive assembly.
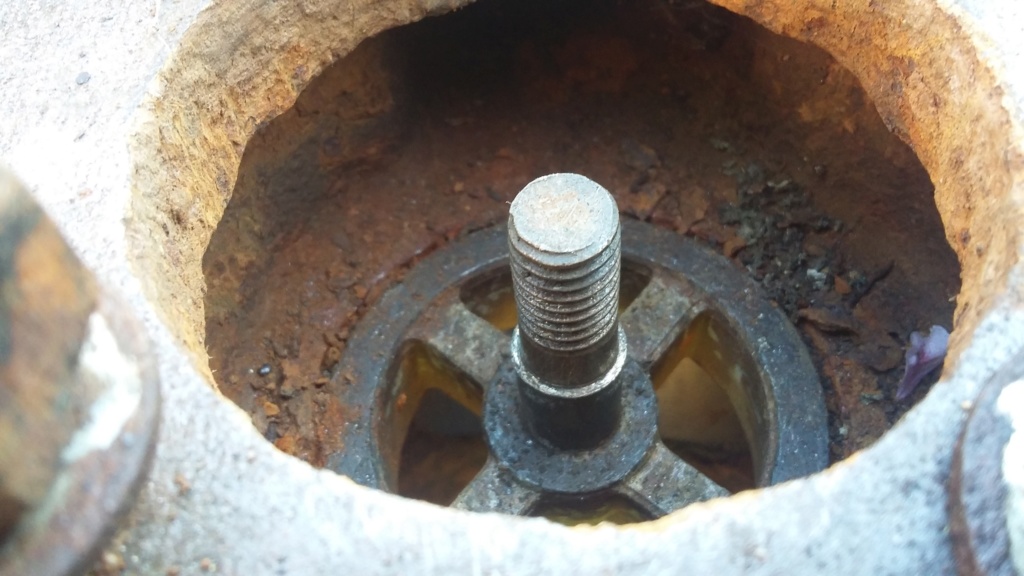
Bottom half of valve cage left in place.

Drive end, upper and lower valve chambers.

Front end view showing that the lower valve chamber is obscured, requiring the use of a short extension on the ratchet to remove the brass nut.
Thank you for the information with regard to the gland packing material, I will measure up and try to identify what size section I will require. I have seen 1/2" square section packing material available from Stationary Engine Parts, on the net. Has anyone had any experience of using any this on an H4 pump?
Out of interest I did measure up the main piston, which revealed the length of 17 1/4" by 2 3/4" diameter.
Due to the need to deal with my Home Brew and ensure I was able to barrel my latest beer, today's activities were limited to applying a top coat of paint to the gland plates and a second coat of gloss to the rear gear drive assembly.

Bottom half of valve cage left in place.

Drive end, upper and lower valve chambers.

Front end view showing that the lower valve chamber is obscured, requiring the use of a short extension on the ratchet to remove the brass nut.
neil (LE)- A credit to the forum

- Posts : 399
Join date : 2012-03-21
Age : 68
Location : N/W Kent
 Re: Lister H4 Pump Disassembly
I bought some PTFE impregnated gland packing from an eBay seller (as far as I can remember!) when I restored my H2 pump, that was 1/2 inch packing as it's a spray pump with a smaller diameter ram. I don't know what size packing your H4 would have used though, perhaps @Villiers might know?
You'll need to do a 'plain scarf joint' (Google it if you're not familiar with the term, I know I had to!) on the ends of the gland packing so it overlaps at an angle and tightens up against itself when the gland packing plate is bolted up. From memory, my pump required two rings of packing per side, so I made sure the two joins were on the opposite side of each other when I fitted the packing. The packing I got was quite tough to cut, so perhaps try a hacksaw with a fresh blade and mind your fingers... a trip to hospital is best avoided at the moment! Perhaps try cutting a spare bit first and see if a hacksaw works? Hope this is useful.
You'll need to do a 'plain scarf joint' (Google it if you're not familiar with the term, I know I had to!) on the ends of the gland packing so it overlaps at an angle and tightens up against itself when the gland packing plate is bolted up. From memory, my pump required two rings of packing per side, so I made sure the two joins were on the opposite side of each other when I fitted the packing. The packing I got was quite tough to cut, so perhaps try a hacksaw with a fresh blade and mind your fingers... a trip to hospital is best avoided at the moment! Perhaps try cutting a spare bit first and see if a hacksaw works? Hope this is useful.
_________________
Jules.

A Lister- A true Stationary engine owner

- Posts : 166
Join date : 2013-01-04
Location : South Cheshire
 Re: Lister H4 Pump Disassembly
Ahh, I’d forgotten about the cages on top of the washers, that makes sense.
I looked at both the ptfe and graphite packings on eBay when I bought mine, only went for the graphite because it looked like what stationary engines parts people sell. It’ll work out much cheaper if you buy it on eBay, I paid just over 14 quid per meter. Only I bought 2 meters thinking I’d need 3 rings per end when I only needed 2 rings per end.
I looked at both the ptfe and graphite packings on eBay when I bought mine, only went for the graphite because it looked like what stationary engines parts people sell. It’ll work out much cheaper if you buy it on eBay, I paid just over 14 quid per meter. Only I bought 2 meters thinking I’d need 3 rings per end when I only needed 2 rings per end.

matthew92- Born to be wild

- Posts : 25
Join date : 2019-09-30
 Re: Lister H4 Pump Disassembly
You need graphite packing, scarf joint it, as for size you need to measure the size of the "lip" on the packing plates and that should give you the size you need.
https://www.totallyseals.com/collections/gland-packing?gclid=CjwKCAjwvtX0BRAFEiwAGWJyZKLslANQGPxMEo1Ee8Smrh6VQojViVLrHRWgdCzX4wOueqIPpOtIxRoCWPwQAvD_BwE
https://www.totallyseals.com/collections/gland-packing?gclid=CjwKCAjwvtX0BRAFEiwAGWJyZKLslANQGPxMEo1Ee8Smrh6VQojViVLrHRWgdCzX4wOueqIPpOtIxRoCWPwQAvD_BwE

Appletop- Life Member

- Posts : 1483
Join date : 2010-01-02
Age : 56
Location : Just outside Diss
 Re: Lister H4 Pump Disassembly
Hi all, and thank you for your replies so far. Graphite packing seems to be the way to go, however all the suppliers I have looked at, seem to offer a graphite combined with another material. The link that Villiers posted, does have VG 4 Graphite packing material on its own but also lists graphite with cotton yarn, glass fibre, PTFE and others. Is graphite on its own the best option. The other issue with Totally Seals, is the they seem to sell in 8 metre lengths, far too much for a single pump.
I have measured the width of the land on the on the packing plates and if I've measured correctly, then I need 3/4" of packing, however from what I've looked at the packing doesn't go that large. When I took mine apart there was two layers of packing, so do I need to get 3/8" packing and fit two layers as I found fitted. If I do this the packing will be 3/4" x 3/8", in which case is 3/8" deep enough to provide the seal required?
Today I have cleaned and polished the main pump piston, cross shaft and the gear wheel bearing pins. There is an amount of pitting on the main piston but I don't think it is too bad. I think it is more important that the piston is smooth, to run through the gland seals without damaging them, rather than being totally efficient. The pump is rated at 1110 gallons per hour, so I don't think I'll worry about a slight reduction in capacity.
As I had weighed some of the other parts, I thought I would take the opportunity to to check some of the other items, the main pump casting and the air vessel as shown below.

The packing plate dimension
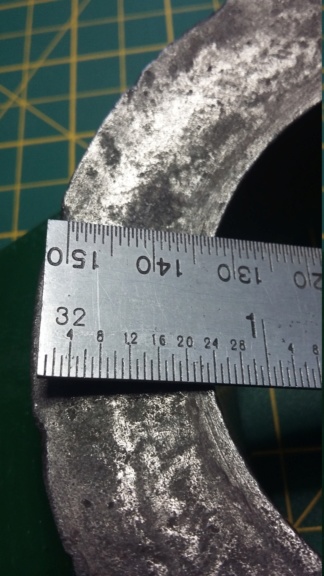
Flange width at 3/4"
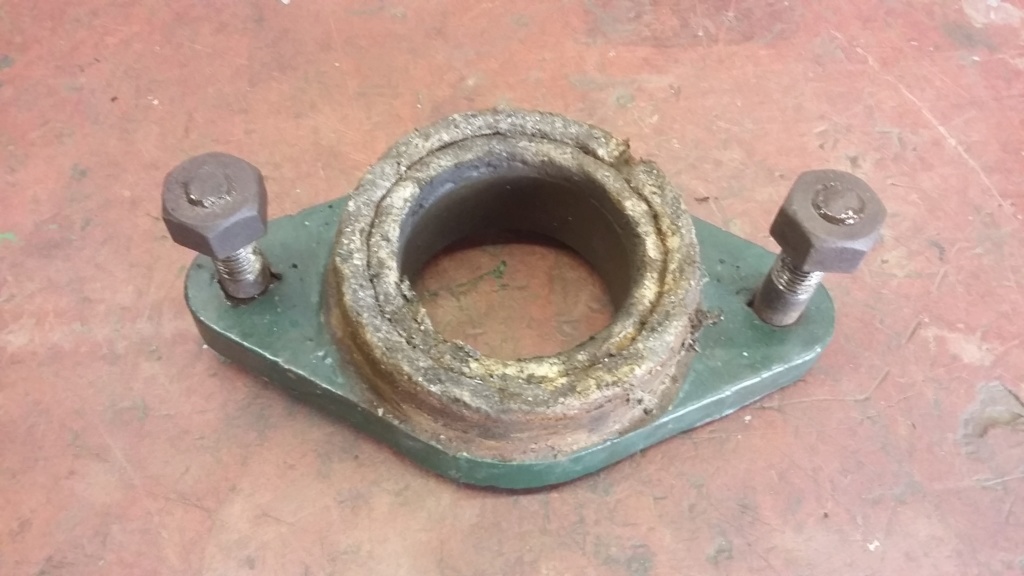
The packing as fitted.

Pump piston, cleaned and polished.

The worst of the piston pitting.

Cross shaft cleaned up.

Gear wheel bearing pin

Other side bearing pin.

Main casting on the scales, weighing in at 10st, 140lbs, 63.5kgs

Air vessel at 1st 11oz, 25ibs, 11.3kgs.
I have measured the width of the land on the on the packing plates and if I've measured correctly, then I need 3/4" of packing, however from what I've looked at the packing doesn't go that large. When I took mine apart there was two layers of packing, so do I need to get 3/8" packing and fit two layers as I found fitted. If I do this the packing will be 3/4" x 3/8", in which case is 3/8" deep enough to provide the seal required?
Today I have cleaned and polished the main pump piston, cross shaft and the gear wheel bearing pins. There is an amount of pitting on the main piston but I don't think it is too bad. I think it is more important that the piston is smooth, to run through the gland seals without damaging them, rather than being totally efficient. The pump is rated at 1110 gallons per hour, so I don't think I'll worry about a slight reduction in capacity.
As I had weighed some of the other parts, I thought I would take the opportunity to to check some of the other items, the main pump casting and the air vessel as shown below.

The packing plate dimension

Flange width at 3/4"

The packing as fitted.

Pump piston, cleaned and polished.

The worst of the piston pitting.

Cross shaft cleaned up.

Gear wheel bearing pin

Other side bearing pin.

Main casting on the scales, weighing in at 10st, 140lbs, 63.5kgs

Air vessel at 1st 11oz, 25ibs, 11.3kgs.
neil (LE)- A credit to the forum

- Posts : 399
Join date : 2012-03-21
Age : 68
Location : N/W Kent
Page 1 of 6 • 1, 2, 3, 4, 5, 6 
 Similar topics
» Lister 'd' to lister domestic pump
» Lister H1 pump nut
» Lister Domestic Pump
» Lister domestic pump help ....
» Lister H3 pump
» Lister H1 pump nut
» Lister Domestic Pump
» Lister domestic pump help ....
» Lister H3 pump
Page 1 of 6
Permissions in this forum:
You cannot reply to topics in this forum