Nutgone goes all Lister! (Lister A tank cooled project).
+11
steve w
Smitty
biomed32uk
rubythursday
blackvanman
A Lister
Carpmanjay
mm5aho
lister dan
Foden
matt86
15 posters
Page 3 of 6
Page 3 of 6 •  1, 2, 3, 4, 5, 6
 Re: Nutgone goes all Lister! (Lister A tank cooled project).
matt86 wrote:flywheels should come off easy enough just give a soak . The worst bit is getting the gib key out! I have a proper gib key remover. il post a pic of it if you would like? .
matt
Yeah OK, Mark (stamford24) is coming over on the weekend with a couple of different ones to try out, but it's always good to know what other people recommend.
_________________
The "F" key is dying on my computer, please remember this when reading my posts, I'm trying to avoid using it.
The name's Matt, but call me Nutts if you like, there's already enough Matt's about.

nutgone- Life Member

- Posts : 2356
Join date : 2012-07-04
Age : 45
Location : East Sussex
 Re: Nutgone goes all Lister! (Lister A tank cooled project).
I have got one that works everytime, use it on all my engines. Claas still use gib keys on there combines, so that's where you can get one from.
matt
matt

matt86- Admin
- Posts : 5577
Join date : 2011-03-29
Age : 38
Location : swindon/ faringdon
 Re: Nutgone goes all Lister! (Lister A tank cooled project).
I heard the Claas ones were good. Not sure what Mark's bringing with him on the weekend, but hopefully we'll have it done then.
I don't think these are particularly bad, well one came out already, so they can't be that bad. I think it's just a case of having the right tools for the job, & a crow bar is definitely not the right tool or the job .
.
I don't think these are particularly bad, well one came out already, so they can't be that bad. I think it's just a case of having the right tools for the job, & a crow bar is definitely not the right tool or the job
_________________
The "F" key is dying on my computer, please remember this when reading my posts, I'm trying to avoid using it.
The name's Matt, but call me Nutts if you like, there's already enough Matt's about.

nutgone- Life Member

- Posts : 2356
Join date : 2012-07-04
Age : 45
Location : East Sussex
 Re: Nutgone goes all Lister! (Lister A tank cooled project).
Sounds like me trying to get a gib key out with hammers wedges and crowbars :stick lol:
I got tired of it and wedged it out, but will invest in a decent "made for the job" one next time,
Cheers mate, John.
I got tired of it and wedged it out, but will invest in a decent "made for the job" one next time,
Cheers mate, John.
_________________
Time is Nature's way of not having everything happen all at once.
It proves out because when everything happens all at once there's never enough time to deal with it!

Smitty- A credit to the forum

- Posts : 275
Join date : 2013-01-13
Age : 73
Location : North Bay, ON, Canada.
 Re: Nutgone goes all Lister! (Lister A tank cooled project).
Right, so despite all the work I've been doing on the Ruston 6PB this weekend, there's also been quite a lot of progress made on this one too.
Saturday I had a couple of visitors over who had a go at the stubborn flywheel for me (flywheel number 2 as it turns out). Well within a short time they had the gib key out for me & were then looking into the removal of the magneto drive sprocket. I made myself useful & went off to make a pot of coffee. By the time we'd drunk our coffee & eaten a few biscuits we had the sprocket off as well. The rest of the afternoon was spent sitting in the sunshine, playing with the cats & chatting about engine related stuff....

Later that day I decided to carry on with the Lister a bit & I managed to get both crank case side plates off, along with the timing gears. I was very surprised to find just one cam on the cam shaft (no one told me about that either), & that there are 2 followers, each profiled differently to give the right characteristics. I've got a sneaking suspicion that the Lister D also has a similar arrangement, but I haven't confirmed this yet (keen Lister enthusiasts will notice a missing nut on the end of the fuel pump lever shaft, despite this not being present the shaft & key are still in good shape)....

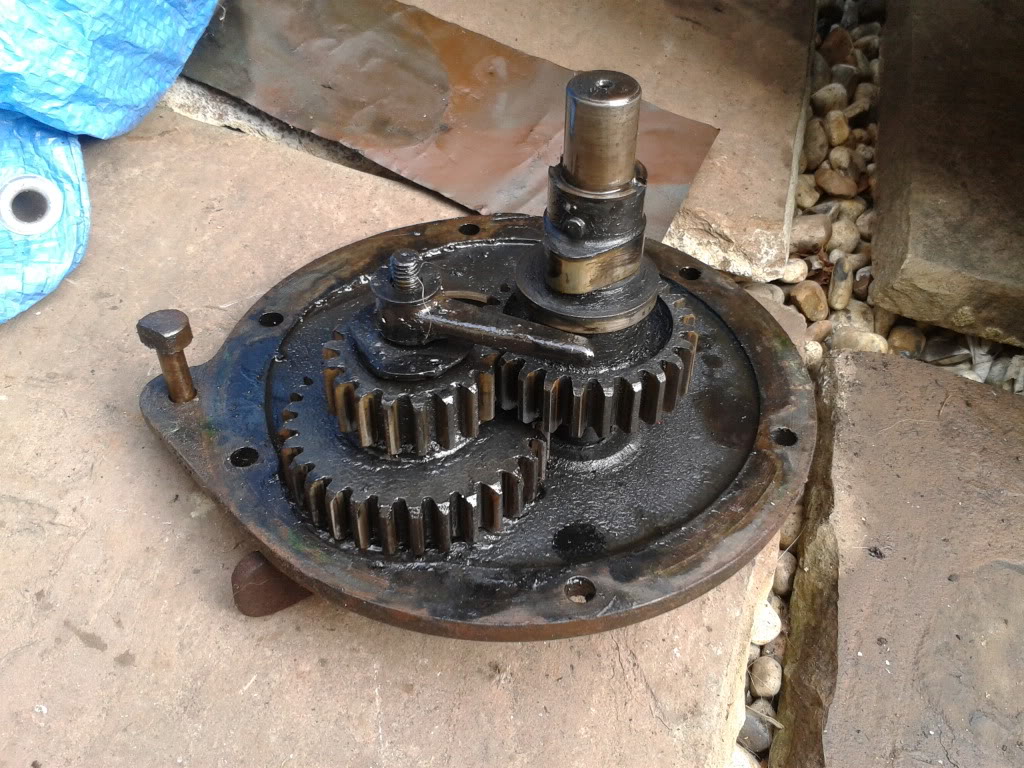
I also removed the governor sliding collar & took some pictures to aid with reassembly....


So I had an empty case, except for the crank shaft, but I still had an obstacle in my way, namely the camshaft drive cog, which was still stuck on the crank shaft....

I left this for another day, but as it turned out I got all the reassembly & priming of the little Ruston Hornsby done in reasonable time this afternoon, so that "other day" was today (Sunday).
I assumed this cog was a sliding fit with a small woodruff key, much like the magneto drive sprocket. I did have ideas of hitting the end of the shaft to drive it through the main bearing, leaving the gear behind, but I didn't want to damage the bearing with the woodruff key, so I managed to get it moving with a pair of tyre levers & eventually got it off. It has a very small woodruff key, like the magneto drive sprocket. They seem very small for such a large engine, but I'm told these very early models had these small keys on them (I'll have to get a pic of that).
Then it was time to remove the crank shaft. I thought something else must be holding it on, as it really didn't want to budge. But after some dressing with a bit of wet & dry paper & plenty of GT85 (& some gentle persuasion) I managed to get it out to reveal a nice empty crank case....
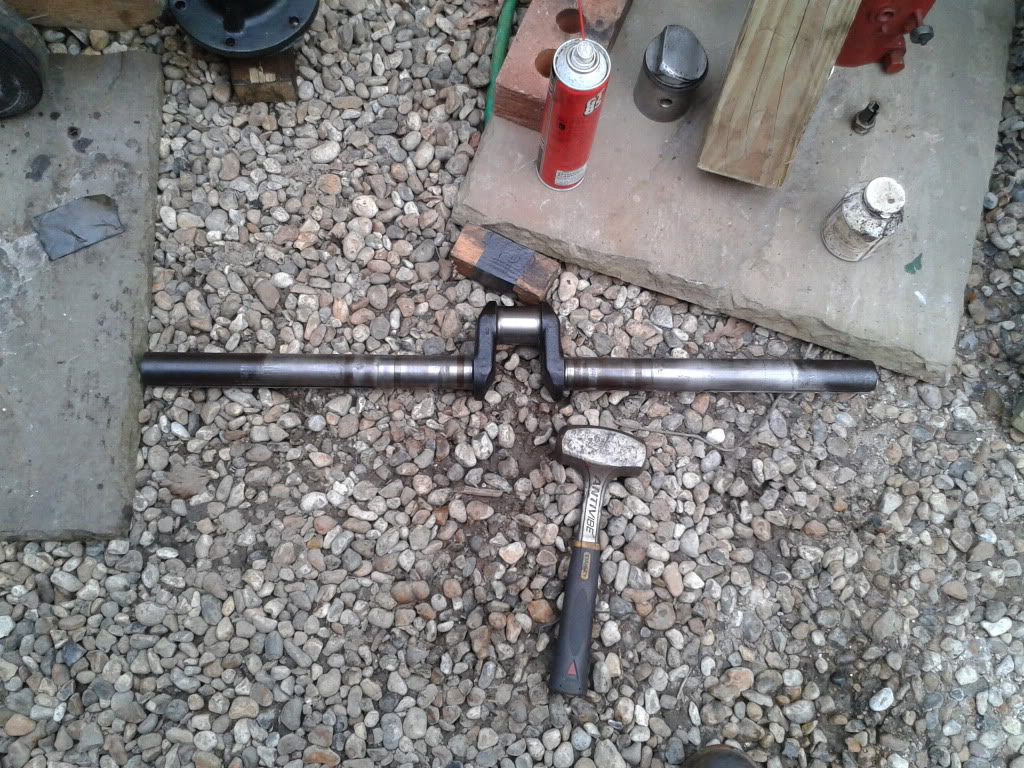

Then I went in & had dinner, after which I came back out & decided it was time to reduce the weight of this lump even further, so I removed the crank case from the cast iron base....
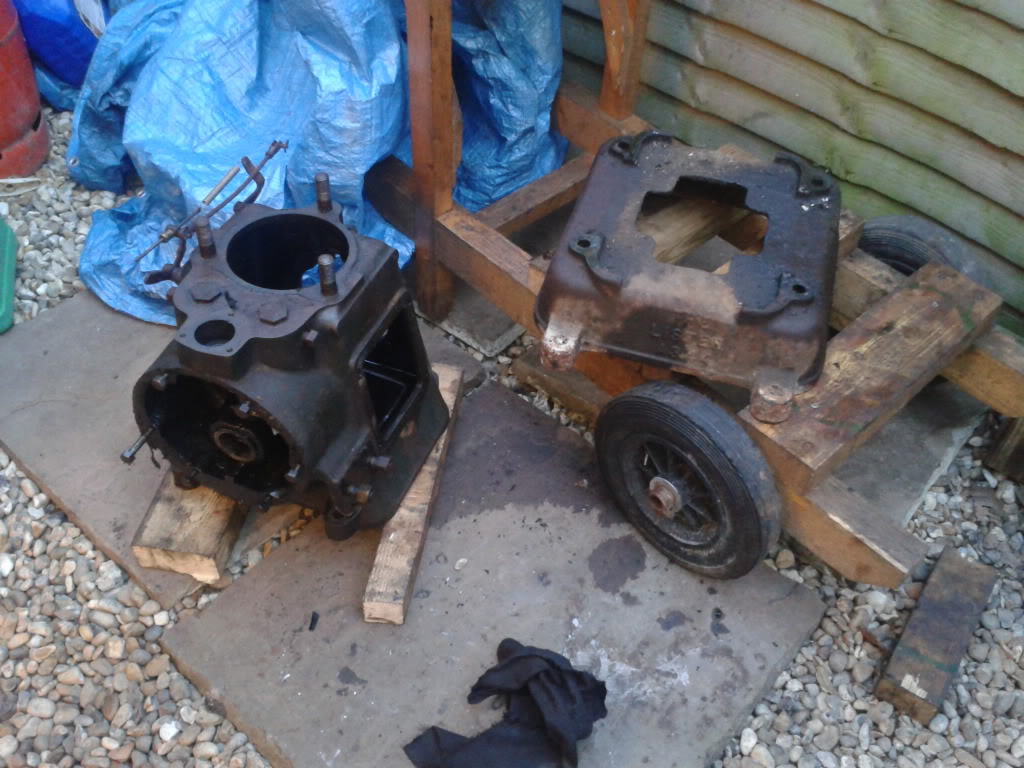
It was beginning to get dark by then, so I drained the oil & put it to bed. Then I went inside the workshop & had a play with the barrel. I had been lent a set of valve seat cutters, so I used them to clean up the valve seats a bit, then I got bored, I was looking in the water jacket & thought to myself "I wonder what my chances are of removing that threaded plug....

Well, with a half inch spanner & a couple of taps of the wrist, I couldn't believe it, it came straight out....

I never thought this engine would come apart so easy!
Next I've got a mountain of parts to clean, & that crank case to clean out as well (not really looking forward to that one, but it's got to be done. I will pick a day & just attack it, get stuck in, then it's done).
The next big job is the piston. The gudgeon pin is still pretty tight in the little end, I don't think I should try & remove it just yet as I think it would risk damage to the piston (so did my visitors on Saturday). It's soaking in easing oil solution & slowly freeing off. I will see about making up a removal tool for it. If it needs to soak for another fortnight then so be it, I'm not going to rush it, I've got plenty else to be getting on with, but the Ruston's coming to a standstill for a couple of days after tomorrow, so I will get busy washing those parts, as & when I can.
Saturday I had a couple of visitors over who had a go at the stubborn flywheel for me (flywheel number 2 as it turns out). Well within a short time they had the gib key out for me & were then looking into the removal of the magneto drive sprocket. I made myself useful & went off to make a pot of coffee. By the time we'd drunk our coffee & eaten a few biscuits we had the sprocket off as well. The rest of the afternoon was spent sitting in the sunshine, playing with the cats & chatting about engine related stuff....

Later that day I decided to carry on with the Lister a bit & I managed to get both crank case side plates off, along with the timing gears. I was very surprised to find just one cam on the cam shaft (no one told me about that either), & that there are 2 followers, each profiled differently to give the right characteristics. I've got a sneaking suspicion that the Lister D also has a similar arrangement, but I haven't confirmed this yet (keen Lister enthusiasts will notice a missing nut on the end of the fuel pump lever shaft, despite this not being present the shaft & key are still in good shape)....


I also removed the governor sliding collar & took some pictures to aid with reassembly....


So I had an empty case, except for the crank shaft, but I still had an obstacle in my way, namely the camshaft drive cog, which was still stuck on the crank shaft....

I left this for another day, but as it turned out I got all the reassembly & priming of the little Ruston Hornsby done in reasonable time this afternoon, so that "other day" was today (Sunday).
I assumed this cog was a sliding fit with a small woodruff key, much like the magneto drive sprocket. I did have ideas of hitting the end of the shaft to drive it through the main bearing, leaving the gear behind, but I didn't want to damage the bearing with the woodruff key, so I managed to get it moving with a pair of tyre levers & eventually got it off. It has a very small woodruff key, like the magneto drive sprocket. They seem very small for such a large engine, but I'm told these very early models had these small keys on them (I'll have to get a pic of that).
Then it was time to remove the crank shaft. I thought something else must be holding it on, as it really didn't want to budge. But after some dressing with a bit of wet & dry paper & plenty of GT85 (& some gentle persuasion) I managed to get it out to reveal a nice empty crank case....


Then I went in & had dinner, after which I came back out & decided it was time to reduce the weight of this lump even further, so I removed the crank case from the cast iron base....

It was beginning to get dark by then, so I drained the oil & put it to bed. Then I went inside the workshop & had a play with the barrel. I had been lent a set of valve seat cutters, so I used them to clean up the valve seats a bit, then I got bored, I was looking in the water jacket & thought to myself "I wonder what my chances are of removing that threaded plug....

Well, with a half inch spanner & a couple of taps of the wrist, I couldn't believe it, it came straight out....

I never thought this engine would come apart so easy!
Next I've got a mountain of parts to clean, & that crank case to clean out as well (not really looking forward to that one, but it's got to be done. I will pick a day & just attack it, get stuck in, then it's done).
The next big job is the piston. The gudgeon pin is still pretty tight in the little end, I don't think I should try & remove it just yet as I think it would risk damage to the piston (so did my visitors on Saturday). It's soaking in easing oil solution & slowly freeing off. I will see about making up a removal tool for it. If it needs to soak for another fortnight then so be it, I'm not going to rush it, I've got plenty else to be getting on with, but the Ruston's coming to a standstill for a couple of days after tomorrow, so I will get busy washing those parts, as & when I can.
_________________
The "F" key is dying on my computer, please remember this when reading my posts, I'm trying to avoid using it.
The name's Matt, but call me Nutts if you like, there's already enough Matt's about.

nutgone- Life Member

- Posts : 2356
Join date : 2012-07-04
Age : 45
Location : East Sussex
 Re: Nutgone goes all Lister! (Lister A tank cooled project).
Looks like you been busy and its coming along well ...
Looks in good shape to be honest . You will soon have it up and running .
Regarding the crankcase ... now that is a messey job indeed , some gunk and a stiff brush . I got the same thing with the D type . at least i have done the crankcase at work with the steam cleaner . Think this week i will go through the other bits and stuff them in a box and take them for the same treatment . So much easier than using degreaser and a brush .
Did you say you was a mag missing ???
matt

matt86- Admin
- Posts : 5577
Join date : 2011-03-29
Age : 38
Location : swindon/ faringdon
 Re: Nutgone goes all Lister! (Lister A tank cooled project).
nutgone wrote: The rest of the afternoon was spent sitting in the sunshine, playing with the cats & chatting about engine related stuff....
Can I just remind you this is an engine forum not a sit in the sunshine and waste valuable engine working time type of a forum.
 :stick lol:
  :stick lol:
You've dong some good work this weekend Nuts considering your doing the Ruston at the same time so I think we can forgive you for taking some time off.
Stu.
Guest- Guest
 Re: Nutgone goes all Lister! (Lister A tank cooled project).
Not my fault Stu, I was itching to get back to the engines, but me being the polite little soul I am I just couldn't ask them to leave!  :angel1:
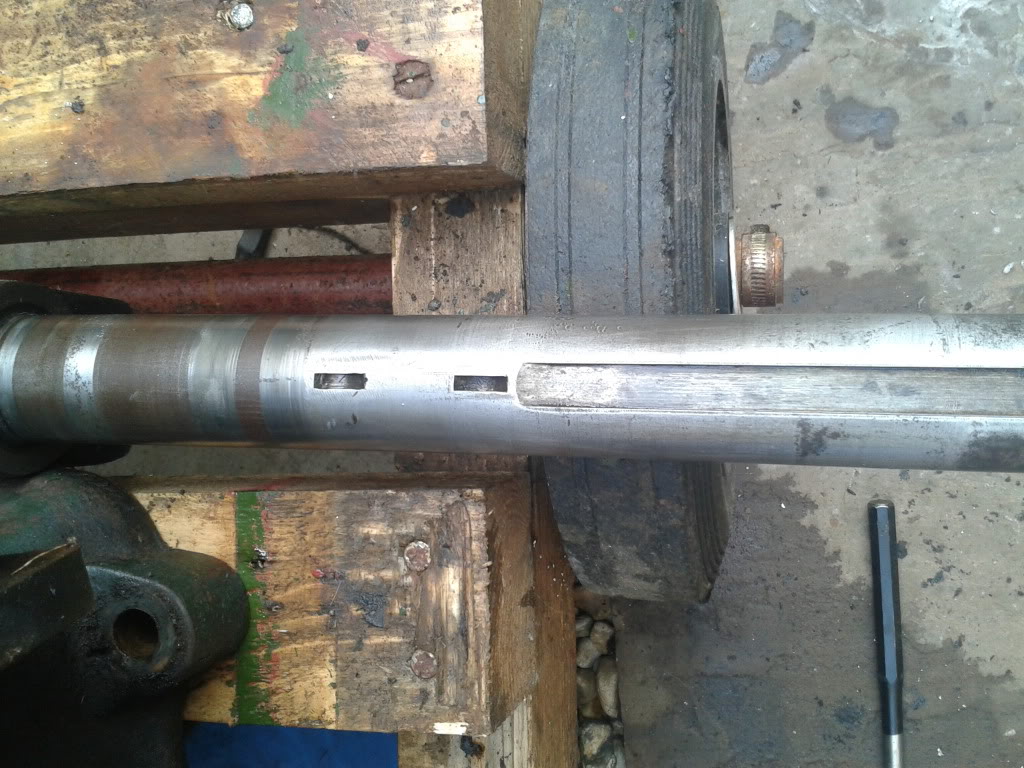
Right, I've got a little pic of the crank shaft to show those small keyways for the mag sprocket & timing gear....
Today I found the long lost copper/asbestos ring gaskets for the valve plugs in the head. I managed to get them both out without damaging them....

I've been playing with a valve seat cutter which was lent to me, but I'm not too sure about these seats, so I took some photos of them (I think I may have had a go with a valve & some grinding paste on one of them before this pic was taken, but I can't remember)....


Now, the exhaust valve is brand new, doesn't even appear to have been fired, but the inlet valve is a different story. I've had a go with some valve grinding paste, both coarse & fine, as it was badly pitted (& it's a big valve), but I still think it may want a little skim on a lathe....

I've also removed the tappets & their guides (not sure why I removed the guides really) & I've marked them up so they go back where they came from. Also I have removed all the governor linkages, so the parts wash tray is looking pretty full now (pretty sure I remember where it all goes)....

I've emptied what oil I can from the sump & thrown in some absorbent granules to soak up the worst of what's left in the various oil troughs & traps. Now I just need to build up some enthusiasm to get on with the mass clean-up.
Right, I've got a little pic of the crank shaft to show those small keyways for the mag sprocket & timing gear....

Today I found the long lost copper/asbestos ring gaskets for the valve plugs in the head. I managed to get them both out without damaging them....

I've been playing with a valve seat cutter which was lent to me, but I'm not too sure about these seats, so I took some photos of them (I think I may have had a go with a valve & some grinding paste on one of them before this pic was taken, but I can't remember)....


Now, the exhaust valve is brand new, doesn't even appear to have been fired, but the inlet valve is a different story. I've had a go with some valve grinding paste, both coarse & fine, as it was badly pitted (& it's a big valve), but I still think it may want a little skim on a lathe....

I've also removed the tappets & their guides (not sure why I removed the guides really) & I've marked them up so they go back where they came from. Also I have removed all the governor linkages, so the parts wash tray is looking pretty full now (pretty sure I remember where it all goes)....

I've emptied what oil I can from the sump & thrown in some absorbent granules to soak up the worst of what's left in the various oil troughs & traps. Now I just need to build up some enthusiasm to get on with the mass clean-up.
_________________
The "F" key is dying on my computer, please remember this when reading my posts, I'm trying to avoid using it.
The name's Matt, but call me Nutts if you like, there's already enough Matt's about.

nutgone- Life Member

- Posts : 2356
Join date : 2012-07-04
Age : 45
Location : East Sussex
 Re: Nutgone goes all Lister! (Lister A tank cooled project).
I had another go with the valve seat cutter & put a bit more effort in to it this time & I'm quite pleased with the results (it seems the surface of the seats has work hardened slightly, but once I was through that the cutter really started to bite, so I eased off a bit, as you only really need to scratch the surface with these)....

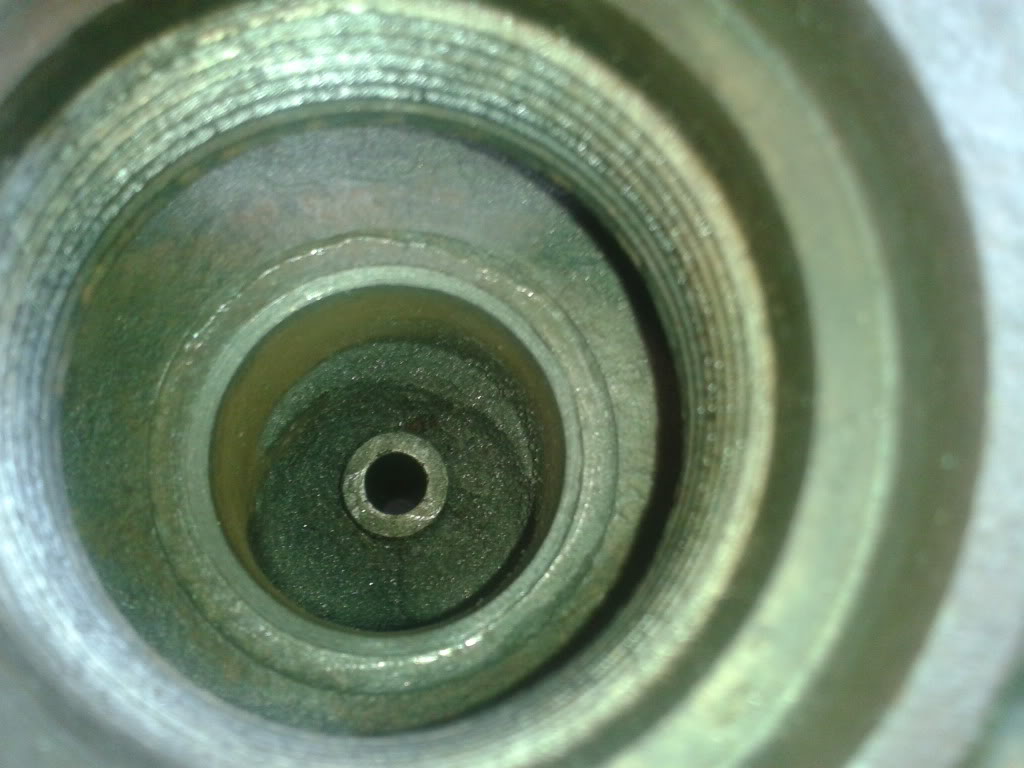
I've also had a look at the new(er) valve & there appears to be a little damage, so I think I will have both valves re-faced on a lathe....

The rest of it is very good, but that particular area really needs some treatment.
I've also thrown some special, wood-based, absorbent granules in the crank case to absorb the old oil, so now I can just scoop it all out & throw it in the bin....
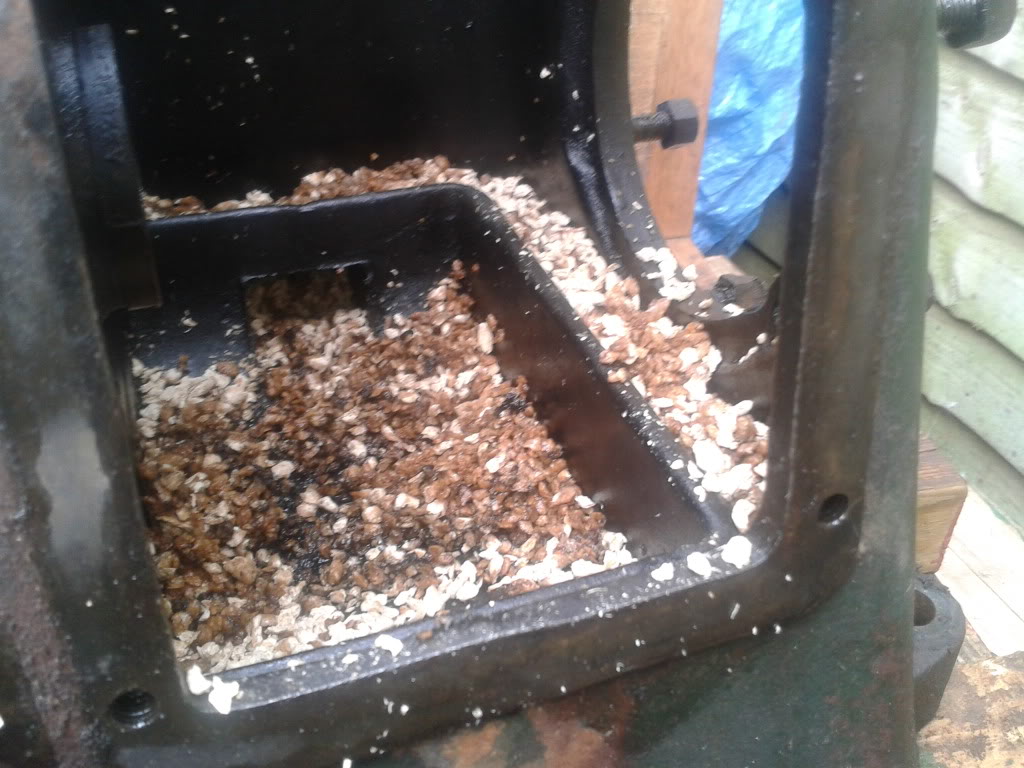
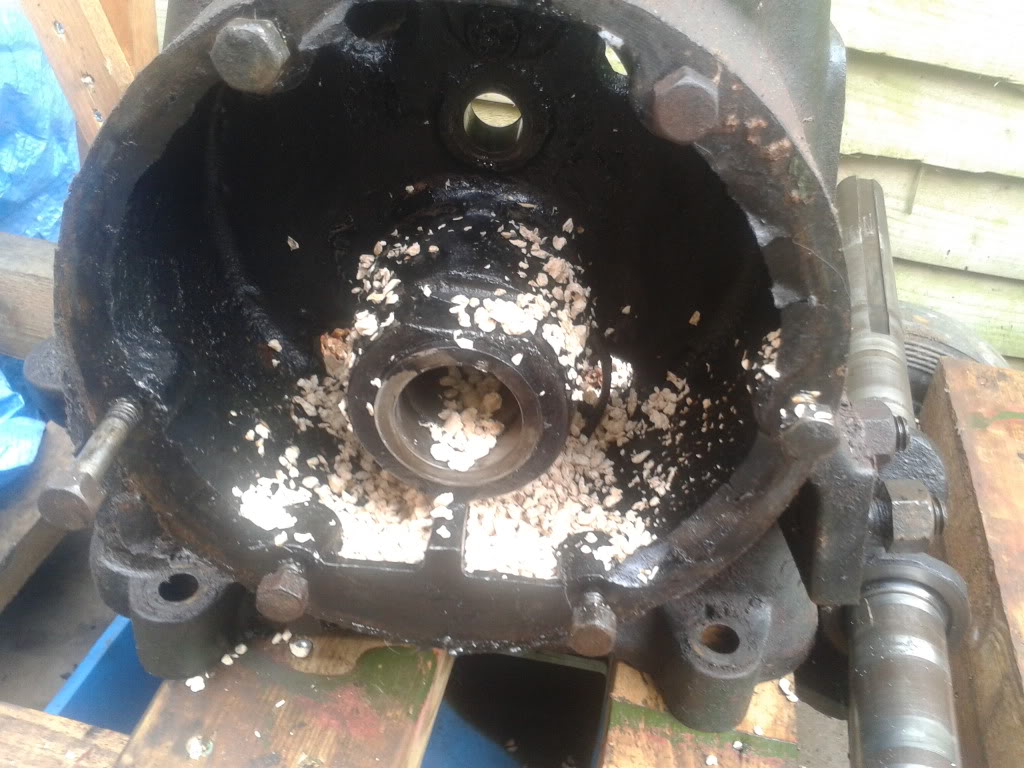
Yes I know it looks like cat litter, that's probably because it is, but it's no ordinary cat litter, it's some special stuff my mum bought a load of, only to find our cats didn't like it. It's not like the other wood based one which is compressed pellets of dust, this is much more like the oil granules you get in garages. In any case, the whole thing's going to be cleaned out, so any & all traces will be removed during cleaning.
Also, I can confirm this stuff was straight out of the bag, no little cat presents in it for me .
.


I've also had a look at the new(er) valve & there appears to be a little damage, so I think I will have both valves re-faced on a lathe....

The rest of it is very good, but that particular area really needs some treatment.
I've also thrown some special, wood-based, absorbent granules in the crank case to absorb the old oil, so now I can just scoop it all out & throw it in the bin....


Yes I know it looks like cat litter, that's probably because it is, but it's no ordinary cat litter, it's some special stuff my mum bought a load of, only to find our cats didn't like it. It's not like the other wood based one which is compressed pellets of dust, this is much more like the oil granules you get in garages. In any case, the whole thing's going to be cleaned out, so any & all traces will be removed during cleaning.
Also, I can confirm this stuff was straight out of the bag, no little cat presents in it for me
_________________
The "F" key is dying on my computer, please remember this when reading my posts, I'm trying to avoid using it.
The name's Matt, but call me Nutts if you like, there's already enough Matt's about.

nutgone- Life Member

- Posts : 2356
Join date : 2012-07-04
Age : 45
Location : East Sussex
 Re: Nutgone goes all Lister! (Lister A tank cooled project).
nutgone wrote:Not my fault Stu, I was itching to get back to the engines, but me being the polite little soul I am I just couldn't ask them to leave!:angel1:
I see it all now!
....I'll remember not to gabble on too much next time
Don't want to be accused of holding up the forum
Stamford24- A true Stationary engine owner

- Posts : 152
Join date : 2013-01-27
 Re: Nutgone goes all Lister! (Lister A tank cooled project).
I wouldn't worry too much, looks like I've been making up for lost time 
I've been doing a little bit more tonight. I was in the workshop (nothing on TV as usual) wondering what to do when I saw the big tray of bits to be washed, so I thought I'd better get cracking.
First lot through the parts wash (it's all been rinsed with brake & clutch cleaner, which dries off all traces of oil, which is why everything looks a bit rusty. For some of these bits this will be enough, but for most this is just the beginning)....

I did a load more after that, now most of the really small stuff is done (see, didn't hurt. One evening out there, by 10:15pm it was done), but there's still the crank case & the various plates to clean, & I'm sure there's a few more small bits in a box, but I chose to ignore that for tonight .
.
Now I've got another little problem (not bad going really, it's just this & the piston I'm stuck on, & the piston is looking better). One of the valve plugs, from the head, contains the spark plug. The problem I've got is there is part of the spark plug still in there & it won't come out. It's the bottom half of an old detachable plug, & it's really well in there. Here's some pics (it did have 3 earth electrodes, but I've since drilled through those with my biggest drill bit, which is a 13mm, I think)....
Top....

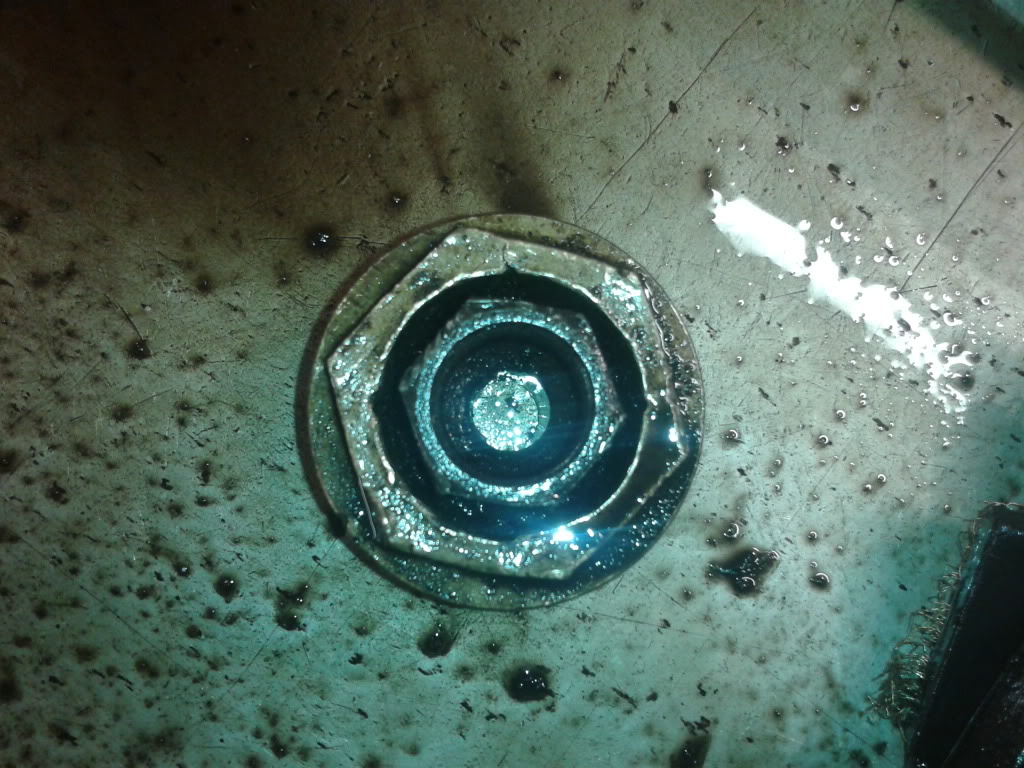
Bottom....
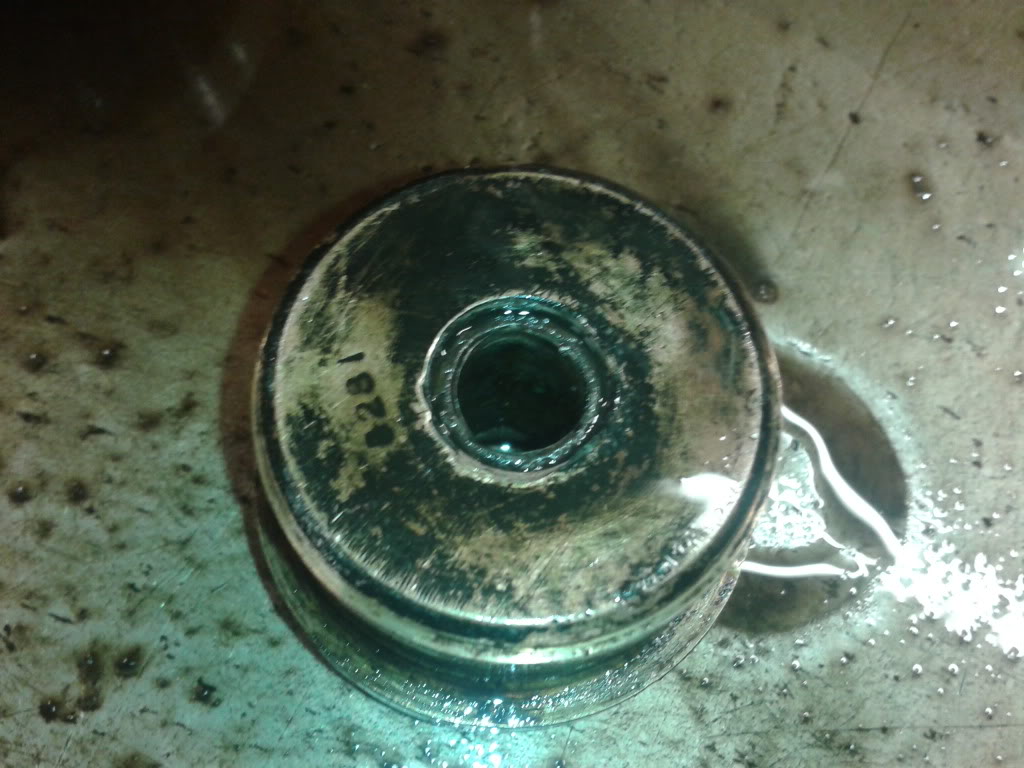
It's not the easiest thing to get a socket on & my sockets are just too thick walled to slip down in there (I have 2 though, so might grind one down a bit on the bench grinder), but I have had a socket on there, with a long bar (about 3' long I think, it's a big bar anyway), but I couldn't get it to budge.
Like I said, I passed a 13mm drill down through it, but I'm not sure what I was hoping to achieve. I would like to drill it so the wall of the threaded part goes really thin, then perhaps go from there, but my drills run out at 13mm. Maybe I should order a bigger one, I dunno, I don't want to damage the threads & drilling is really a last resort with these things I reckon. I suppose if it did become damaged I could bore it out & make up a threaded sleeve to go in there, but I'd rather it didn't come to that. Not sure I can get a hacksaw blade in there either, maybe a junior hacksaw blade, but they're pretty useless, & again I'd need to be careful not to damage the threads.
For now I've got it soaking in my easing solution after cleaning out as much crud as I could, to give it half a chance.
Any ideas???
I've been doing a little bit more tonight. I was in the workshop (nothing on TV as usual) wondering what to do when I saw the big tray of bits to be washed, so I thought I'd better get cracking.
First lot through the parts wash (it's all been rinsed with brake & clutch cleaner, which dries off all traces of oil, which is why everything looks a bit rusty. For some of these bits this will be enough, but for most this is just the beginning)....

I did a load more after that, now most of the really small stuff is done (see, didn't hurt. One evening out there, by 10:15pm it was done), but there's still the crank case & the various plates to clean, & I'm sure there's a few more small bits in a box, but I chose to ignore that for tonight
Now I've got another little problem (not bad going really, it's just this & the piston I'm stuck on, & the piston is looking better). One of the valve plugs, from the head, contains the spark plug. The problem I've got is there is part of the spark plug still in there & it won't come out. It's the bottom half of an old detachable plug, & it's really well in there. Here's some pics (it did have 3 earth electrodes, but I've since drilled through those with my biggest drill bit, which is a 13mm, I think)....
Top....


Bottom....

It's not the easiest thing to get a socket on & my sockets are just too thick walled to slip down in there (I have 2 though, so might grind one down a bit on the bench grinder), but I have had a socket on there, with a long bar (about 3' long I think, it's a big bar anyway), but I couldn't get it to budge.
Like I said, I passed a 13mm drill down through it, but I'm not sure what I was hoping to achieve. I would like to drill it so the wall of the threaded part goes really thin, then perhaps go from there, but my drills run out at 13mm. Maybe I should order a bigger one, I dunno, I don't want to damage the threads & drilling is really a last resort with these things I reckon. I suppose if it did become damaged I could bore it out & make up a threaded sleeve to go in there, but I'd rather it didn't come to that. Not sure I can get a hacksaw blade in there either, maybe a junior hacksaw blade, but they're pretty useless, & again I'd need to be careful not to damage the threads.
For now I've got it soaking in my easing solution after cleaning out as much crud as I could, to give it half a chance.
Any ideas???
_________________
The "F" key is dying on my computer, please remember this when reading my posts, I'm trying to avoid using it.
The name's Matt, but call me Nutts if you like, there's already enough Matt's about.

nutgone- Life Member

- Posts : 2356
Join date : 2012-07-04
Age : 45
Location : East Sussex
 Re: Nutgone goes all Lister! (Lister A tank cooled project).
clean it off, stick it in a bag, box it and post it to me, I can get it out 
Oh and I love the way you call cat litter "wood based absorbent granules" lol
lol
Oh and I love the way you call cat litter "wood based absorbent granules"
_________________
The garage is my workshop, my den and my peace haven.
They say if you can pee you can paint, my mother always said my aim in that department was crap.

blackvanman- Life Member

- Posts : 935
Join date : 2012-06-17
Location : Southampton
 Re: Nutgone goes all Lister! (Lister A tank cooled project).
get the welder out and weld a bit of bar on, the heat will help loosen it and the bar gives you something to grip.
_________________
Tony Simons
York
www.tonysimons.me.uk
1913 Hornsby L Type 8HP, 1926 Blackstone 5HP, 1927 Lister D 'Shafty', 1940 Stuart Turner P5LY generating set, 1944 Ruston Hornsby 6PB, 1945 Wolseley WD2, 1946 Norman SC, 1971 Rover 2000 auto, 1990 VW T4 camper, 2002 Land Rover Discovery TD5 Auto, 2005 Volvo S60 auto.
 Re: Nutgone goes all Lister! (Lister A tank cooled project).
Hmm, a couple of good replies there. I keep forgetting I've got a welder (  ) but I'm not sure what I've got in the way of metal stock (not a lot, that I can be sure of). Metal stock is one of my biggest problems here, years ago I had a shed full of junk with bits & bobs all over the place, now I've got a small plastic tub which I throw odd bits of scrap off various engines etc. into.
Andy, thanks for the offer. I may well be taking you up on it.
The big brass bung isn't the easiest thing to hold in the vice either.
Andy, thanks for the offer. I may well be taking you up on it.
The big brass bung isn't the easiest thing to hold in the vice either.
_________________
The "F" key is dying on my computer, please remember this when reading my posts, I'm trying to avoid using it.
The name's Matt, but call me Nutts if you like, there's already enough Matt's about.

nutgone- Life Member

- Posts : 2356
Join date : 2012-07-04
Age : 45
Location : East Sussex
 Re: Nutgone goes all Lister! (Lister A tank cooled project).
nutgone wrote:Hmm, a couple of good replies there. I keep forgetting I've got a welder () but I'm not sure what I've got in the way of metal stock (not a lot, that I can be sure of). Metal stock is one of my biggest problems here, years ago I had a shed full of junk with bits & bobs all over the place, now I've got a small plastic tub which I throw odd bits of scrap off various engines etc. into.
Andy, thanks for the offer. I may well be taking you up on it.
The big brass bung isn't the easiest thing to hold in the vice either.
yep, have a way, Mohamed and mountains
_________________
The garage is my workshop, my den and my peace haven.
They say if you can pee you can paint, my mother always said my aim in that department was crap.

blackvanman- Life Member

- Posts : 935
Join date : 2012-06-17
Location : Southampton
 Re: Nutgone goes all Lister! (Lister A tank cooled project).
Stamford24 wrote:nutgone wrote:Not my fault Stu, I was itching to get back to the engines, but me being the polite little soul I am I just couldn't ask them to leave!:angel1:
I see it all now!
....I'll remember not to gabble on too much next time
Don't want to be accused of holding up the forum
When you were at Matt's was he itching to get back to his engines? I some how picture him trying work and talk at the same time as if nothing is unusual about it. He seems the type you need to tie down to stop him working
Stu.
Guest- Guest
 Re: Nutgone goes all Lister! (Lister A tank cooled project).
Well it didn't come across like that, I think Matt enjoyed the chat and was able to converse with like minded souls.
'All work and no play makes Johnnie a dull boy'
I am very impressed though with the speed of work and commitment he puts in. These engines are not slapped together I can assure you and I've seen some right rubbish on the rallyfield over the years.
'All work and no play makes Johnnie a dull boy'
I am very impressed though with the speed of work and commitment he puts in. These engines are not slapped together I can assure you and I've seen some right rubbish on the rallyfield over the years.
Stamford24- A true Stationary engine owner

- Posts : 152
Join date : 2013-01-27
 Re: Nutgone goes all Lister! (Lister A tank cooled project).
_________________
The "F" key is dying on my computer, please remember this when reading my posts, I'm trying to avoid using it.
The name's Matt, but call me Nutts if you like, there's already enough Matt's about.

nutgone- Life Member

- Posts : 2356
Join date : 2012-07-04
Age : 45
Location : East Sussex
 Re: Nutgone goes all Lister! (Lister A tank cooled project).
Oh yes, very quickly (as I've got a hospital appointment which I must keep), this morning I managed to get that pesky piece o spark plug out o the valve cap thingy.
I took pictures as I went along (there's confidence or you) & will explain later how I did it.
I've also done a bit more parts washing & managed to snap the end off one of the throttle control rods (
 ), but I should be able to repair that & still keep some form of adjustment on it.
I took pictures as I went along (there's confidence or you) & will explain later how I did it.
I've also done a bit more parts washing & managed to snap the end off one of the throttle control rods (
_________________
The "F" key is dying on my computer, please remember this when reading my posts, I'm trying to avoid using it.
The name's Matt, but call me Nutts if you like, there's already enough Matt's about.

nutgone- Life Member

- Posts : 2356
Join date : 2012-07-04
Age : 45
Location : East Sussex
 Re: Nutgone goes all Lister! (Lister A tank cooled project).
nutgone wrote:Oh yes, very quickly (as I've got a hospital appointment which I must keep), this morning I managed to get that pesky piece o spark plug out o the valve cap thingy.
I took pictures as I went along (there's confidence or you) & will explain later how I did it.
I've also done a bit more parts washing & managed to snap the end off one of the throttle control rods (
), but I should be able to repair that & still keep some form of adjustment on it.
I have some throttle rod spares in my box o bits nutts .
matt

matt86- Admin
- Posts : 5577
Join date : 2011-03-29
Age : 38
Location : swindon/ faringdon
 Re: Nutgone goes all Lister! (Lister A tank cooled project).
Right, so to remove the spark plug I started off by cleaning up the valve cap as best I could, then put it on a piece of bar, which was stuck in the vice. This was so I could heat it up with the blow lamp....
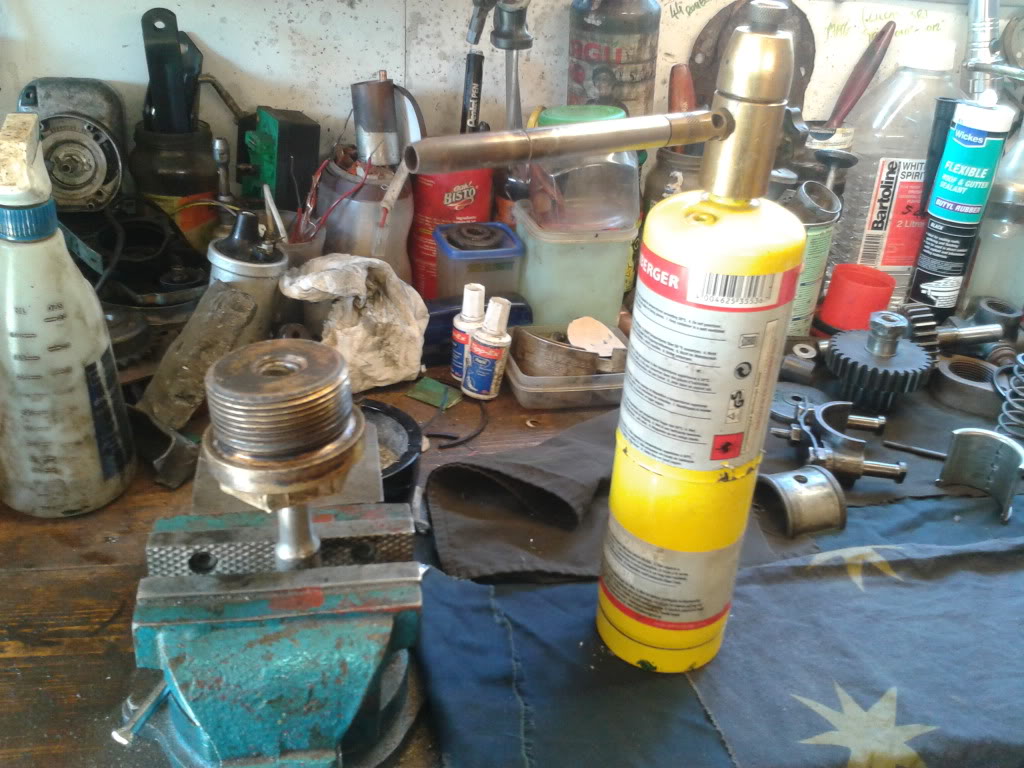
Then I found myself a 9/16 Whitworth socket & shaved off a bit from the outer wall on the bench grinder, so it would slip down beside the remains of the spark plug....
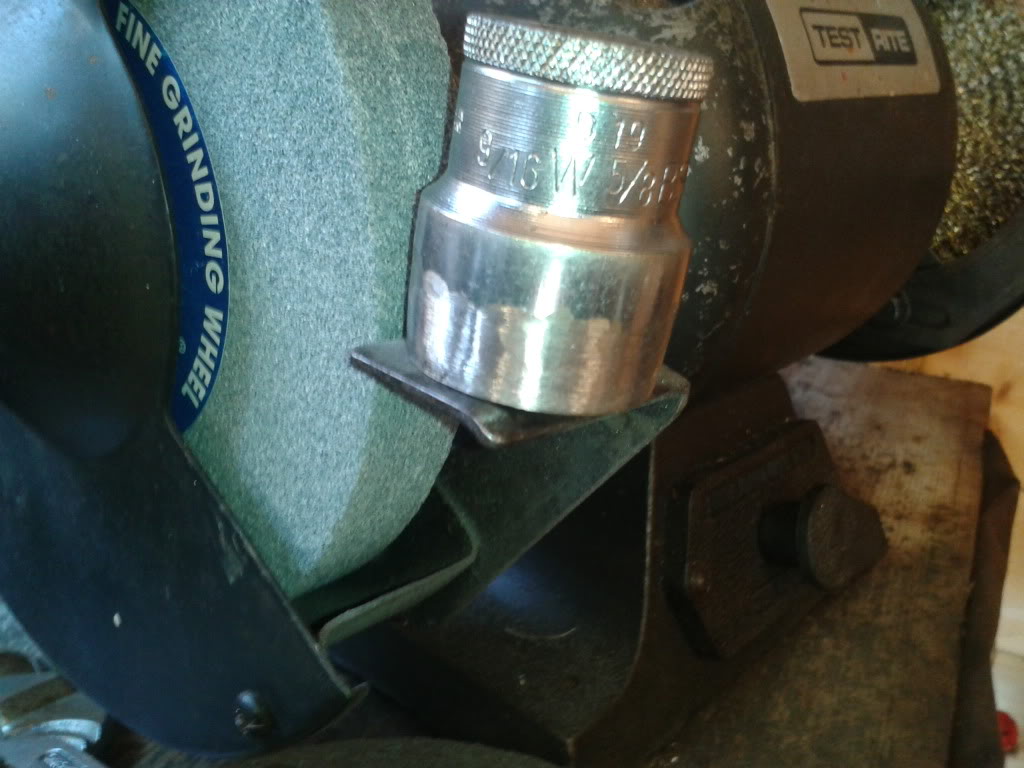
After heating the brass plug (I could see some of the left over easing oil bubbling up through the threads) & letting it cool slightly I applied some more easing oil (whilst it was still hot, but not so hot as to ignite the easing oil) to get it down in there, then I secured the brass plug in the vice (handling it carefully, as it was still hot) & I took my long 1/2" drive bar to it....

I had to secure the nut flats of the plug in the vice sideways, with the left over spark plug facing into the jaws. I got the socket on there & gave it a few tugs from the end of the bar (for best leverage). It started to move, but looking at the other end I couldn't see corresponding movement, so it was obviously twisting in there, although it was moving a little. This was where I realised it was a mistake to pass the 13mm drill through there yesterday, as I had undoubtedly weakened it.
I carried on with jerky movements (always better than a long straight pull on something) & sure enough it started to move. Eventually it came out....

I'm glad it was a long bodied plug, if it had been the usual 8COM I doubt I would've got the socket down in there.
Now I just need to get a thread chaser to clean it up a bit. It might be fine, but I prefer my spark plugs to go in & out easily, with no stiff spots. That way you know they're in without having to over-tighten them.

Then I found myself a 9/16 Whitworth socket & shaved off a bit from the outer wall on the bench grinder, so it would slip down beside the remains of the spark plug....

After heating the brass plug (I could see some of the left over easing oil bubbling up through the threads) & letting it cool slightly I applied some more easing oil (whilst it was still hot, but not so hot as to ignite the easing oil) to get it down in there, then I secured the brass plug in the vice (handling it carefully, as it was still hot) & I took my long 1/2" drive bar to it....

I had to secure the nut flats of the plug in the vice sideways, with the left over spark plug facing into the jaws. I got the socket on there & gave it a few tugs from the end of the bar (for best leverage). It started to move, but looking at the other end I couldn't see corresponding movement, so it was obviously twisting in there, although it was moving a little. This was where I realised it was a mistake to pass the 13mm drill through there yesterday, as I had undoubtedly weakened it.
I carried on with jerky movements (always better than a long straight pull on something) & sure enough it started to move. Eventually it came out....

I'm glad it was a long bodied plug, if it had been the usual 8COM I doubt I would've got the socket down in there.
Now I just need to get a thread chaser to clean it up a bit. It might be fine, but I prefer my spark plugs to go in & out easily, with no stiff spots. That way you know they're in without having to over-tighten them.
_________________
The "F" key is dying on my computer, please remember this when reading my posts, I'm trying to avoid using it.
The name's Matt, but call me Nutts if you like, there's already enough Matt's about.

nutgone- Life Member

- Posts : 2356
Join date : 2012-07-04
Age : 45
Location : East Sussex
 Re: Nutgone goes all Lister! (Lister A tank cooled project).
matt86 wrote:
I have some throttle rod spares in my box o bits nutts .
matt
Cheers Matt, I will post up a pic of what I've broken. I started to drill down into it with the idea of joining the 2 bits with some M3.5 screw stud, I was doing really well until I snapped a 2mm drill bit in there! Obviously it won't just tap out & is broken well below the surface, so it will probably need to be welded, unless I can find suitable replacement.
I'll take some pics tonight.
_________________
The "F" key is dying on my computer, please remember this when reading my posts, I'm trying to avoid using it.
The name's Matt, but call me Nutts if you like, there's already enough Matt's about.

nutgone- Life Member

- Posts : 2356
Join date : 2012-07-04
Age : 45
Location : East Sussex
 Re: Nutgone goes all Lister! (Lister A tank cooled project).
Here's some details on the bit I've broken (don't know why I messed with it really, but it went so easy I couldn't believe it!  ).
).
It appears to be the shortest of the throttle control rods. It's the final rod in the linkage, which connects to the throttle slide plate. Trouble is not only would I need the rod, I would also need the end which connects to the throttle slide (it's just the same as all the other rod ends, so nothing special, but the one I have has got part of a 2mm drill stuck inside it)!
Here's a pic of the rod, laid out with the end pieces & the throttle slide....

Here's the bit that's broken....

& here's the ends. You can see where I've started to drill, originally just in the rod end piece to try & get the piece of rod out with an easy-out, but then in both halves to try & cut a 3.5mm thread & join them together as I realised the broken piece of rod was not going to come out. But the drill snapped off in there, so then I cleaned them both up ready for welding....

The thread on the other end is still fine, so if I did have to weld it there would still be plenty of scope for throttle adjustment in the future. So if it can't be replaced, it's not the end of the world.
Also I've been busy again tonight cleaning up more of the small bits & bobs, & some of the not so small pieces....

Apart from a few nuts & bolts left in the crank case that's about all the small bits done. I've got the mag chain soaking, but I think it will need a new one. Also the piston is still soaking, but it's slowly easing off a bit, & I've still got to clean out the carb.
Talking of the carb, I've had one go at it & managed to remove the pipe unions, but are there any special tricks to getting inside & giving it a really good clean??? I'm thinking about making up one of those electrolysis tanks to remove rust but not attack the metal, I can't see any other way of getting right in there to clean & de-rust it. I suppose it'll still work & most people just do their best. Maybe I'm being a bit too picky???
It appears to be the shortest of the throttle control rods. It's the final rod in the linkage, which connects to the throttle slide plate. Trouble is not only would I need the rod, I would also need the end which connects to the throttle slide (it's just the same as all the other rod ends, so nothing special, but the one I have has got part of a 2mm drill stuck inside it)!
Here's a pic of the rod, laid out with the end pieces & the throttle slide....

Here's the bit that's broken....

& here's the ends. You can see where I've started to drill, originally just in the rod end piece to try & get the piece of rod out with an easy-out, but then in both halves to try & cut a 3.5mm thread & join them together as I realised the broken piece of rod was not going to come out. But the drill snapped off in there, so then I cleaned them both up ready for welding....

The thread on the other end is still fine, so if I did have to weld it there would still be plenty of scope for throttle adjustment in the future. So if it can't be replaced, it's not the end of the world.
Also I've been busy again tonight cleaning up more of the small bits & bobs, & some of the not so small pieces....

Apart from a few nuts & bolts left in the crank case that's about all the small bits done. I've got the mag chain soaking, but I think it will need a new one. Also the piston is still soaking, but it's slowly easing off a bit, & I've still got to clean out the carb.
Talking of the carb, I've had one go at it & managed to remove the pipe unions, but are there any special tricks to getting inside & giving it a really good clean??? I'm thinking about making up one of those electrolysis tanks to remove rust but not attack the metal, I can't see any other way of getting right in there to clean & de-rust it. I suppose it'll still work & most people just do their best. Maybe I'm being a bit too picky???
_________________
The "F" key is dying on my computer, please remember this when reading my posts, I'm trying to avoid using it.
The name's Matt, but call me Nutts if you like, there's already enough Matt's about.

nutgone- Life Member

- Posts : 2356
Join date : 2012-07-04
Age : 45
Location : East Sussex
 Re: Nutgone goes all Lister! (Lister A tank cooled project).
I think i can help you out there with the slide rod il have a dig around in sheds ... Those rods are allways a nightmare 1 of the joints snapped off on the D type ... there so delicate its easy to snap them ... at least they can be made or obtained easy enough .
matt
matt

matt86- Admin
- Posts : 5577
Join date : 2011-03-29
Age : 38
Location : swindon/ faringdon
 Re: Nutgone goes all Lister! (Lister A tank cooled project).
well done mate that's almost what I was going to do, but I was going to mig a bit of flat bar onto the spark plug to hold in the vice, then fully warm the brass plug and unscrew it. 
_________________
The garage is my workshop, my den and my peace haven.
They say if you can pee you can paint, my mother always said my aim in that department was crap.

blackvanman- Life Member

- Posts : 935
Join date : 2012-06-17
Location : Southampton
Page 3 of 6 •  1, 2, 3, 4, 5, 6
 Similar topics
» Lister B tank cooled make over
» My Lister Junior B tank cooled
» Lister D project next
» LISTER D CAD PROJECT
» Lister d petrol paraffin rad cooled
» My Lister Junior B tank cooled
» Lister D project next
» LISTER D CAD PROJECT
» Lister d petrol paraffin rad cooled
Page 3 of 6
Permissions in this forum:
You cannot reply to topics in this forum
