
WW2 US Army Homelite Generating Set
Page 4 of 5 •  1, 2, 3, 4, 5
 ![]()
Re: WW2 US Army Homelite Generating Set
![]() by Guest Wed Dec 12 2012, 12:56
by Guest Wed Dec 12 2012, 12:56
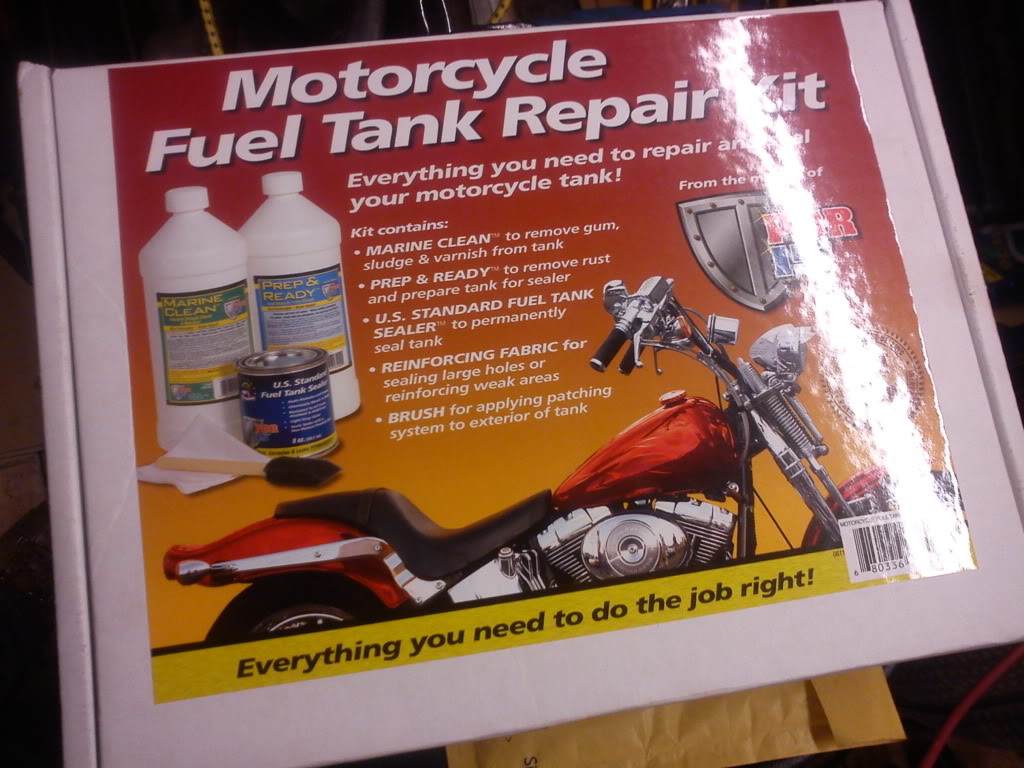
The tin does contradict itself about not using once opened, if your going to try and keep some put some shrink wrap on the top before the lid goes on then turn it upside down to get a good seal.
Stu.
Guest- Guest
Re: WW2 US Army Homelite Generating Set
![]() by nutgone Wed Dec 12 2012, 13:50
by nutgone Wed Dec 12 2012, 13:50
_________________
The "F" key is dying on my computer, please remember this when reading my posts, I'm trying to avoid using it.
The name's Matt, but call me Nutts if you like, there's already enough Matt's about.

nutgone- Life Member

- Posts : 2356
Join date : 2012-07-04
Age : 44
Location : East Sussex
Re: WW2 US Army Homelite Generating Set
![]() by nutgone Sat Dec 15 2012, 12:06
by nutgone Sat Dec 15 2012, 12:06
Once the Scott's back together & I've 2nd coated Ian's Stuart Turner I can crack on with this. I might begin the process of de=greasing the tank this weekend, as I'm going to get stuck with the Scott waiting for the new governor bearing to arrive, & I want to leave Ian's Stuart until at least Tuesday before re-coating, that will have given it a whole week to go off, so I can rub it down for the 2nd coat. I could have this tank de-greased, rust-treated & drying while I paint the Stuart, ready for tank sealing once that's done.
Well, that's one plan anyway.
_________________
The "F" key is dying on my computer, please remember this when reading my posts, I'm trying to avoid using it.
The name's Matt, but call me Nutts if you like, there's already enough Matt's about.
nutgone- Life Member
- Posts : 2356
Join date : 2012-07-04
Age : 44
Location : East Sussex
Re: WW2 US Army Homelite Generating Set
![]() by Guest Sat Dec 15 2012, 12:23
by Guest Sat Dec 15 2012, 12:23
Good luck with the tank repair.
Stu.
Guest- Guest
Re: WW2 US Army Homelite Generating Set
![]() by nutgone Mon Dec 17 2012, 21:54
by nutgone Mon Dec 17 2012, 21:54
I de-greased the Homelite & Briggs tanks together but the acid-etch rust eater "Prep & Ready" needs to be done separately, so I did the Homelite tank first & dried it with a heat gun whilst doing the Briggs tank.
I blew the heat gun into the tank several times, until it was too hot to touch. It was at this point I decided it was fully dry & thought I might as well have a go at the sealing.
So I put the heat gun on it one more time whilst I rinsed out the Briggs tank & turned up the heater in the workshop to get the ambient temperature up a bit. With the tank still slightly warm I applied the sealer.
Blimey it's messy stuff. I've managed to get some on my hands, so I guess that'll still be there well into the new year. It managed to find a couple of pin-holes, which I patched up on the outside as well with the patching kit, although it claims these will be sealed anyway, I thought a belt & braces approach was best.
I didn't quite manage to get it all out, there was a very small pool of it left, but it wasn't much. I will give it extra drying time to compensate for this.
I've cleared all the threads & removed all the bungs. I've also blown through the breather pipes. The instructions say to give it 4 days to dry, but I plan to give it more like 2 weeks, probably more, before I put fuel in. I can start to reassemble the engine after the 4 days though, as there's quite a bit to remember & it's been a long time.
_________________
The "F" key is dying on my computer, please remember this when reading my posts, I'm trying to avoid using it.
The name's Matt, but call me Nutts if you like, there's already enough Matt's about.
nutgone- Life Member
- Posts : 2356
Join date : 2012-07-04
Age : 44
Location : East Sussex
Re: WW2 US Army Homelite Generating Set
![]() by Guest Tue Dec 18 2012, 12:03
by Guest Tue Dec 18 2012, 12:03
Stu.
Guest- Guest
Re: WW2 US Army Homelite Generating Set
![]() by nutgone Tue Dec 18 2012, 19:01
by nutgone Tue Dec 18 2012, 19:01
Sealer tin was pretty well damaged getting the lid off last night (I think that's their plan) so it wouldn't seal again, even with some cling-film, so I put the remainder in a plastic container, covered with cling=film before snapping on the tight fitting lid. It was still fine this evening when I did the Briggs tank, so I've put the remainder back in & re-sealed it. Will probably use the rest to seal/line one of my old petrol cans, see how far it will stretch (Ian & me have got 3 old 2-gallon cans to sort out between us).
Anyway, all looking good so far.
_________________
The "F" key is dying on my computer, please remember this when reading my posts, I'm trying to avoid using it.
The name's Matt, but call me Nutts if you like, there's already enough Matt's about.
nutgone- Life Member
- Posts : 2356
Join date : 2012-07-04
Age : 44
Location : East Sussex
Re: WW2 US Army Homelite Generating Set
![]() by Guest Wed Dec 19 2012, 12:05
by Guest Wed Dec 19 2012, 12:05
Stu.
Guest- Guest
Re: WW2 US Army Homelite Generating Set
![]() by nutgone Mon Dec 24 2012, 23:41
by nutgone Mon Dec 24 2012, 23:41
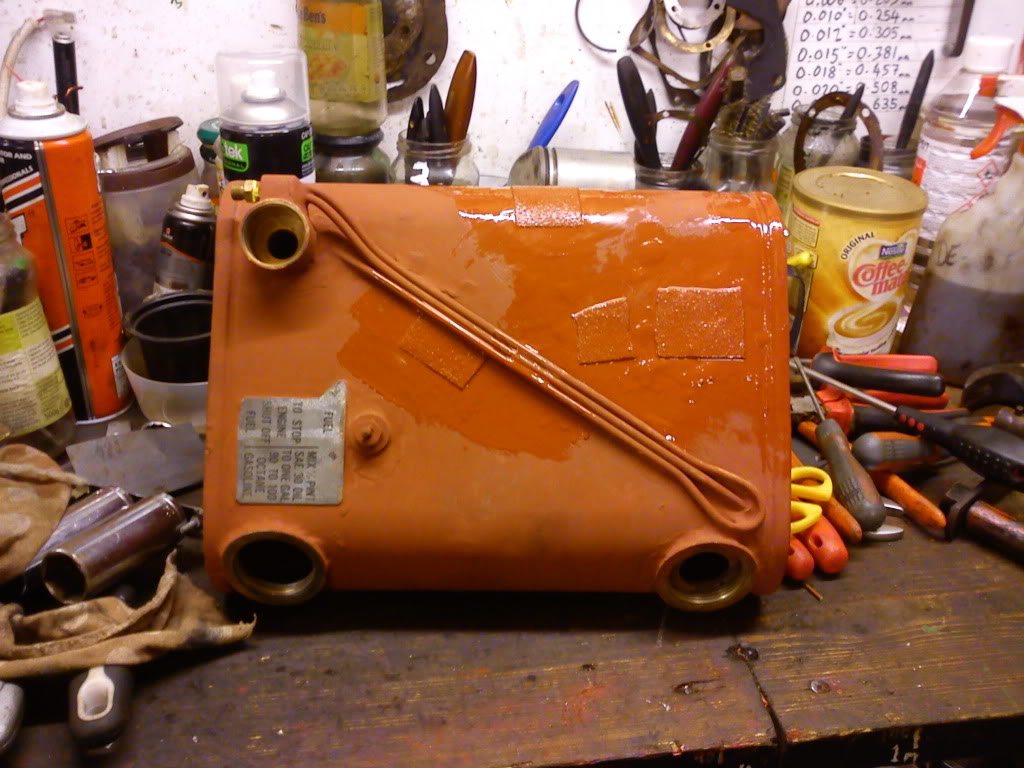
I was a bit concerned it wouldn't stick to the external sealer as I'd heard paint doesn't bond well to it, but this Teamac red-oxide primer seems to stick to most things like the proverbial wotsit to a blanket.
I'm thinking about putting this one to the top of my list, as I'm trying to get runners sorted ready for next season & so far all we have is my Scott. This one is so close it won't take much more work now to be done, I've even sourced some paint for it.
Even if it had to stay on the wooden skids for now, they could still be made to look nice, & it'll be another "runner" ready for the spring.
I can still be getting on with other projects, as there are always gaps in these things, like waiting for materials to harden (builder's best excuse) or waiting for parts to arrive, so I can still be moving other projects along, but I feel the need to prioritise. It wouldn't even be that hard to make up a proper pair of skids like the originals, we've got some of the materials already, the rest can be sourced easy enough.
_________________
The "F" key is dying on my computer, please remember this when reading my posts, I'm trying to avoid using it.
The name's Matt, but call me Nutts if you like, there's already enough Matt's about.
nutgone- Life Member
- Posts : 2356
Join date : 2012-07-04
Age : 44
Location : East Sussex
Re: WW2 US Army Homelite Generating Set
![]() by nutgone Fri Dec 28 2012, 23:37
by nutgone Fri Dec 28 2012, 23:37
I'm currently waiting for some "classic" oil to arrive. I've ordered some straight sae:30 non-detergent oil to mix with a gallon of petrol, as I'm told that these engines don't like running on modern 2 stroke oils & will only run satisfactorily on the original 16:1 petrol-to-sae:30 oil mixture.
I'd already cleaned the carb & put it back together last night. I started today by taking the exhaust off, with a view to wire brushing it & giving it a coat of Kurust (it's a good high-temp black coating & also a good rust inhibitor), but I never got that done, as it was then I decided I would have a go with the 2 stroke mix I've already got.
By then I also had the barrel off (after the mistake I made with my Tarpen I wanted to be sure the piston was on the right way round. Of course it was, as this one wouldn't run at all if it wasn't (it's a ported piston, so will only function the right way round). Still, it's always good to check these things. The ring gaps had moved round & were almost meeting, & I finally managed to get the spark plug adapter out. I wasn't 100% sure it was an adapter, it was more of a hunch. I actually ended up taking out 2 adapters. it seems the hole in the blind head is a very big one, possibly 3/4", which carries a brass sleeve with the 18mm spark plug hole. It was into this that a 14mm adapter sleeve had been fitted at some point, & the only non-resistor 14mm long reach plug I had has ended up in my dad's Velocette. All my spare plugs are 18mm, so I'm glad to have finally opened that up.
Having the barrel off also gave me the opportunity to put the studs back into the block. You see, the nuts have rusted on & now 3 out of the 4 studs come out instead of staying in there. I know some people don't seem to mind this, when it happens, but it's one of my pet hates, I just can't stand it. I make a thorough job of cleaning up all the threads with a solvent cleaner & applying a little Loctite before locking 2 nuts onto the stud & screwing it firmly back where it belongs. I also clean up the exposed thread with a miniature wire brush & more cleaner & give it a smear of grease (as I do with pretty much all my threads during a restoration) so it doesn't happen again. I also treated one of the exhaust studs to the same treatment. It's just one of those things that gets to me. I like a stud to be a stud, not a bolt.
Anyway, I got the thing back together & put a gallon of this modern 2 stroke mix into the tank. I pumped the primer a few times & managed to find a (very short) piece of cord.
I think she fired up 2nd or 3rd pull, which was very surprising. I had blocked off the "float feed device" on the fuel tank, with a spare fuel tap, so the tank was sealed.
She ran OK, but didn't seem as fast as it should be. It must have run for a good 30 seconds at least, probably more like 1 or 2 minutes, then it began to falter & eventually stopped. When I opened the crank case drain tap a quantity of raw fuel drained out.
So, it's over fuelling. I have 2 possible reasons for this:
1) Maybe it's delivering fuel as it should, but the tank breather pipes (which I think could also be over-flow return pipes) are partially blocked due to the tank sealer (I can blow through them, but they are definitely partially obstructed by the sealer) & are not letting enough fuel back into the tank.
I'm not too sure about this theory, as I still don't think these pipes are an over flow system.
2) The primer system isn't working properly. I know there's a small spring missing from a ball valve there. Maybe it's just sucking raw fuel into the ports where it's ending up in the crank case?
This could be easily fixed. I can simply block off the primer system, but then I lose it, & it is quite helpful when starting from cold.
But, what if the crank case is supposed to have some petrol in there? There is, after all, the pipe union from there running back to the carb, feeding the "bubble lift" pump. Maybe this should take any extra fuel back to the carb?
Actually, that last bit is just stupid. I don't think any 2 stroke is designed to run with raw fuel sloshing around in the crank case.
I think I'm going to have to drain the tank & wait for my oil to arrive. I'll mix up some proper old fashioned 2 stroke, using the measuring cup on the filler cap & see if that's any better.
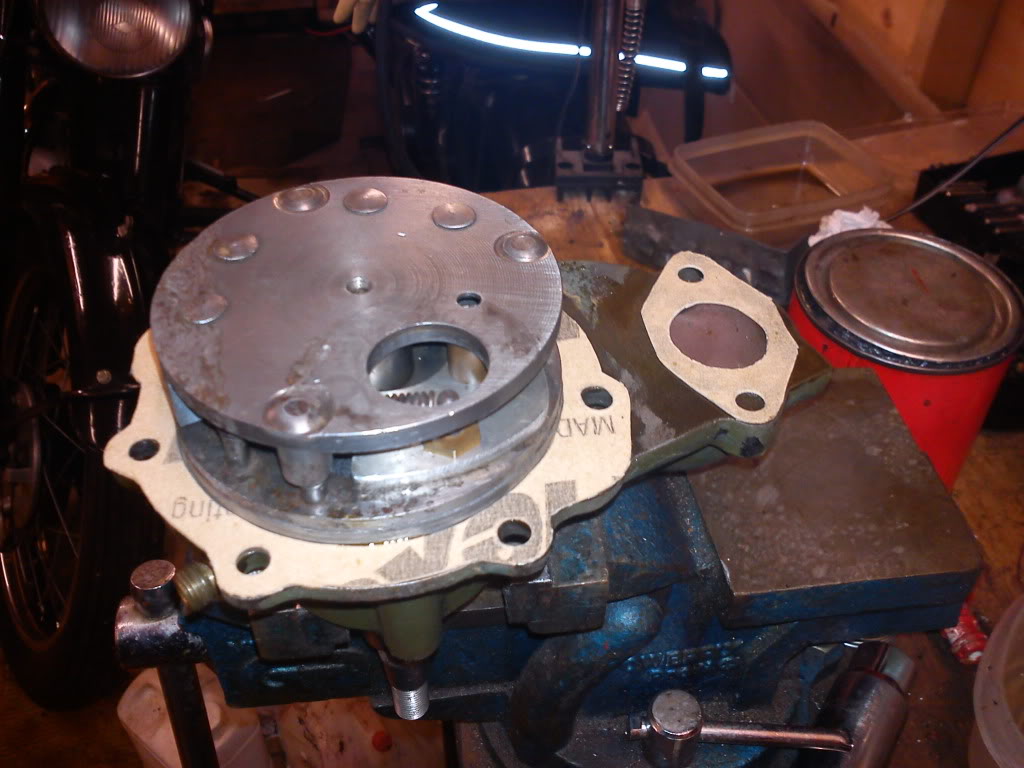
I did take the front end off the engine, just to have a look & see if everything was OK in there. The disc valve seems fine & the throttle governor is moving as it should. I've cleaned up the mag & put it all back together (I've forgotten to oil the pad for the points cam! Bugger!)
Anyway, I just hope something comes to light soon with this one. I would love to have it running properly. Tonight I have been playing with the electrical side of things. I lifted the brushes & stroked the terminals of a 12v battery onto the brush holders. I think I brushed the negative onto the side with the 2 capacitors on it (just so I remember it), hopefully I will be able to get the engine running long enough to do some testing.
_________________
The "F" key is dying on my computer, please remember this when reading my posts, I'm trying to avoid using it.
The name's Matt, but call me Nutts if you like, there's already enough Matt's about.
nutgone- Life Member
- Posts : 2356
Join date : 2012-07-04
Age : 44
Location : East Sussex
Re: WW2 US Army Homelite Generating Set
![]() by matt86 Fri Dec 28 2012, 23:54
by matt86 Fri Dec 28 2012, 23:54
with the over fueling problem If was me 1st thing to check is all pipes and breathers are clear and working as they should . Does the carb have diagram / gaskets like a modern 2 stoke carb in ???
Im sure a man of your wisdom will be able to sort it .
matt

matt86- Admin
- Posts : 5577
Join date : 2011-03-29
Age : 37
Location : swindon/ faringdon
Re: WW2 US Army Homelite Generating Set
![]() by Guest Sat Dec 29 2012, 12:31
by Guest Sat Dec 29 2012, 12:31
Stu.
Guest- Guest
Re: WW2 US Army Homelite Generating Set
![]() by nutgone Sat Dec 29 2012, 13:30
by nutgone Sat Dec 29 2012, 13:30
matt86 wrote:. Does the carb have diagram / gaskets like a modern 2 stoke carb in ???
matt
No, this one uses a "Bubble Lift" pump arrangement, which I'm told needs a certain amount of pressure. But it's not something I can regulate myself.
I've got a hunch I know what's wrong, but I'm fast running out of ideas again with this one. I suppose it's time I went back out there & had another go at it.
_________________
The "F" key is dying on my computer, please remember this when reading my posts, I'm trying to avoid using it.
The name's Matt, but call me Nutts if you like, there's already enough Matt's about.
nutgone- Life Member
- Posts : 2356
Join date : 2012-07-04
Age : 44
Location : East Sussex
Re: WW2 US Army Homelite Generating Set
![]() by nutgone Sat Dec 29 2012, 17:30
by nutgone Sat Dec 29 2012, 17:30
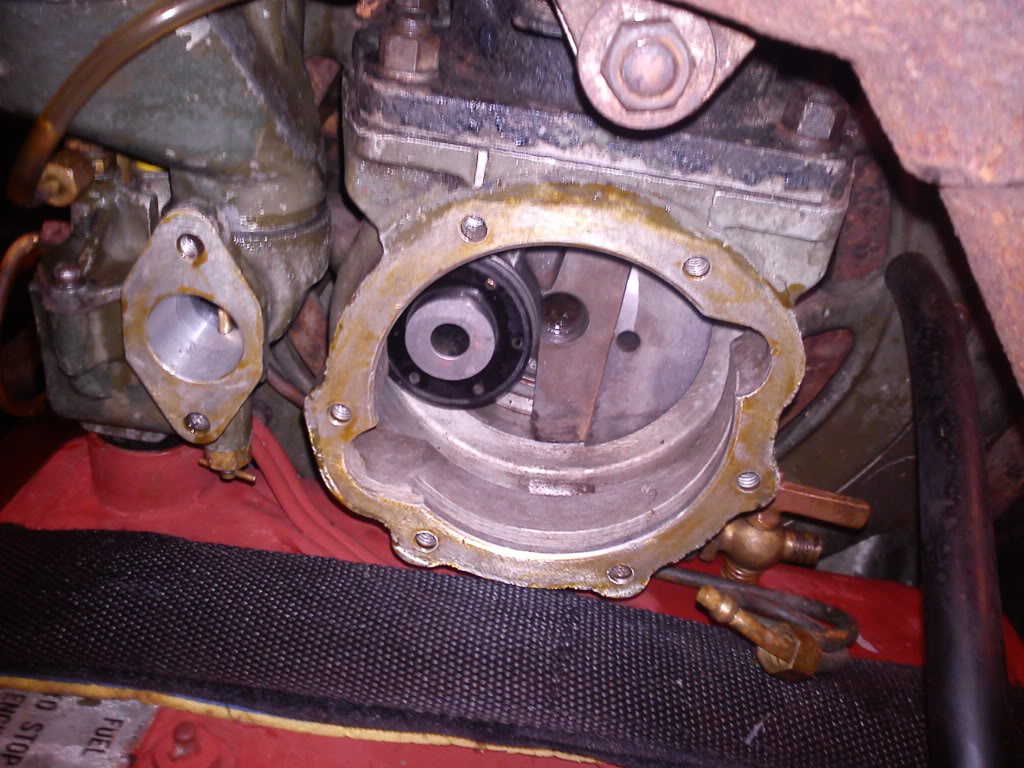
Anyway, today I decided to have another go with it. I managed to get it started again, without too much trouble.
Now, some time ago I had to replace a section of the primer pump tube, as the original brass one had broken. So I found some very small clear flexible plastic tubing which slides over the original 1/8" brass pipe (you can just make it out in the top left of the above picture). This is how I knew that the engine was sucking raw fuel straight into the intake ports. The trouble is there is a missing spring from the primer pump, this spring holds down the small ball bearing in the pump itself, there is another ball bearing with a small spring in the outlet section as well, but this still has it's tapered spring. The one that's missing is a stronger spring & I guess is there to stop the engine sucking fuel straight through the primer pump.
So, after I started the engine, I made sure it was running reasonably well & I bent the small flexible tube over to block it. This seemed to help the running & the engine continued to run well. I opened the crank case drain tap occasionally & very little fuel came out (it is possible to open it whilst running without stopping the engine).
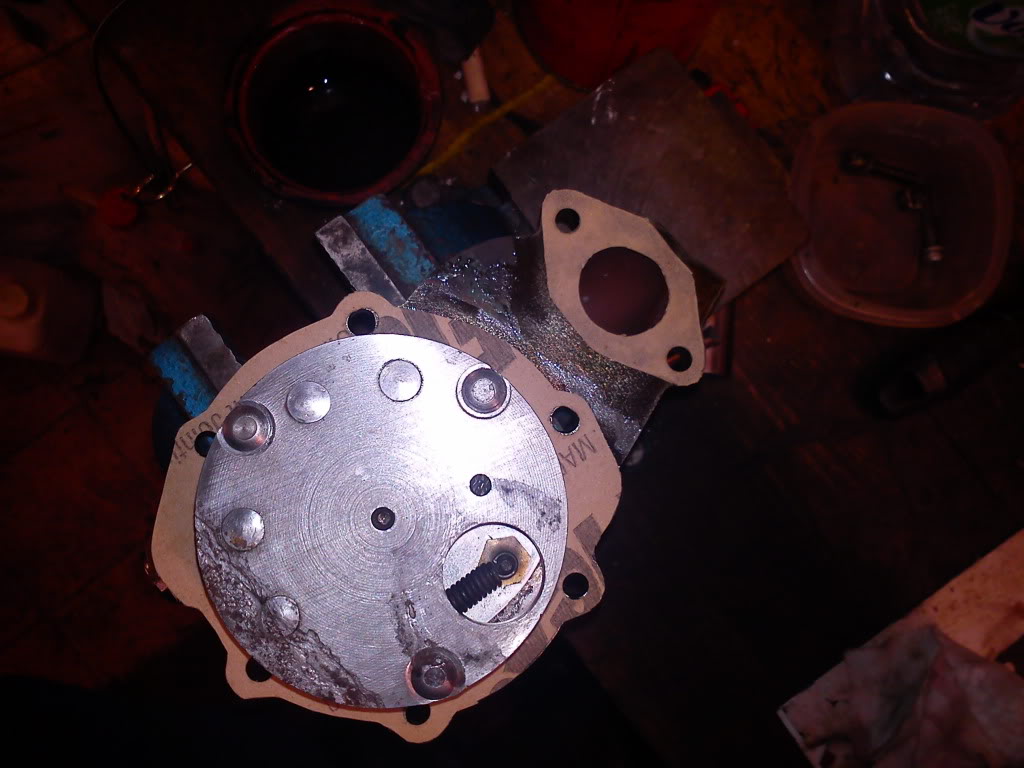
I then stopped the engine & decided to remove the primer pump tube. I took off the clear plastic tubing & removed the compression nuts from either end of the old brass pipe. I put a small ball bearing in each pipe union & did up the nuts, therefore blocking the pipe unions, like so (these are 1/8" pipe unions)....
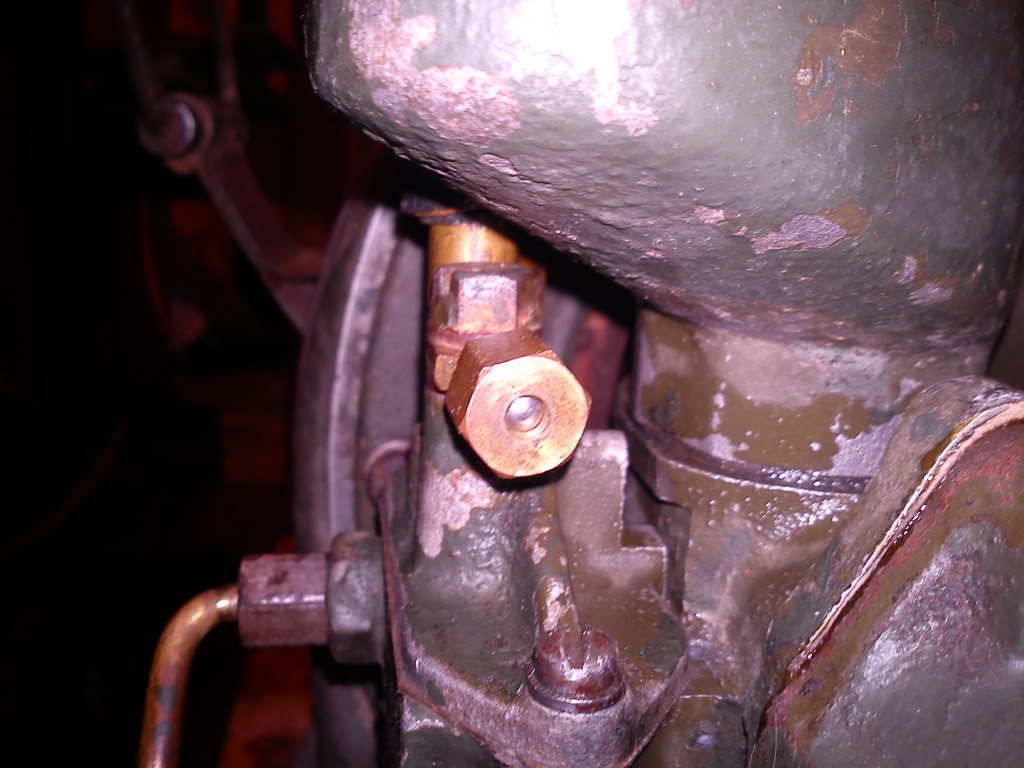
I started it again & she ran fine. Also, the adjustable needle jet on the carb now has a direct effect on the running of the engine. If I wind it right in the engine stops, as I wind it out it hunts on the governor, until the mixture gets stronger. Then, if I wind it out too far the engine starts to stall as the mixture is too strong. This all happens in about 2 or so full turns.
Anyway, I'm not counting my chickens just yet. I've now lost the primer pump, so cold starting could be an issue. I may have to rig something up with a small fuel tap in the line, so I can still use it.
Do they make 1/8" petrol taps???
_________________
The "F" key is dying on my computer, please remember this when reading my posts, I'm trying to avoid using it.
The name's Matt, but call me Nutts if you like, there's already enough Matt's about.
nutgone- Life Member
- Posts : 2356
Join date : 2012-07-04
Age : 44
Location : East Sussex
Re: WW2 US Army Homelite Generating Set
![]() by Guest Sun Dec 30 2012, 12:19
by Guest Sun Dec 30 2012, 12:19
Thing is you've sorted the running but I don't think you'll settle for the pipe being blanked off and you'll want to fix it so it's 100%.
Stu.
Guest- Guest
Re: WW2 US Army Homelite Generating Set
![]() by nutgone Sun Dec 30 2012, 14:28
by nutgone Sun Dec 30 2012, 14:28
So, although it now runs pretty well, it's not easy to start first thing. Once it's been started it fires up easy, but that first start is a bit of a b1tch.
I would like to reinstate the pipe, but it will need a tap on it. Trouble is it's 1/8" pipe (that's about 3mm diameter), so very small. However, I have found taps that small, they are used on model steam stuff (what they call "Live Steam" models). They are hand made, so not cheap, but not as expensive as you'd think, so I may well end up going down this route.
I've tried to replace the spring in the ball valve, it's a similar size to a biro pen spring, but it needs to be tapered or the ball won't lift. It's proving to be a very difficult spring to replace & I've even tried to wind my own, but all to no avail, so I think the steam valve/tap idea is going to be the only way, unless I think of something else.
Another way could be to make the primer pump deposit it's fuel straight into the carb float area (it's not actually a "float" chamber, this carb doesn't have a float), rather than straight into the ports (I believe the later carbs actually worked like this). This would also be quite simple, as the pump is built into the carb. I would only need to drill one small hole, in the top of the carb, & bond the small 1/8" pipe into that. If it didn't work then it would be simple enough to block the hole up again, it would also be cheaper than spending the best part of £20 on a tiny valve/tap thingy, & the engine wouldn't be able to "suck" excess fuel in this way, as there's no suction in this area.
Also, I've got the pipe union which goes into the ports. I could possibly make up some way of injecting fuel into this for cold starting without using the carb pump.
From what I've heard on SmokStak, these engines are prone to this, so even with the extra spring, it could possibly still suck extra fuel in through this primer pump system. It's one of the few parts of this engine which were modified in time. I've even been told not to bother using the Homelite carb & just to put some other carb on there instead.
I dunno what to do, I like the valve/tap idea, & I think it will look good (it'll make the engine look more complicated that it already is
At the moment I'm just using a small squirt of Easy-Start into the plug hole, which seems to work, but I don't like using the stuff on my engines.
_________________
The "F" key is dying on my computer, please remember this when reading my posts, I'm trying to avoid using it.
The name's Matt, but call me Nutts if you like, there's already enough Matt's about.
nutgone- Life Member
- Posts : 2356
Join date : 2012-07-04
Age : 44
Location : East Sussex
Re: WW2 US Army Homelite Generating Set
![]() by matt86 Sun Dec 30 2012, 21:59
by matt86 Sun Dec 30 2012, 21:59
matt
matt86- Admin
- Posts : 5577
Join date : 2011-03-29
Age : 37
Location : swindon/ faringdon
Re: WW2 US Army Homelite Generating Set
![]() by nutgone Mon Dec 31 2012, 00:16
by nutgone Mon Dec 31 2012, 00:16
I'm not so sure priming into the carb will have such a good effect. Also, this priming pump can act a little like a choke, adding more fuel straight into the ports when it's cold. The valve (as it's a valve & not a tap) is variable, so can be screwed in as the engine warms up.
It definitely needs something for the cold starting, I've used Easy Start 3 times now, I don't really want to keep using it, might have to dig out a small syringe & put fuel down the plug hole from now on, until I get the valve & pipe sorted.
_________________
The "F" key is dying on my computer, please remember this when reading my posts, I'm trying to avoid using it.
The name's Matt, but call me Nutts if you like, there's already enough Matt's about.
nutgone- Life Member
- Posts : 2356
Join date : 2012-07-04
Age : 44
Location : East Sussex
Re: WW2 US Army Homelite Generating Set
![]() by Guest Mon Dec 31 2012, 12:45
by Guest Mon Dec 31 2012, 12:45
Stu.
Guest- Guest
Re: WW2 US Army Homelite Generating Set
![]() by nutgone Mon Dec 31 2012, 12:54
by nutgone Mon Dec 31 2012, 12:54
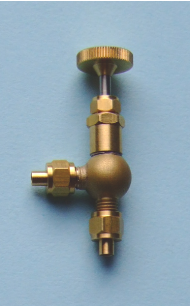
Right, it looks like we are going down the expensive route after all.
I have ordered one of these....
Some of this....
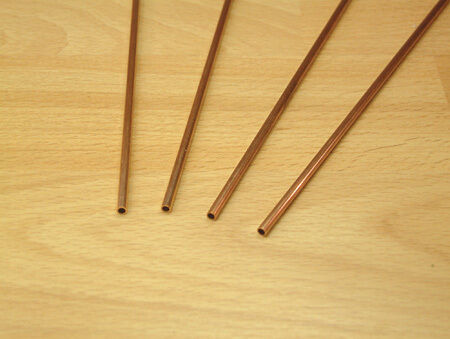
& some of these....
QE9s3HFcz,BQOMqNLsGQ~~60_35.JPG)
All together it's cost around £20, which I probably shouldn't be spending, but I want this thing finished & working properly.
All those bits are very small, the pipe is brass (not copper) like the original & is 1/8" OD (which is about 3mm), so it's all miniature stuff.
The valve is supplied with soldered on ferrules (soldered nipples) but may well work with olives instead, I'm not too fussed, I can solder just as well as slide an olive onto the pipe, it's just that the rest of the pipe unions are all olive compression fittings, so I would prefer to keep it all the same.
This valve will, hopefully, act like a choke for the engine. I will open it up before starting, give the primer pump a few strokes then start the engine, closing the valve as it warms up.
Let's hope it works.
_________________
The "F" key is dying on my computer, please remember this when reading my posts, I'm trying to avoid using it.
The name's Matt, but call me Nutts if you like, there's already enough Matt's about.
nutgone- Life Member
- Posts : 2356
Join date : 2012-07-04
Age : 44
Location : East Sussex
Re: WW2 US Army Homelite Generating Set
![]() by Guest Tue Jan 01 2013, 13:11
by Guest Tue Jan 01 2013, 13:11
Matt I would have thought the size of it you wouldn't be able to tell the olive type unless you were up close so I wouldn't be to bothered about changing them.
Stu.
Guest- Guest
Re: WW2 US Army Homelite Generating Set
![]() by nutgone Thu Jan 10 2013, 13:53
by nutgone Thu Jan 10 2013, 13:53
Got all the bits together (not happy with the pipe, the wall thickness is very thin, but I thought I would give it a go & try not to kink it)....
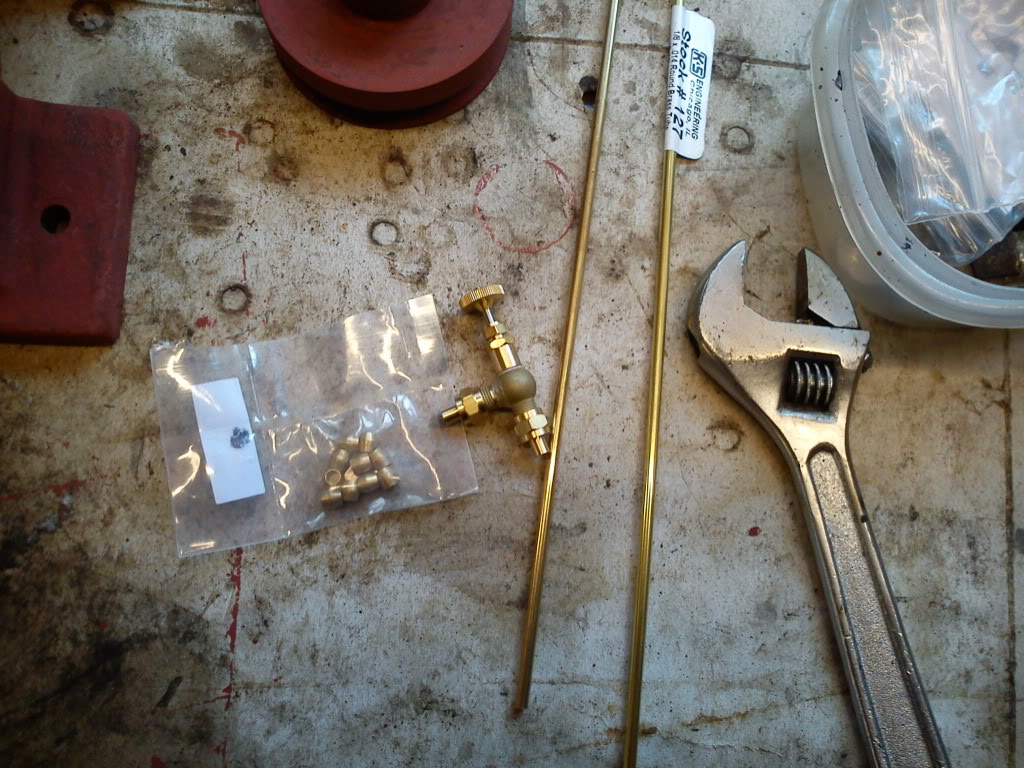
the valve is tiny....

I managed to get the S bend in the pipe without any major kinks, then cut off the ends to suit. I soldered the ferrules on & used the new olives on the engine connections. I left the main body of the carb in place so I would know my limits, but took the air cleaner & top cowling off to get at it all....

Air cleaner back on & here's how it looks all assembled....
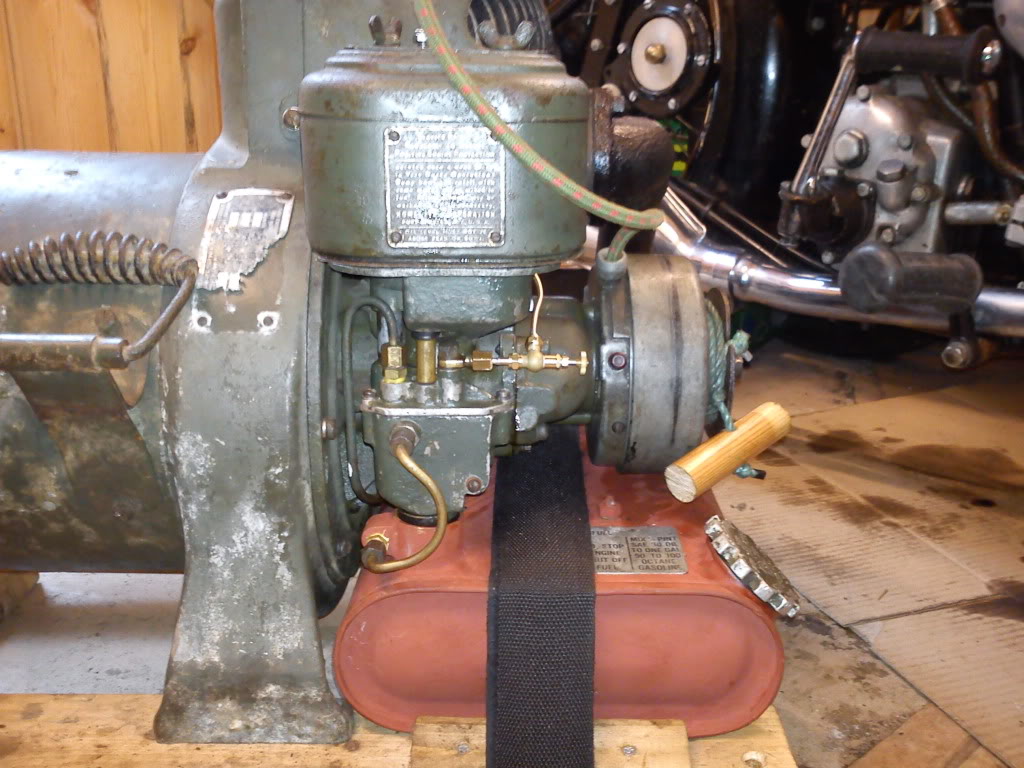


I think it looks quite neat & it doesn't get in the way. It seems to work well & does it's job nicely.
Just need to make up some replica spring mounted skids for it now & it will be complete.
Still not getting any power from the dynamo though, been asking in a few places & tried a few different things, but still no juice.
_________________
The "F" key is dying on my computer, please remember this when reading my posts, I'm trying to avoid using it.
The name's Matt, but call me Nutts if you like, there's already enough Matt's about.
nutgone- Life Member
- Posts : 2356
Join date : 2012-07-04
Age : 44
Location : East Sussex
Re: WW2 US Army Homelite Generating Set
![]() by Guest Fri Jan 11 2013, 13:05
by Guest Fri Jan 11 2013, 13:05
Stu.
Guest- Guest
Re: WW2 US Army Homelite Generating Set
![]() by nutgone Fri Jan 11 2013, 15:04
by nutgone Fri Jan 11 2013, 15:04
_________________
The "F" key is dying on my computer, please remember this when reading my posts, I'm trying to avoid using it.
The name's Matt, but call me Nutts if you like, there's already enough Matt's about.
nutgone- Life Member
- Posts : 2356
Join date : 2012-07-04
Age : 44
Location : East Sussex
Re: WW2 US Army Homelite Generating Set
![]() by Guest Sat Jan 12 2013, 11:53
by Guest Sat Jan 12 2013, 11:53
Stu.
Guest- Guest
Page 4 of 5 • 1, 2, 3, 4, 5 ![]()
» Douglas FT35 generating set
» Stuart Turner 50/68volt Generating set
» Tarpen generating set info required
» Petter generating set - might turn into a project
|
|
|