
Lister Domestic Pump Rebuild
2 posters
Page 1 of 1

Lister Domestic Pump Rebuild
![]() by roger f Tue Sep 03 2019, 22:57
by roger f Tue Sep 03 2019, 22:57
Hi all, I recently brought a running 1948 Lister D (first engine) & domestic pump that came stripped down in bits. I've been stripping/cleaning/blasting bits & have got it to a stage where I can start to rebuild it now its painted & once some parts have arrived.


I found the two parts diagrams of the pump which have been a great help but I'm stuck with a couple of things that I hope people from here might be able to help with.
I can see that the valves are made up with the valve bolt, the spring, the carrier, the rubber disc & then the bolt goes through the seating plate with the nut on the other side, does this nut do up tight? And then are the other two on the opposite side the same?
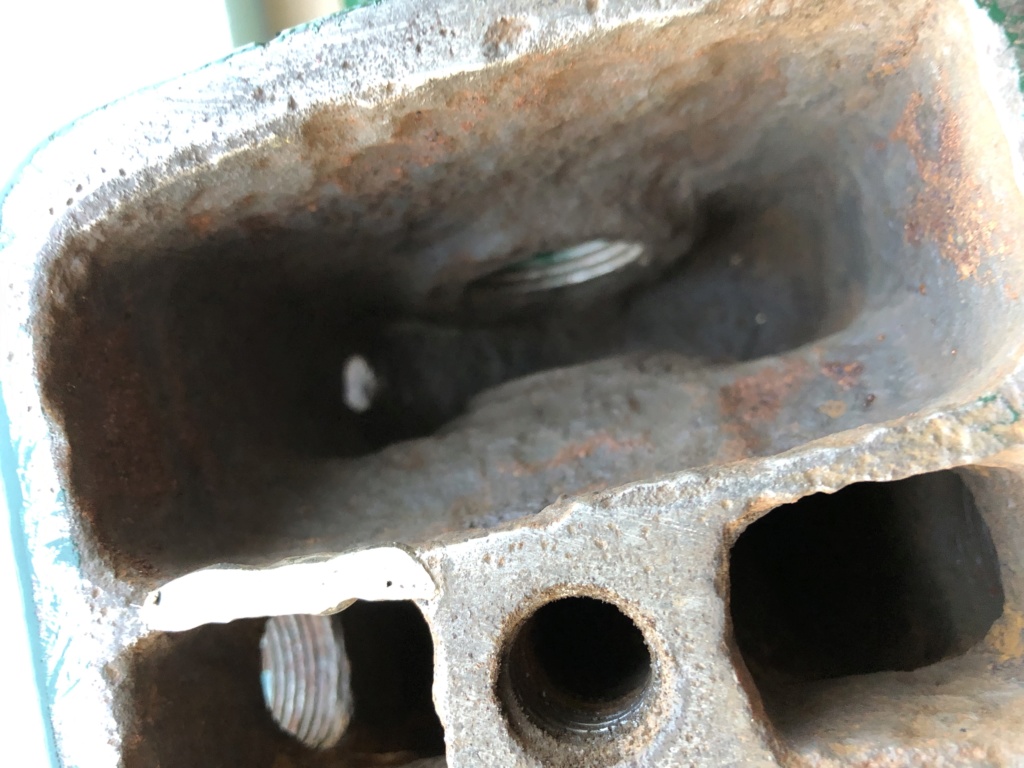
The inside of the pump body & air chamber were quite rotten & I've needle gunned them out but was wondering if there is something I could coat them with to try & stop any more corrosion?

I tried getting a 1 1/4" flange for the end of the pump from a local engineering place but it was like a blank where as the original one is like this.

Does it need to be the same?
I also got a couple of 1/8" drain plugs but one side strips the threads. I was going to tap them but am a little confused if I need a Whitworth, UNC or BSP tap?
And one last thing for the moment, I brought two new compression fittings for the inlet & outlet. Is there a way I can get these to shine like the older brassware or is the quality that poor I'll be fighting a losing battle?
Any help would be greatly appreciated & I'll post more once bits arrive & things progress


I found the two parts diagrams of the pump which have been a great help but I'm stuck with a couple of things that I hope people from here might be able to help with.
I can see that the valves are made up with the valve bolt, the spring, the carrier, the rubber disc & then the bolt goes through the seating plate with the nut on the other side, does this nut do up tight? And then are the other two on the opposite side the same?
The inside of the pump body & air chamber were quite rotten & I've needle gunned them out but was wondering if there is something I could coat them with to try & stop any more corrosion?


I tried getting a 1 1/4" flange for the end of the pump from a local engineering place but it was like a blank where as the original one is like this.

Does it need to be the same?
I also got a couple of 1/8" drain plugs but one side strips the threads. I was going to tap them but am a little confused if I need a Whitworth, UNC or BSP tap?
And one last thing for the moment, I brought two new compression fittings for the inlet & outlet. Is there a way I can get these to shine like the older brassware or is the quality that poor I'll be fighting a losing battle?
Any help would be greatly appreciated & I'll post more once bits arrive & things progress
roger f- Posts : 2
Join date : 2019-08-24
Re: Lister Domestic Pump Rebuild
![]() by blue cat Wed Sep 11 2019, 19:35
by blue cat Wed Sep 11 2019, 19:35
Hi Roger,
Welcome to the forum. Surprised that none of our pump experts answered your questions, but I'll have a go.......
Welcome to the forum. Surprised that none of our pump experts answered your questions, but I'll have a go.......
roger f wrote:Hi all, I recently brought a running 1948 Lister D (first engine) & domestic pump that came stripped down in bits. I've been stripping/cleaning/blasting bits & have got it to a stage where I can start to rebuild it now its painted & once some parts have arrived.
I found the two parts diagrams of the pump which have been a great help but I'm stuck with a couple of things that I hope people from here might be able to help with.
I can see that the valves are made up with the valve bolt, the spring, the carrier, the rubber disc & then the bolt goes through the seating plate with the nut on the other side, does this nut do up tight? And then are the other two on the opposite side the same? Just tight enough, but not overtight as there is a risk of shearing the brass thread. Two valves on one side of the plate and the other two on the other side. Usually wise to photo them before taking apart so you know how to re-assemble them.
The inside of the pump body & air chamber were quite rotten & I've needle gunned them out but was wondering if there is something I could coat them with to try & stop any more corrosion? It is normal to leave the internal rust coat as it is, as this protects the iron from further rusting, and just remove anything loose. Not much you can do now but leave it to rust again.
I tried getting a 1 1/4" flange for the end of the pump from a local engineering place but it was like a blank where as the original one is like this.
Does it need to be the same? No, the new blank brass plug will do the same job.
I also got a couple of 1/8" drain plugs but one side strips the threads. I was going to tap them but am a little confused if I need a Whitworth, UNC or BSP tap?
They will be 1/8 BSP thread.
And one last thing for the moment, I brought two new compression fittings for the inlet & outlet. Is there a way I can get these to shine like the older brassware or is the quality that poor I'll be fighting a losing battle? No idea, I usually fit iron pipes like it would have been originally.
Any help would be greatly appreciated & I'll post more once bits arrive & things progress
_________________
blue cat
blue cat- Life Member

- Posts : 1065
Join date : 2013-10-10
Re: Lister Domestic Pump Rebuild
![]() by roger f Sun Sep 29 2019, 11:23
by roger f Sun Sep 29 2019, 11:23
Thanks for your reply blue cat.
I made up the valves on the seating plate from the diagram I have but noticed the holes in the middle of the carriers were really worn so have ordered new brass carriers.

I answered the other questions above, the drain plug just needed a good clean before I screwed it in.
I'm now at a stage to rebuild the plunger rod & get it fitted. My leather cup washers have been soaking, I'm wondering if I need to grease the plunger barrel or should the washers just slide in? Also do you have any advice for fitting the gland packing?
This is where I'm up to with it now.

roger f- Posts : 2
Join date : 2019-08-24
Re: Lister Domestic Pump Rebuild
![]() by blue cat Wed Oct 02 2019, 20:01
by blue cat Wed Oct 02 2019, 20:01
The oiled leather cups should slide into the brass barrel with a little persuasion.
Gland packing should be cut to fit and fitted as a complete circle. You will need more than one. Place the cut ends of the second one opposite the cut ends of the first one so that you don't get leakage at the cut ends.
https://www.heritagesteamsupplies.co.uk/gland-packing/fitting-instructions-for-gland-packing.html
_________________
blue cat
blue cat- Life Member
- Posts : 1065
Join date : 2013-10-10
» Lister Domestic pump rebuild
» Help with Lister H3 pump strip / rebuild
» Lister Domestic Pump
» Lister Domestic pump
» Lister Domestic pump
» Help with Lister H3 pump strip / rebuild
» Lister Domestic Pump
» Lister Domestic pump
» Lister Domestic pump
Page 1 of 1
Permissions in this forum:
You cannot reply to topics in this forum