
Petter A1 restoration project
Page 3 of 4 •  1, 2, 3, 4
 ![]()
Re: Petter A1 restoration project
![]() by nutgone Mon Aug 06 2012, 14:56
by nutgone Mon Aug 06 2012, 14:56
http://www.ebay.co.uk/sch/i.html?_nkw=gib+key&_sacat=0&_odkw=gold&_osacat=0
That should explain a lot. They go onto a parallel shaft, hammered in tight, to hold the flywheel, pulley or sprocket on.
The idea with parallel (& tapered) shafts with keys is that the key shouldn't take any of the forces from the turning of the shaft. The parallel shaft should be a tight fit with the pulley, flywheel or sprocket that is mounted on it. The key is just used to locate it on there. A gib-key is tapered so it holds in there by friction, a parallel key usually needs a grub screw to hold it in place.
If a key is incorrectly fitted & ends up taking the turning force from the shaft it will simply shear off.
_________________
The "F" key is dying on my computer, please remember this when reading my posts, I'm trying to avoid using it.
The name's Matt, but call me Nutts if you like, there's already enough Matt's about.

nutgone- Life Member

- Posts : 2356
Join date : 2012-07-04
Age : 44
Location : East Sussex
Re: Petter A1 restoration project
![]() by sjs205 Mon Aug 06 2012, 15:15
by sjs205 Mon Aug 06 2012, 15:15
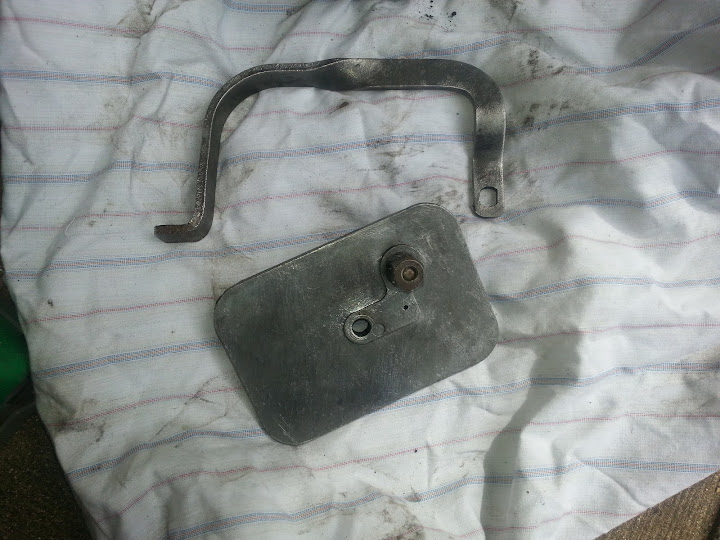
pulley and gib-key
I will see what I can do with it tonight
Cheers guys...

sjs205- Born to be wild

- Posts : 31
Join date : 2012-07-16
Re: Petter A1 restoration project
![]() by nutgone Mon Aug 06 2012, 15:23
by nutgone Mon Aug 06 2012, 15:23
Good luck with it.
_________________
The "F" key is dying on my computer, please remember this when reading my posts, I'm trying to avoid using it.
The name's Matt, but call me Nutts if you like, there's already enough Matt's about.
nutgone- Life Member
- Posts : 2356
Join date : 2012-07-04
Age : 44
Location : East Sussex
Re: Petter A1 restoration project
![]() by hob Mon Aug 06 2012, 17:48
by hob Mon Aug 06 2012, 17:48
the bore of both the pulley and flywheel is parallel too, there are no retaining screws and both retaining keys are tapered.
i pulled my pulley off with the key still in it, with hindsight i should maybe have tried to hit the pulley further onto the shaft to try to loosen the key as pulling it with the key in made a few small cracks in that end of the pulley key way.

the key on the flywheel stuck out far enough to get a taper in and tap it out .........once the key was out and the shaft polished with some emery cloth the flywheel slid off the shaft.
its a big lump with a set of cooling blades on the back ......so is quite heavy.

_________________
Lister D............ Lister domestic water pump
Petter A1 .......................Union pillar drill
National F type 1935.............wood planer
argosy pump
Villiers mk 15

hob- Life Member
- Posts : 725
Join date : 2011-06-14
Age : 72
Location : East Suffolk
Re: Petter A1 restoration project
![]() by sjs205 Mon Aug 06 2012, 18:13
by sjs205 Mon Aug 06 2012, 18:13
I have been spraying it with gt-85 every so often, but I think it is going to be a struggle trying to get the key out, especially without the lug in place.
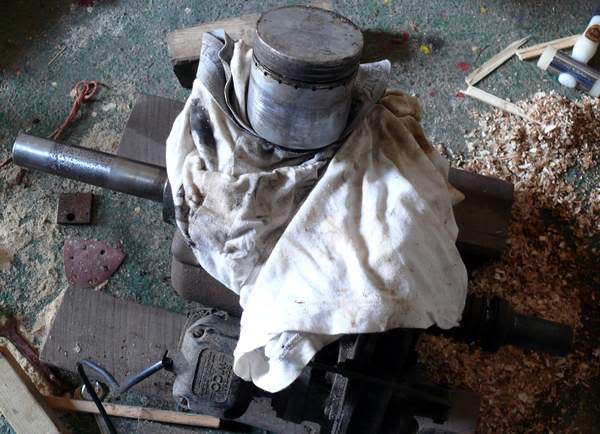
I also had a look at the piston and cylinder, the rust that can be seen in the picture is actually sitting proud, so is just a little surface rust. Should clean off fine with some emery cloth.
sjs205- Born to be wild
- Posts : 31
Join date : 2012-07-16
Re: Petter A1 restoration project
![]() by hob Mon Aug 06 2012, 18:38
by hob Mon Aug 06 2012, 18:38
_________________
Lister D............ Lister domestic water pump
Petter A1 .......................Union pillar drill
National F type 1935.............wood planer
argosy pump
Villiers mk 15
hob- Life Member
- Posts : 725
Join date : 2011-06-14
Age : 72
Location : East Suffolk
Re: Petter A1 restoration project
![]() by hob Mon Aug 06 2012, 18:51
by hob Mon Aug 06 2012, 18:51
a small amount of sideways movement on the crank allows the piston to line up with the barrel ...........where you don't want a lot of movement is up and down (worn shells) so if thats ok its best left alone as i have not seen anywhere to get replacements and its not likely to see huge amounts of use in the future.
_________________
Lister D............ Lister domestic water pump
Petter A1 .......................Union pillar drill
National F type 1935.............wood planer
argosy pump
Villiers mk 15
hob- Life Member
- Posts : 725
Join date : 2011-06-14
Age : 72
Location : East Suffolk
Re: Petter A1 restoration project
![]() by hob Mon Aug 06 2012, 19:25
by hob Mon Aug 06 2012, 19:25
http://www.stationaryengineparts.com/petter-models-a-a1-ap-pa1-head-gasket-1977-0.html
transfers here
http://www.ebay.co.uk/sch/internalfire/m.html?hash=item19d32d0d10&item=110917127440&pt=UK_BOI_FarmingEquipment_RL&rt=nc&_trksid=p4340.l2562
Neville
_________________
Lister D............ Lister domestic water pump
Petter A1 .......................Union pillar drill
National F type 1935.............wood planer
argosy pump
Villiers mk 15
hob- Life Member
- Posts : 725
Join date : 2011-06-14
Age : 72
Location : East Suffolk
Re: Petter A1 restoration project
![]() by nutgone Mon Aug 06 2012, 20:57
by nutgone Mon Aug 06 2012, 20:57
 , but a big normal one should do the trick).
I would try to get that pulley back on the shaft, I have a copper & hide mallet, but personally would use blocks of wood & a club hammer (my copper & hide is pretty well worn).
You could always drill that gib key, either drill & tap something into it, or just try to drill it until it's small enough to collapse in on itself, that's a long job though.
I wouldn't personally try to pull it as-is with the pulley though, only as a last resort. These cast iron pulleys are quite brittle. Well, all cast iron is generally quite brittle, & not easy to weld back up afterwards either.
Just a few more suggestions for you. At least now you have good pictures to show you how it all goes together/comes apart.
I know StationaryEngineParts.com do a good set of 3 pullers for a very reasonable price. I don't know if the largest would be large enough though, but at their price they are very useful to have around, I'm tempted to buy a set myself. Here's a link....
http://www.stationaryengineparts.com/three-piece-puller-set-723-0.html
I see they're currently out of stock, but it gives you an idea, may be worth emailing them, see if they're getting any more in.
_________________
The "F" key is dying on my computer, please remember this when reading my posts, I'm trying to avoid using it.
The name's Matt, but call me Nutts if you like, there's already enough Matt's about.
nutgone- Life Member
- Posts : 2356
Join date : 2012-07-04
Age : 44
Location : East Sussex
Re: Petter A1 restoration project
![]() by Guest Tue Aug 07 2012, 12:34
by Guest Tue Aug 07 2012, 12:34
All I can add is keep soaking it and you could maybe get a small blunt chisel behind the gib key lug but you'd have to take care as they break easy.
Stu.
Guest- Guest
Re: Petter A1 restoration project
![]() by sjs205 Sat Aug 11 2012, 12:10
by sjs205 Sat Aug 11 2012, 12:10
stationary stu wrote:There's plenty of pullers for sale on ebay at a reasonable price or most good hire shops do them but the hire price is normally quite high.
All I can add is keep soaking it and you could maybe get a small blunt chisel behind the gib key lug but you'd have to take care as they break easy.
Stu.
I'm looking for a puller, but first I will try to smack that pulley back on the shaft a little to see if it budges...
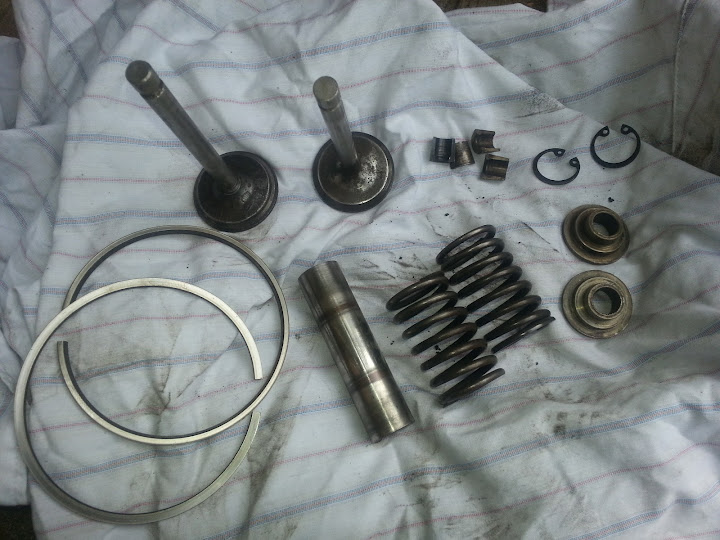
Whilst I'm waiting for the pulley I've been cleaning the head components, the piston, valves, the head itself; all that stuff... But whilst cleaning the bottom piston ring I managed to snap it in two - It was pretty clogged up!
How easy are these to replace?
Also, are new gasket kits available or should I get some gasket paper? And if so, how thick?
Cheers guys,
Steven
sjs205- Born to be wild
- Posts : 31
Join date : 2012-07-16
Re: Petter A1 restoration project
![]() by hob Sat Aug 11 2012, 13:22
by hob Sat Aug 11 2012, 13:22
sjs205 wrote: whilst cleaning the bottom piston ring I managed to snap it in two - It was pretty clogged up!
How easy are these to replace?
Also, are new gasket kits available or should I get some gasket paper? And if so, how thick?
Cheers guys,
Steven
i got new rings from here
http://www.fwthornton.co.uk/8.html
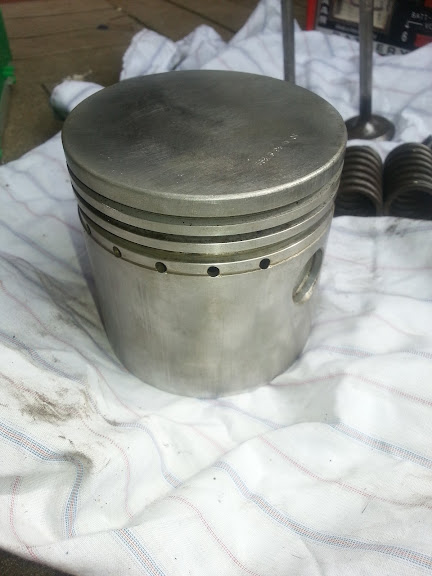
check the top of the piston for marks, mine shows STD.............. meaning its a standard piston, IE not rebored to a larger size.

i'm told these people do rings but have never used them myself
COX & TURNER ENGINEERING
61 CAMEL GREEN ROAD
FORDINGBRIDGE
HANTS
SP6 3AU
01425 652627
EMAIL...ian@coxnturner.freeserve.co.uk
i never found anyone selling gasket sets (see my post on the previous page for head gaskets) but they are easily made from 0.8 or 1 mm gasket material, i have heard of people making them from cardboard cereal boxes
Neville
_________________
Lister D............ Lister domestic water pump
Petter A1 .......................Union pillar drill
National F type 1935.............wood planer
argosy pump
Villiers mk 15
hob- Life Member
- Posts : 725
Join date : 2011-06-14
Age : 72
Location : East Suffolk
Re: Petter A1 restoration project
![]() by sjs205 Sat Aug 11 2012, 15:31
by sjs205 Sat Aug 11 2012, 15:31
hob wrote:
i got new rings from here
http://www.fwthornton.co.uk/8.html
check the top of the piston for marks, mine shows STD.............. meaning its a standard piston, IE not rebored to a larger size.
i'm told these people do rings but have never used them myself
COX & TURNER ENGINEERING
61 CAMEL GREEN ROAD
FORDINGBRIDGE
HANTS
SP6 3AU
01425 652627
EMAIL...ian@coxnturner.freeserve.co.uk
i never found anyone selling gasket sets (see my post on the previous page for head gaskets) but they are easily made from 0.8 or 1 mm gasket material, i have heard of people making them from cardboard cereal boxesbut not tried that either.
Neville
Okay, thanks for the reply.
The piston itself has the following markings:
"538/4 P5 IV OT"
And:
"WP 538 YA"
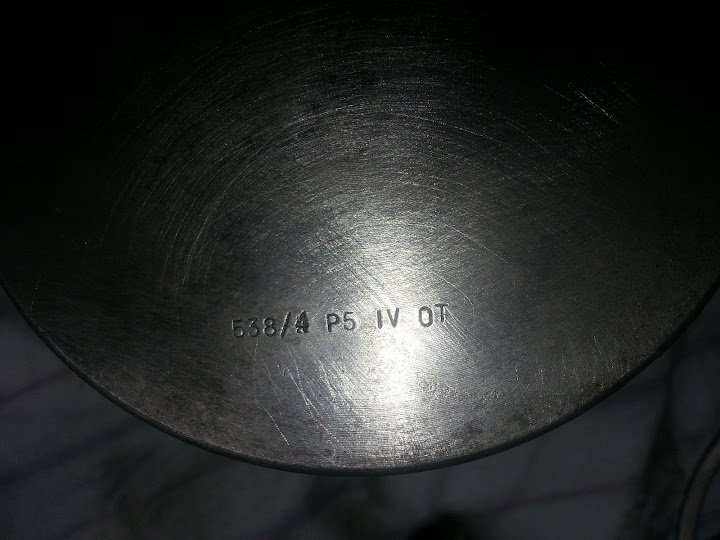

I am guessing this is an oversized piston? I have emailed both of the companies that you suggested so hopefully they will get back to me.
A quick update on how I'm getting on; mostly cleaning everything from the cylinder up whilst I wait for a puller or lump hammer to get that pulley off. some
Piston:
Valves etc.:
Valve cover:
And the cylinder, I'm still working on this, going to wait for some new wire brush attachments

Making steady progress...
sjs205- Born to be wild
- Posts : 31
Join date : 2012-07-16
Re: Petter A1 restoration project
![]() by Guest Sun Aug 12 2012, 11:43
by Guest Sun Aug 12 2012, 11:43
Stu.
Guest- Guest
Re: Petter A1 restoration project
![]() by sjs205 Sun Aug 12 2012, 12:23
by sjs205 Sun Aug 12 2012, 12:23
stationary stu wrote:A few members use Turner and Cox and say they are very good and have them posted out the same day. Give them a ring and they should help with sizing the rings as they don't look standard. You'll have to make the gaskets check out ebay for head gasket material and normal gasket paper or get eating cornflakes
Stu.
Hello Stu,
I've sent those guys an email, I'll see if they reply, if not, I will call them and see what they can do.
With regards to gaskets, I have found this:
ebay - Petter A Gasket Set, Petter A Stationary Engine Gaskets
But it doesn't look complete so I will need to produce some...
Re the valves, I gave them a good going over with the wirebrush and some wet-n-dry. The exhaust one seems to be a tight fit an sticks a little on the stem. I already have some grinding paste etc to re-seat them, but I wasn't going to reface them. I'm guessing I can't do this myself with an angle grinder - if I'm very careful? I'll get some better pictures of them on here later...
Steven
sjs205- Born to be wild
- Posts : 31
Join date : 2012-07-16
Re: Petter A1 restoration project
![]() by Ianhw77k Mon Aug 13 2012, 09:25
by Ianhw77k Mon Aug 13 2012, 09:25

Ianhw77k- A credit to the forum
- Posts : 455
Join date : 2012-07-02
Age : 44
Location : East Sussex
Re: Petter A1 restoration project
![]() by sjs205 Mon Aug 13 2012, 09:40
by sjs205 Mon Aug 13 2012, 09:40
Ianhw77k wrote:I wouldn't try refacing valves with an angle grinder mateBetter just to work your way through the different valve grinding paste grades until you are done. It may take a bit of time but will be worth it.
Well I have two grades... fine and course
sjs205- Born to be wild
- Posts : 31
Join date : 2012-07-16
Re: Petter A1 restoration project
![]() by Guest Mon Aug 13 2012, 11:57
by Guest Mon Aug 13 2012, 11:57
I think that the gasket set is a bit expensive for what your getting but that's just my opinion, I'd just buy some gasket paper and make them all.
Stu.
Guest- Guest
Re: Petter A1 restoration project
![]() by pauldg Mon Aug 13 2012, 14:11
by pauldg Mon Aug 13 2012, 14:11
I haven't bought a gasket for years, I make all mine out of cereal boxes or brown packing paper if I need thinner stuff. I did buy one sheet of 1mm paper about 18 months ago for one specific job, but that was definitely a one-off.
If I can't reuse head gaskets, I make those too - I'll share my method on that when I make one for an upcoming engine...
Paul
pauldg- A credit to the forum
- Posts : 300
Join date : 2012-06-30
Age : 46
Location : South Wiltshire
Re: Petter A1 restoration project
![]() by sjs205 Mon Aug 13 2012, 14:54
by sjs205 Mon Aug 13 2012, 14:54
pauldg wrote:Re: gaskets...
I haven't bought a gasket for years, I make all mine out of cereal boxes or brown packing paper if I need thinner stuff. I did buy one sheet of 1mm paper about 18 months ago for one specific job, but that was definitely a one-off.
If I can't reuse head gaskets, I make those too - I'll share my method on that when I make one for an upcoming engine...
Paul
Yeah, I think I am just being Lazy... I'd love to see your method once you do make it!
Steven
sjs205- Born to be wild
- Posts : 31
Join date : 2012-07-16
Re: Petter A1 restoration project
![]() by nutgone Mon Aug 13 2012, 22:36
by nutgone Mon Aug 13 2012, 22:36
I think I would prefer to use cereal boxes, they're probably easier to cut. And once given a good smear of grease (something you should do to almost all gaskets, with the exception of head gaskets & the hotter exhaust ones) they're much the same thing anyway.
I think I would prefer cereal boxes to instant gasket, but then I'm not a big fan of instant gasket.
_________________
The "F" key is dying on my computer, please remember this when reading my posts, I'm trying to avoid using it.
The name's Matt, but call me Nutts if you like, there's already enough Matt's about.
nutgone- Life Member
- Posts : 2356
Join date : 2012-07-04
Age : 44
Location : East Sussex
Re: Petter A1 restoration project
![]() by sjs205 Tue Aug 14 2012, 22:39
by sjs205 Tue Aug 14 2012, 22:39
nutgone wrote:I like gasket paper, but only because there happens to be some in the workshop at the moment. If I didn't have any I doubt I would be buying it (it came free with some non-asbestos head gasket material my brother bought).
I think I would prefer to use cereal boxes, they're probably easier to cut. And once given a good smear of grease (something you should do to almost all gaskets, with the exception of head gaskets & the hotter exhaust ones) they're much the same thing anyway.
I think I would prefer cereal boxes to instant gasket, but then I'm not a big fan of instant gasket.
I have ordered some gasket paper online so that should be with me soon. And a good tip about the greese, cheers nutgone!
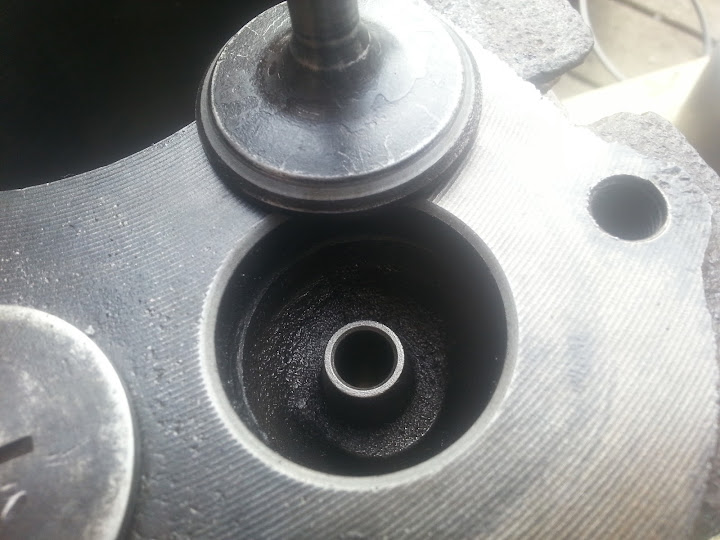
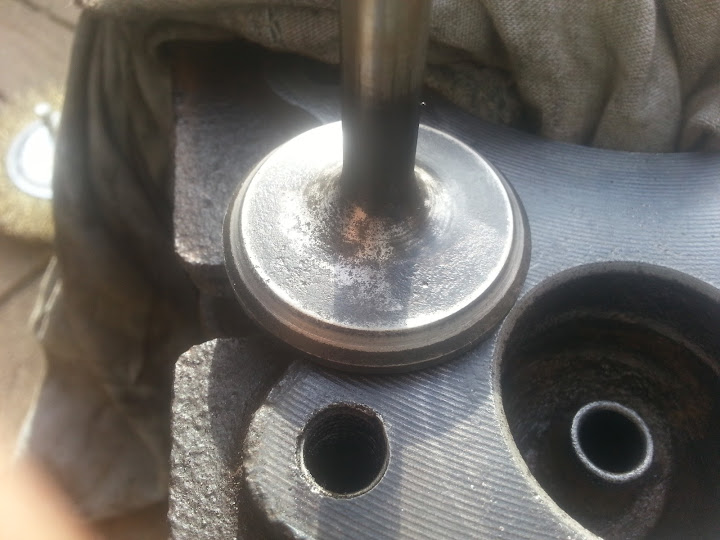
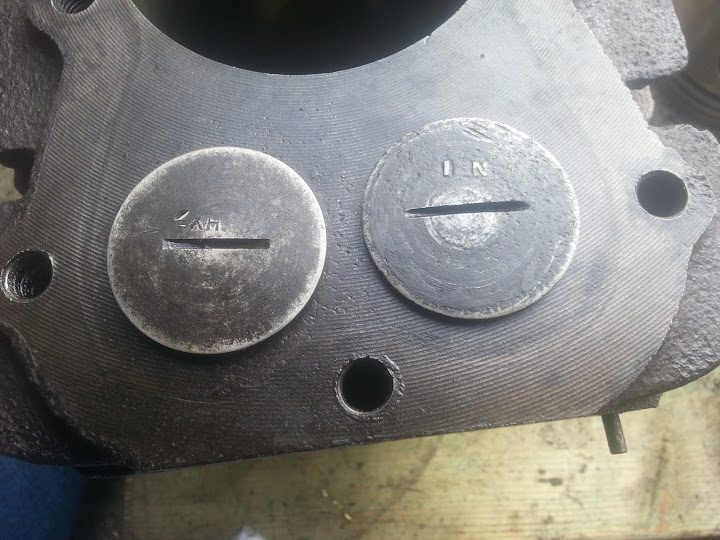
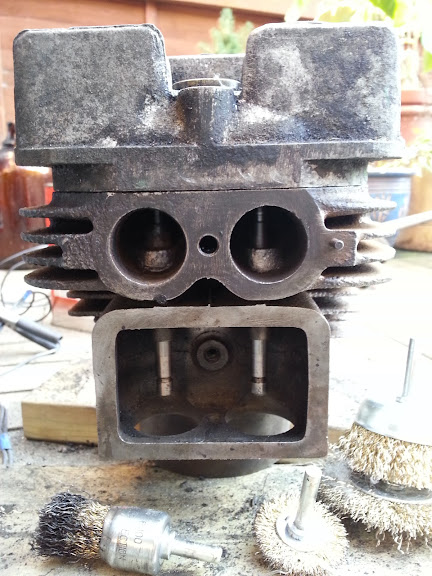
I've done a little more work today including seating the valves and cleaning the head, the block is nearly complete too, although still quite rusty in the fins.
Pictures:
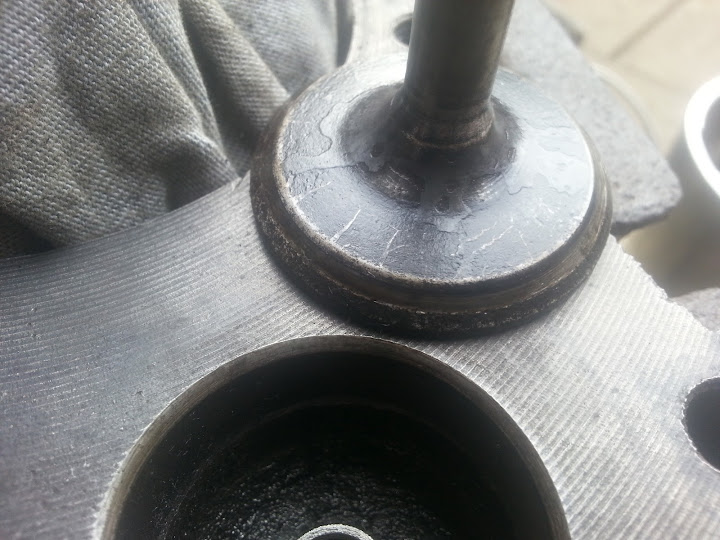
Exhaust and inlet valves before:
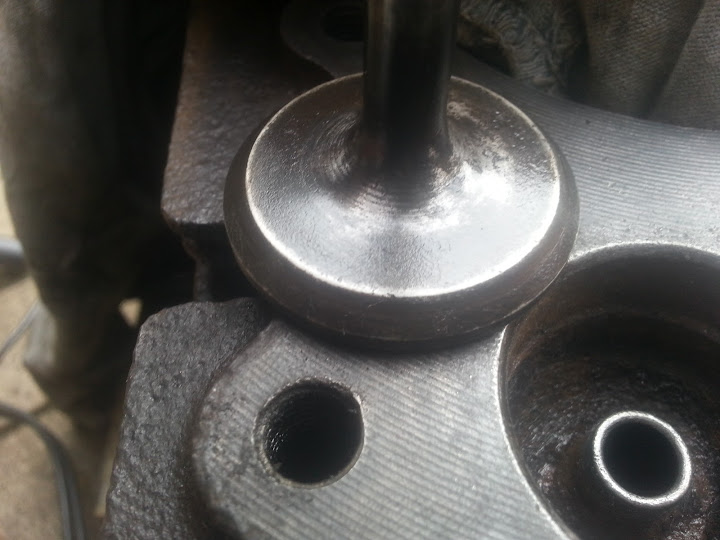
After:
The head:

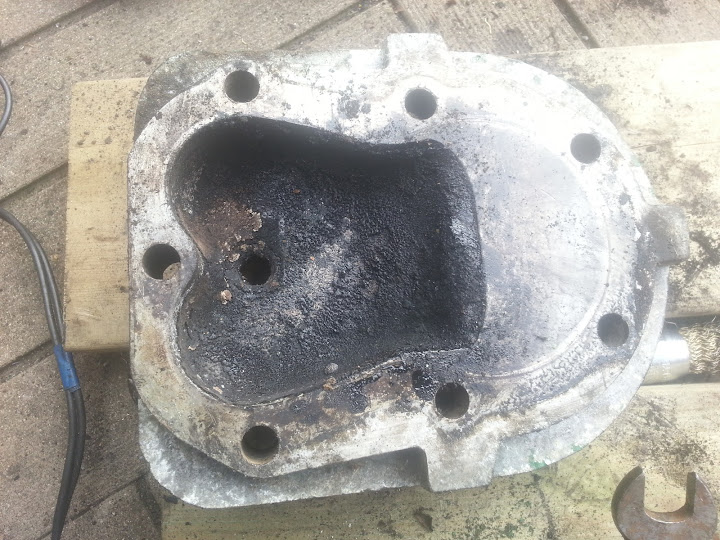
After:


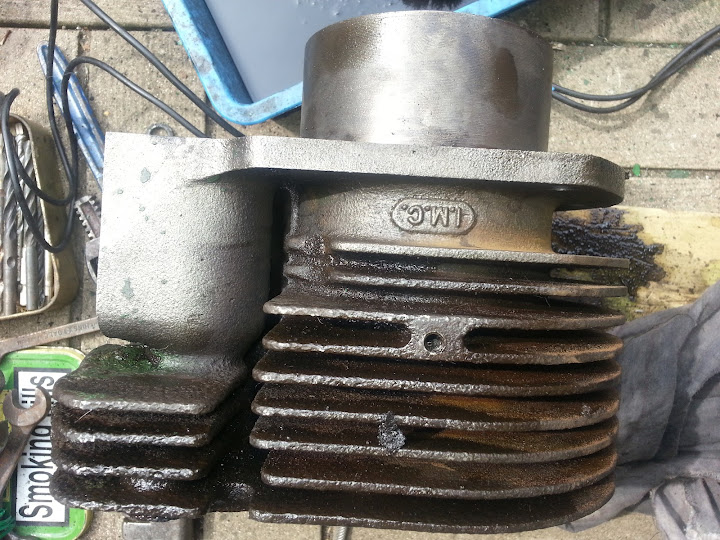
And how the block is looking:
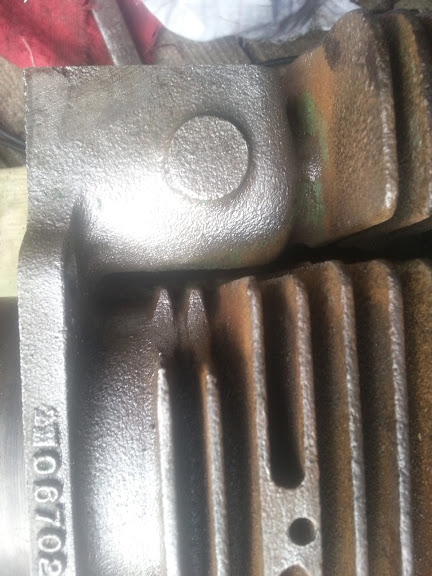

Any tips for getting that rust off the fins? I can't quite get in there with the wire brush attachments. Also, would this have origionally been painted? From what I can see it had previously been painted up to the fins.
Apologies for all the boring pictures... I like taking them
sjs205- Born to be wild
- Posts : 31
Join date : 2012-07-16
Re: Petter A1 restoration project
![]() by pauldg Tue Aug 14 2012, 23:25
by pauldg Tue Aug 14 2012, 23:25
Seems like you need about 71 more wire brushes to get in there
Seriously though, I have no clue apart from something like sandpaper wrapped around a stick. That's one of the reasons I got my blasting cabinet (even though it's not set up yet).
pauldg- A credit to the forum
- Posts : 300
Join date : 2012-06-30
Age : 46
Location : South Wiltshire
Re: Petter A1 restoration project
![]() by sjs205 Tue Aug 14 2012, 23:31
by sjs205 Tue Aug 14 2012, 23:31
I have a small air-compressor with sandblasting gun... but no cabinet... I was thinking aobut using two large buckets and just swaping around when one gets ful, but I have no idea how pratical that is?
sjs205- Born to be wild
- Posts : 31
Join date : 2012-07-16
Re: Petter A1 restoration project
![]() by pauldg Tue Aug 14 2012, 23:35
by pauldg Tue Aug 14 2012, 23:35
Also - if you do it that way - make sure to wear some decent goggles, good gloves, and the best dust mask you can get.
You could always knock up a little cabinet from a few sheets of ply if you have any laying around - it won't last forever but it'd do a turn.
(btw, never use kiln dried sand, or sand at all really, for blasting. Unless of course breathing sensibly is one of those chores you just can't be bothered with any more...)
pauldg- A credit to the forum
- Posts : 300
Join date : 2012-06-30
Age : 46
Location : South Wiltshire
Page 3 of 4 • 1, 2, 3, 4 ![]()
» A few pic's of my J.A.P 2A stripdown/restoration project !.
» Lister D Restoration Project
» my latest restoration project.....
» My first restoration project a Douglas SV54
|
|
|