
Petter A1 restoration project
Page 2 of 4 •  1, 2, 3, 4
 ![]()
Re: Petter A1 restoration project
![]() by sjs205 Thu Jul 19 2012, 21:40
by sjs205 Thu Jul 19 2012, 21:40
hob wrote:sjs205 wrote:Hello all,
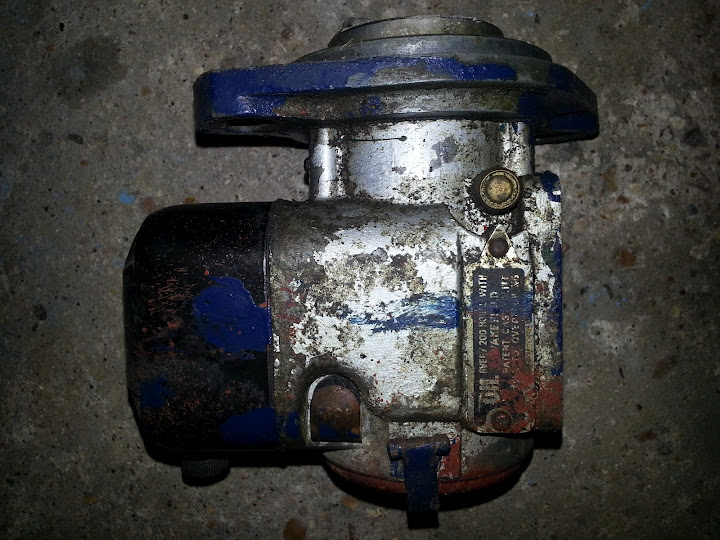
This one is of the magneto that I have, it is a Wlco series A. I've noticed that the mounting bracket is slightly offset... Can this bracket be adjusted or will I need a different Mag?
Steven
comparing pictures of my mag with yours i begin to see what you mean...........your mounting flange is offset the opposite way to mine
i don't see any blue paint on the engine in your original photo's of the engine...........maybe its not from that engine?sjs205 wrote:Hello all,
I have just been given 3 Petter A1 engines by a friend, they are all in poor states but I have taken the best from the bunch and plan to start restoration over the coming weeks - need something to do while the weather is so awful!
Steven
what are the other 2 engines like? and do they have mags with them.

One of the other ones has a mag, but my friends father has been "restoring" this for the last two years... my friend said that I could take them all since his father hasn't looked at it for the last 18 months and seems to have got bored with it, but I want to wait to confirm it with him before I start ripping parts off of it. This one also has a round fuel tank and pepper pot exhaust... But I still maintain that mine is the better engine
I know it is as good as mine, but I want to see him before I just take that one...
I have this mag here on my desk now, I can see that the mounting bracket will come off but I can't swivel it, so it is definatly stuck at this angle.
So my question for now is, does anyone have a bracket the right way around for sale? Or even a broken Mag?

sjs205- Born to be wild

- Posts : 31
Join date : 2012-07-16
Re: Petter A1 restoration project
![]() by nutgone Thu Jul 19 2012, 21:57
by nutgone Thu Jul 19 2012, 21:57
pauldg wrote:I started using plus gas in the late 80's, early 90's - that wasn't the spray one though, it was in a tin. Maybe it's more concentrated like that?
I was one of the ones talking about stripper - if you're happy with the 'new formula', eco-mental-friendly, non-toxic, not quite as good as rubbing it with grass, expensive, (I could go on, but I'd start swearing) then that's just fine. It does sort-of work. After a fashion. If you're patient. I had much more success with a wire brush in a drill though. Less mess too.
If, on the other hand, you liked the old stuff - the kind you didn't even have to open the tin and paint would fall off as you walked past - then the new one will be a sad disappointment to you. (I did always wonder what paint they used on the tin as it happens, why didn't that come off??)
While we're on the subject, I've got a nearly full 5 litre tin of 'new' nitromors here if anyone wants to buy it off me?
Alternatively, wait a little while, then bring it to me and I'll blast it for you... Discount for forum members
Funnily enough, I never liked the old Nitromors stripper, but I was young & impatient. It was very smelly, heavily solvented, but never seemed to do much.
This Wickes stuff seemed very good, but I'm a bit older, more patient, more willing to put in the extra work & my expectations were probably a lot lower. Also I was coating stuff up & leaving it over night.
None of it works miracles though, none of it ever has IMO, which ever way you go it involves work & elbow grease. A good wire brush attachment for a drill (personally I wouldn't use an angle grinder one, they're just too fast & dangerous a machine) would help a lot.
How I'd love a blasting cabinet though
 .
. A good reason for using stripper is the lead content in old paints, although I always thought you had to actually ingest lead to get lead poisoning (another reason why the greens got it wrong with unleaded petrol
Steven, are you sure that mag flange can't be turned round? Have you dismantled this mag yet? I'm pretty sure it can be done, as the Wico was used on many different engines, loads of them using that flange mounting.

nutgone- Life Member

- Posts : 2356
Join date : 2012-07-04
Age : 44
Location : East Sussex
Re: Petter A1 restoration project
![]() by sjs205 Thu Jul 19 2012, 22:37
by sjs205 Thu Jul 19 2012, 22:37
pauldg wrote:
Steven, are you sure that mag flange can't be turned round? Have you dismantled this mag yet? I'm pretty sure it can be done, as the Wico was used on many different engines, loads of them using that flange mounting.
I have started pulling it apart... but I'm stuck removing the plate under the spring with the little arm on it... the photos are uploading and I will post one shortly...
But it doesn't look good fitting to my engine... from what I can work out I could rotate the mount 180 deg... but will be exactly the same!
sjs205- Born to be wild
- Posts : 31
Join date : 2012-07-16
Re: Petter A1 restoration project
![]() by pauldg Thu Jul 19 2012, 22:45
by pauldg Thu Jul 19 2012, 22:45
nutgone wrote:
How I'd love a blasting cabinet though
A good reason for using stripper is the lead content in old paints, although I always thought you had to actually ingest lead to get lead poisoning (another reason why the greens got it wrong with unleaded petrol
Steven, are you sure that mag flange can't be turned round? Have you dismantled this mag yet? I'm pretty sure it can be done, as the Wico was used on many different engines, loads of them using that flange mounting.
I already have a 5'x2'x4' upright cabinet - just need to finish the shed to put it in - and the compressor to drive it... Nicely, when you set them up right the lead paint isn't an issue - still have to use the right media though.
You do (or did) ingest the lead in petrol if you think about it, the bulk of it passed through the engine and into the atmosphere, there it either sat on plants and leached in or went up into the sky, came back down with the rain and then went in that way - then either you (or the animals) eat the plants. Et voila, lead for dinner. I'm far from 'green' most of the time, but I always thought lead in petrol was a bad idea, design your engine properly (like they used to) and there's no need for it.
With that mag, I've seen them with both integrated and bolted flanges, so it could be either - if it's bolted you could always turn it a bit and drill new holes. If it's an integrated one, make up an adaptor plate? I'll admit making up stuff isn't original, but then you don't appear to have the original parts so that'll never happen anyway. Just my opinion on that.
pauldg- A credit to the forum
- Posts : 300
Join date : 2012-06-30
Age : 46
Location : South Wiltshire
Re: Petter A1 restoration project
![]() by sjs205 Thu Jul 19 2012, 23:20
by sjs205 Thu Jul 19 2012, 23:20
pauldg wrote:
With that mag, I've seen them with both integrated and bolted flanges, so it could be either - if it's bolted you could always turn it a bit and drill new holes. If it's an integrated one, make up an adaptor plate? I'll admit making up stuff isn't original, but then you don't appear to have the original parts so that'll never happen anyway. Just my opinion on that.
I had considered drilling some more holes in the bracket, I am hoping that I could get away with just too if I shifted it one hole to the right but I can't get it off at the moment. It looks like it should come off as it does have mounting bolts.
The problem I'm having is the plate that carries the centrifugal arm won't budge, would this be a tapered shaft?:
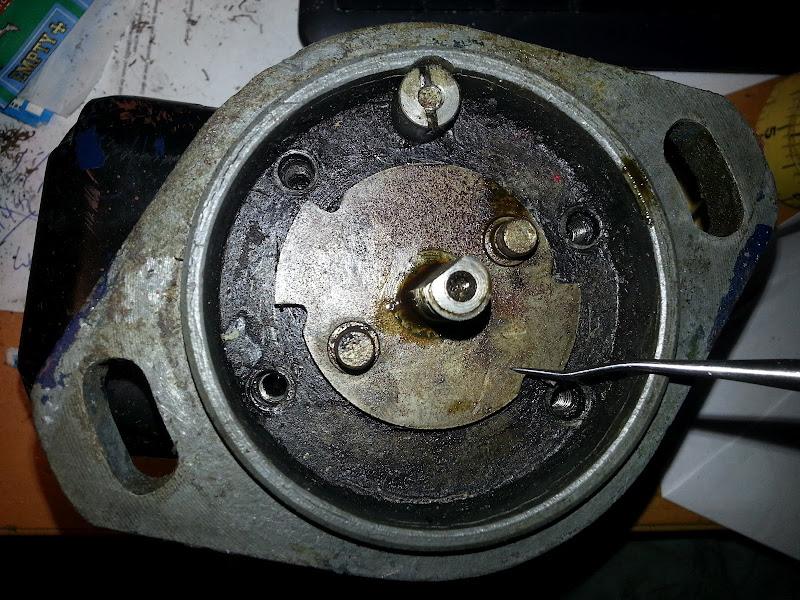
And what does the centrifugal arm actually do?
Do manuals for these mags exist?
Cheers,
Steven
sjs205- Born to be wild
- Posts : 31
Join date : 2012-07-16
Re: Petter A1 restoration project
![]() by hob Thu Jul 19 2012, 23:33
by hob Thu Jul 19 2012, 23:33
however it should be what is known as an impulse mag meaning when the shaft turns slowly you should heat it click ...........this is a built in mechanism that retards the spark at slow speeds to make starting easier ..........when the engine speeds up to normal running speed this stops happening. i'm guessing that somewhere inside there must be some centrifugal weights in there that operate the impulse.??
_________________
Lister D............ Lister domestic water pump
Petter A1 .......................Union pillar drill
National F type 1935.............wood planer
argosy pump
Villiers mk 15

hob- Life Member
- Posts : 725
Join date : 2011-06-14
Age : 72
Location : East Suffolk
Re: Petter A1 restoration project
![]() by nutgone Thu Jul 19 2012, 23:42
by nutgone Thu Jul 19 2012, 23:42
These mags are very popular, & there are service books available, try looking on Stationary Engine parts (is it dot com or dot co dot uk? I don't remember) They should have a manual for you. It's a Wico type A isn't it? (should be written on it anyway). They're actually very good mags, I've had a few & never any trouble. (certainly not as much trouble as I'm having with a Lucas SR1 at the moment
Here you go.....
http://www.stationaryengineparts.com/wico-series-a-instructions-1955-0.html
Last edited by nutgone on Thu Jul 19 2012, 23:45; edited 1 time in total (Reason for editing : Found link)
nutgone- Life Member
- Posts : 2356
Join date : 2012-07-04
Age : 44
Location : East Sussex
Re: Petter A1 restoration project
![]() by hob Thu Jul 19 2012, 23:53
by hob Thu Jul 19 2012, 23:53
http://www.oldengine.org/members/diesel/WicoMagneto/MagData4.htm
_________________
Lister D............ Lister domestic water pump
Petter A1 .......................Union pillar drill
National F type 1935.............wood planer
argosy pump
Villiers mk 15
hob- Life Member
- Posts : 725
Join date : 2011-06-14
Age : 72
Location : East Suffolk
Update
![]() by sjs205 Mon Aug 06 2012, 11:57
by sjs205 Mon Aug 06 2012, 11:57
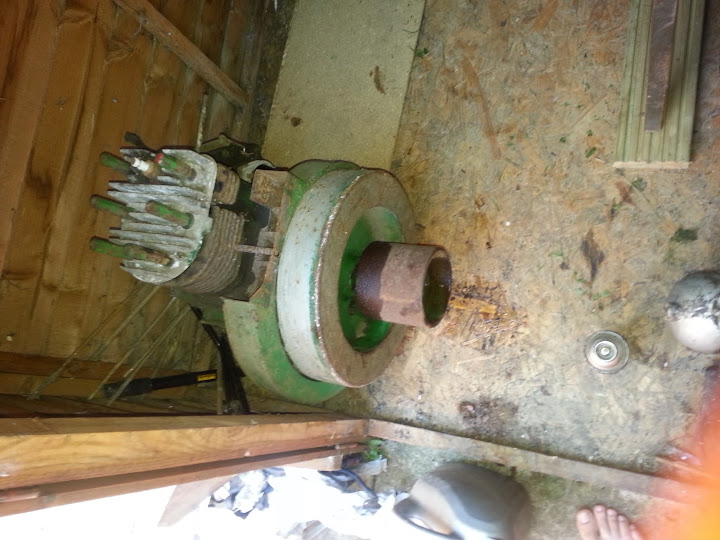
Just a quick update. I haven't got much done so far since I never had the working space setup... I've now set up my work bench in the garden shed:

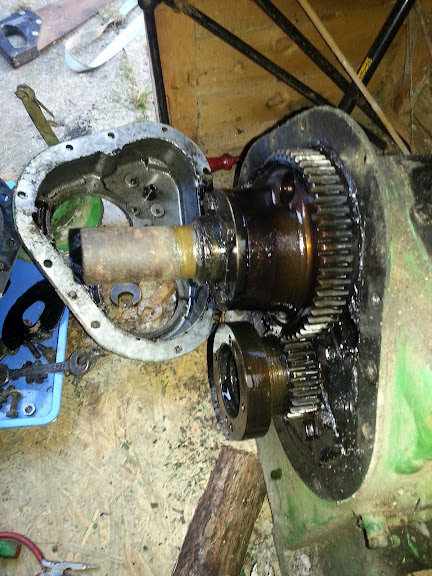
I have also stripped quite a bit of the engine down, basically, the only thing left to strip now is the gears and the crankshaft:

There is actually quite a bit of play in the bigend of this conrod... what are the tolerances?

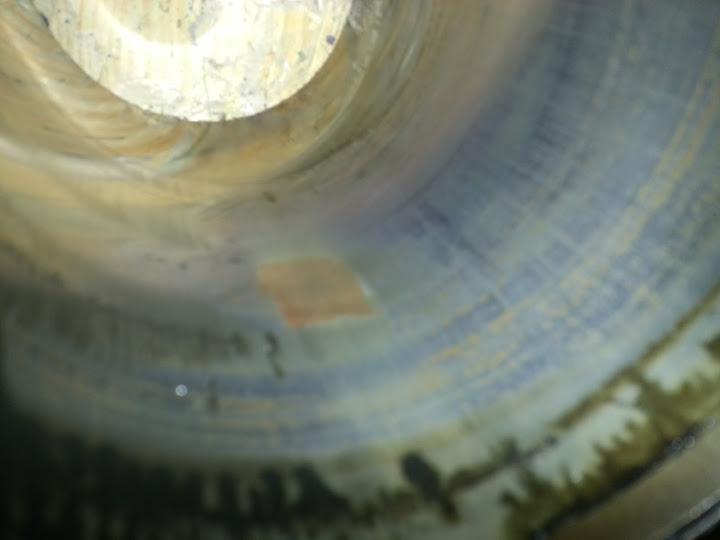
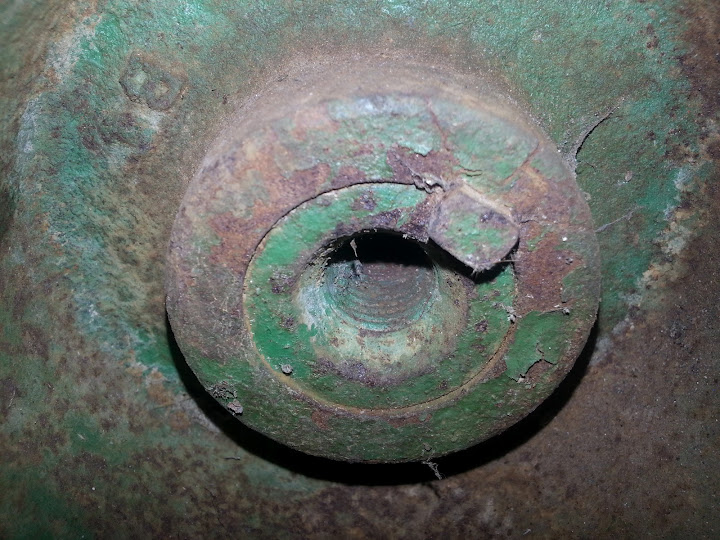
I also noticed some scoring inside the cylinder barrel as can be seen here - brown rusted section... It is only small so I am hoping that it is alright??
Also got the gear cover off:
And that is where I'm at. I have stripped down the head too, what is the best way to get the rust of the alu head? I was thinking a drill with wire brush? I will then reseat the vales and put this back together. This is my first job.
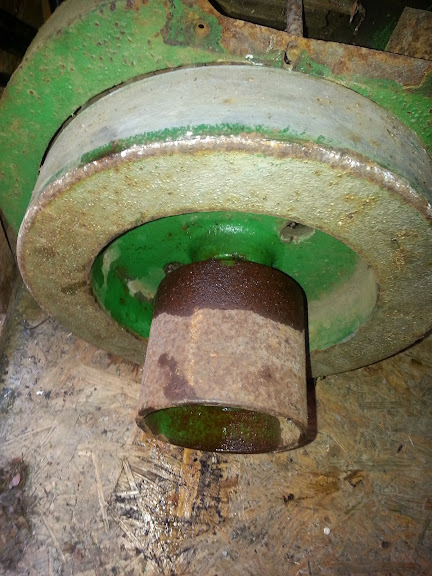
I also still need to get that pully and flywheel off, my understanding is that the flywheel will be on a tapered shaft, but the will the pully be on a threaded shaft connecting to the crankshaft? if so, how will I get this off? I have been spraying it every day with rust penetrator:
Cheers guys,
Steven
sjs205- Born to be wild
- Posts : 31
Join date : 2012-07-16
Re: Petter A1 restoration project
![]() by Guest Mon Aug 06 2012, 12:21
by Guest Mon Aug 06 2012, 12:21
Stu.
Guest- Guest
Re: Petter A1 restoration project
![]() by sjs205 Mon Aug 06 2012, 12:59
by sjs205 Mon Aug 06 2012, 12:59
stationary stu wrote:Steven when you say play on the big end is it sideways if yes it's not a problem, once you get the big end seperated from the engine and look at the shell (bearing) will you be a ble to see if it's worn or not. Can you clean the piston up and see if there's much scoring down the sides and how deep the scoring is this will let you know if the piston is ok. Best to use a glaze buster on the bore to see if the scoring is just surface marks or not, if you havn't a glaze buster use emery cloth (about medium grade) soaked in a bit of parraffin. Think that should keep you busy for a few days and you can report back with your findings.
Stu.
Yes the play is sideways on that Bigend. I'll get some pictures one I get it off and have a look at how worn it is.
I'll give the piston a good clean tonight but I don't think it is so bad... I think this damage could have occured perviously... the patch that you see on the cylinder barrel is a small recessed section, I think you would need to take quite a bit off with the glaze buster to get at it
I will give it all a little going over with some emery cloth tonight and let you know how I go...
sjs205- Born to be wild
- Posts : 31
Join date : 2012-07-16
Re: Petter A1 restoration project
![]() by Guest Mon Aug 06 2012, 13:15
by Guest Mon Aug 06 2012, 13:15
Stu.
Guest- Guest
Re: Petter A1 restoration project
![]() by nutgone Mon Aug 06 2012, 13:33
by nutgone Mon Aug 06 2012, 13:33
I included a link to a gib-key puller, for the flywheel, will have to see if I can find it again.
_________________
The "F" key is dying on my computer, please remember this when reading my posts, I'm trying to avoid using it.
The name's Matt, but call me Nutts if you like, there's already enough Matt's about.
nutgone- Life Member
- Posts : 2356
Join date : 2012-07-04
Age : 44
Location : East Sussex
Re: Petter A1 restoration project
![]() by sjs205 Mon Aug 06 2012, 13:36
by sjs205 Mon Aug 06 2012, 13:36
nutgone wrote:I did write a reply to this thread today, but it seems to have disappeared.
I included a link to a gib-key puller, for the flywheel, will have to see if I can find it again.
I hate it when that happens... I always have to copy my post content before pressing send just incase it crashes...
That info sounds like it could be of help, so if you could find it again it would be most appreciated
sjs205- Born to be wild
- Posts : 31
Join date : 2012-07-16
Re: Petter A1 restoration project
![]() by nutgone Mon Aug 06 2012, 13:49
by nutgone Mon Aug 06 2012, 13:49
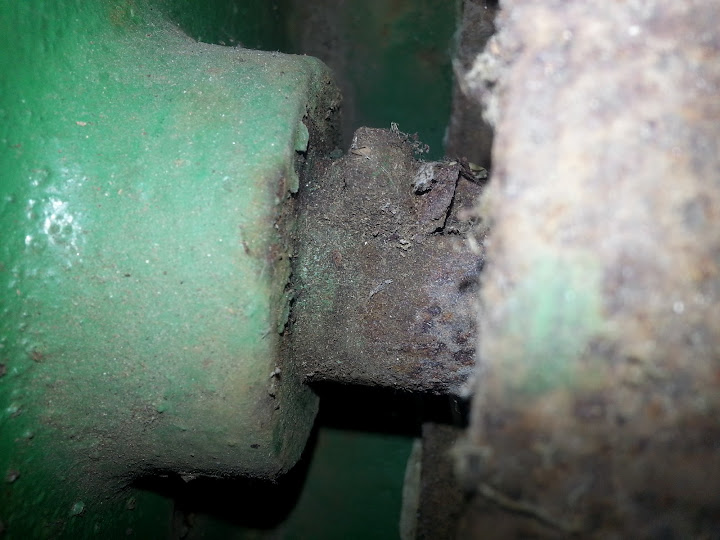
The pulley looks to be on a keyed parallel shaft, it should have a grub-screw or bolts to the flywheel (which I don't see) to secure it, you'll need to release whatever it is before attacking it with a puller, but be prepared, it could be a long job.
I think the flywheel is also on a keyed parallel shaft, but it is secured with a gib-key. You can get pullers for these, there's one for sale HERE, but I don't know if it will fit your engine.
Once again I would advocate GT85 as an easing/penetrating liquid, although whatever you use it'll likely be a long job. I personally have never removed a gib-key, I always left them well alone. I've heard all sorts of tales of them snapping off & needing to be drilled out etc etc, but that's usually on larger engines.
I also asked if your big end play was side-to-side along the shaft, in which case it's fine. Personally I wouldn't disturb the big end either.
The cylinder I would hone, with a good hone & some honing oil, if these aren't available I would simply use some wet & dry paper (same sort of thing as emery, just cheaper & made of paper instead of cloth) possibly with some WD40, or paraffin or diesel or something to give it a bit of lubrication. It doesn't look bad to me, especially if that mark is low down the cylinder.
these engines weren't exactly built to the tightest tolerances, they can take in a fair amount of wear without effecting running too much.
Hope this helps.
_________________
The "F" key is dying on my computer, please remember this when reading my posts, I'm trying to avoid using it.
The name's Matt, but call me Nutts if you like, there's already enough Matt's about.
nutgone- Life Member
- Posts : 2356
Join date : 2012-07-04
Age : 44
Location : East Sussex
Re: Petter A1 restoration project
![]() by sjs205 Mon Aug 06 2012, 13:52
by sjs205 Mon Aug 06 2012, 13:52
sjs205 wrote:
sjs205- Born to be wild
- Posts : 31
Join date : 2012-07-16
Re: Petter A1 restoration project
![]() by nutgone Mon Aug 06 2012, 14:02
by nutgone Mon Aug 06 2012, 14:02
There should be a grub screw holding against that key, threaded into the side of the pulley. Is there a little hole in the pulley (the bit the belt lays on)???
The gib key is the one on the flywheel, you can see it in one of your other pics.
_________________
The "F" key is dying on my computer, please remember this when reading my posts, I'm trying to avoid using it.
The name's Matt, but call me Nutts if you like, there's already enough Matt's about.
nutgone- Life Member
- Posts : 2356
Join date : 2012-07-04
Age : 44
Location : East Sussex
Re: Petter A1 restoration project
![]() by nutgone Mon Aug 06 2012, 14:08
by nutgone Mon Aug 06 2012, 14:08
_________________
The "F" key is dying on my computer, please remember this when reading my posts, I'm trying to avoid using it.
The name's Matt, but call me Nutts if you like, there's already enough Matt's about.
nutgone- Life Member
- Posts : 2356
Join date : 2012-07-04
Age : 44
Location : East Sussex
Re: Petter A1 restoration project
![]() by pauldg Mon Aug 06 2012, 14:24
by pauldg Mon Aug 06 2012, 14:24
A gib key puller is (or was) a standard service tool - that's why so many of them fail when trying to remove rusty and seized keys... That job is beyond what they were actually designed to do.
pauldg- A credit to the forum
- Posts : 300
Join date : 2012-06-30
Age : 46
Location : South Wiltshire
Re: Petter A1 restoration project
![]() by pauldg Mon Aug 06 2012, 14:27
by pauldg Mon Aug 06 2012, 14:27
pauldg- A credit to the forum
- Posts : 300
Join date : 2012-06-30
Age : 46
Location : South Wiltshire
Re: Petter A1 restoration project
![]() by nutgone Mon Aug 06 2012, 14:34
by nutgone Mon Aug 06 2012, 14:34
pauldg wrote:After what I just said, the key in that pulley could be a gib key with the head missing! I can't see much evidence of bolts or grub screws in any of the photos.
Could be. In which case it'll be even harder to get that pulley off. I would expect it to be a simple parallel affair on the pulley though. I suppose there's a chance someone jammed it on there without a grub-screw. I've seen that done before (& worse).
_________________
The "F" key is dying on my computer, please remember this when reading my posts, I'm trying to avoid using it.
The name's Matt, but call me Nutts if you like, there's already enough Matt's about.
nutgone- Life Member
- Posts : 2356
Join date : 2012-07-04
Age : 44
Location : East Sussex
Re: Petter A1 restoration project
![]() by nutgone Mon Aug 06 2012, 14:41
by nutgone Mon Aug 06 2012, 14:41
If that's the case then surely pushing the pulley on a bit (& there's only a bit of clearance) could free it up a bit.
We'd need to know there's no grub screw in there first though, to know for sure.
Think I'd still be inclined to leave it be, if it were mine. I know it's nice to get these things apart, I'm one of the worst for getting the dismantling bug, but sometimes it's best to leave well alone, clean it up as best you can & get some paint on it.
_________________
The "F" key is dying on my computer, please remember this when reading my posts, I'm trying to avoid using it.
The name's Matt, but call me Nutts if you like, there's already enough Matt's about.
nutgone- Life Member
- Posts : 2356
Join date : 2012-07-04
Age : 44
Location : East Sussex
Re: Petter A1 restoration project
![]() by nutgone Mon Aug 06 2012, 14:45
by nutgone Mon Aug 06 2012, 14:45
Whatever you do with it, be very careful with the head gasket joint faces. These should be cleaned up very carefully. Head joints are very important, heads should never be separated from barrels with ANY type of lever between the faces & a head gasket always goes on dry, never with any gasket jointing compounds, grease, oil or anything else.
You shouldn't have any trouble getting a new head gasket for this engine, unless the one which came off it is OK. If it's a solid copper one it can be annealed & re used quite easily, saving a few quid. But I expect it's a composite gasket.
_________________
The "F" key is dying on my computer, please remember this when reading my posts, I'm trying to avoid using it.
The name's Matt, but call me Nutts if you like, there's already enough Matt's about.
nutgone- Life Member
- Posts : 2356
Join date : 2012-07-04
Age : 44
Location : East Sussex
Re: Petter A1 restoration project
![]() by sjs205 Mon Aug 06 2012, 14:50
by sjs205 Mon Aug 06 2012, 14:50
pauldg wrote:After what I just said, the key in that pulley could be a gib key with the head missing! I can't see much evidence of bolts or grub screws in any of the photos.
I think I would agree, I don't remember seeing any holes in that pully, the only thing I could see is that parallel gib-key thing that sticks out the front...
With the head missing? what do you mean by that?
So I guess the way to get the pully off would be to remove this key buy pulling it with some sort of puller or wedge?
sjs205- Born to be wild
- Posts : 31
Join date : 2012-07-16
Re: Petter A1 restoration project
![]() by pauldg Mon Aug 06 2012, 14:55
by pauldg Mon Aug 06 2012, 14:55
A tapered gib key is sort-of 'L' shaped, the bottom of the 'L' being the head - this would usually give you something to put the puller behind (it's actually more of a 'pusher' but hey).
If there is definitely no retaining bolt or grub screw, the 'best' way (other than push the pully on a little more as nutgone said - but that would need the shaft behind to be clean enough to allow it to slide) to get that out would be to weld a bolt or something to it - it'll give you something to hold on to and the heat from welding will also help to release it.
If it were mine, I'd want to get it off.
Last edited by pauldg on Mon Aug 06 2012, 14:57; edited 1 time in total
pauldg- A credit to the forum
- Posts : 300
Join date : 2012-06-30
Age : 46
Location : South Wiltshire
Page 2 of 4 • 1, 2, 3, 4 ![]()
» A few pic's of my J.A.P 2A stripdown/restoration project !.
» Lister D Restoration Project
» my latest restoration project.....
» My first restoration project a Douglas SV54
|
|
|