
I'm at it again! Tarpen Resto No. 3
Page 1 of 3 • 1, 2, 3 ![]()

I'm at it again! Tarpen Resto No. 3
![]() by nutgone Mon Dec 31 2012, 00:20
by nutgone Mon Dec 31 2012, 00:20
4Un!~~60_1.JPG)
Here's the listing....
http://www.ebay.co.uk/itm/Tarpen-400-Watt-Generating-Set-COLLECTION-ONLY-/140899660459?item=140899660459&ViewItem=&ssPageName=ADME:B:WNA:GB:1123&nma=true&si=ku5g8sy6w6DJ9UQX7VczBLkreWs%3D&orig_cvip=true&rt=nc&_trksid=p2047675.l2557
Funny thing is, the seller is the same bloke who bought mine off me a few weeks ago.
Last edited by nutgone on Mon Dec 31 2012, 10:50; edited 1 time in total
_________________
The "F" key is dying on my computer, please remember this when reading my posts, I'm trying to avoid using it.
The name's Matt, but call me Nutts if you like, there's already enough Matt's about.

nutgone- Life Member

- Posts : 2356
Join date : 2012-07-04
Age : 44
Location : East Sussex
Re: I'm at it again! Tarpen Resto No. 3
![]() by matt86 Mon Dec 31 2012, 00:46
by matt86 Mon Dec 31 2012, 00:46
does it run ?
matt

matt86- Admin
- Posts : 5577
Join date : 2011-03-29
Age : 37
Location : swindon/ faringdon
Re: I'm at it again! Tarpen Resto No. 3
![]() by nutgone Mon Dec 31 2012, 01:04
by nutgone Mon Dec 31 2012, 01:04
It's going to join the very back of the queue though, it will live outside, under a tarp, until I can do something with it. Think of it as an investment for the spring. Might even end up showing it, & I would like to teach my nephews about 2 stroke engines & a bit about generators, if I can get them to stand still for 5 minutes!
_________________
The "F" key is dying on my computer, please remember this when reading my posts, I'm trying to avoid using it.
The name's Matt, but call me Nutts if you like, there's already enough Matt's about.
nutgone- Life Member
- Posts : 2356
Join date : 2012-07-04
Age : 44
Location : East Sussex
Re: I'm at it again! Tarpen Resto No. 3
![]() by Ianhw77k Mon Dec 31 2012, 01:58
by Ianhw77k Mon Dec 31 2012, 01:58

Ianhw77k- A credit to the forum
- Posts : 455
Join date : 2012-07-02
Age : 44
Location : East Sussex
Re: I'm at it again! Tarpen Resto No. 3
![]() by kevjhnsn Mon Dec 31 2012, 04:05
by kevjhnsn Mon Dec 31 2012, 04:05
matt86 wrote:you love them dont you ....
does it run ?
matt
matt is that one of them tarpen genys with the exhurst in thee bottom frame
not seen one of these before on here
think he will be doing these at the rallys like that team that does the grey fergys sripe and rebuild over the weekend at the shows lol
and next door the stationary tarpen pen
nutty matt
when do we start the stop watch on this one ready steady and nutgone tarpen says
hope this one is an easy fix for you mate
kev
_________________
 " IF YOU DONT DO ANYTHING " "" YOU'LL NEVER MAKES MISTAKES ""
kevjhnsn- Life Member
- Posts : 3596
Join date : 2011-02-10
Age : 45
Location : south cheshire
Re: I'm at it again! Tarpen Resto No. 3
![]() by nutgone Mon Dec 31 2012, 10:57
by nutgone Mon Dec 31 2012, 10:57
I suppose my first engine was a Tarpen (the one I still have in Ian's garage), so I do have a bit of a soft spot for them. I think I will use this one to fill in the gaps between other projects. I often get times when I seem to be scratching around for something to do, this engine can fill those gaps & keep me occupied.
I will need to buy in a few bits for this one though. I've pretty much used up my stock of Tarpen resto. bits & bobs, & finances are a bit stretched, so I doubt I will be rushing with this one.
_________________
The "F" key is dying on my computer, please remember this when reading my posts, I'm trying to avoid using it.
The name's Matt, but call me Nutts if you like, there's already enough Matt's about.
nutgone- Life Member
- Posts : 2356
Join date : 2012-07-04
Age : 44
Location : East Sussex
Guest- Guest
Re: I'm at it again! Tarpen Resto No. 3
![]() by braydh Mon Dec 31 2012, 21:53
by braydh Mon Dec 31 2012, 21:53
braydh- A true Stationary engine owner
- Posts : 130
Join date : 2012-10-21
Age : 59
Location : West Sussex
Re: I'm at it again! Tarpen Resto No. 3
![]() by nutgone Mon Dec 31 2012, 22:01
by nutgone Mon Dec 31 2012, 22:01
Braydh, are you still looking? I'll keep an eye out id you are. You'd probably prefer something water cooled though.
_________________
The "F" key is dying on my computer, please remember this when reading my posts, I'm trying to avoid using it.
The name's Matt, but call me Nutts if you like, there's already enough Matt's about.
nutgone- Life Member
- Posts : 2356
Join date : 2012-07-04
Age : 44
Location : East Sussex
Re: I'm at it again! Tarpen Resto No. 3
![]() by braydh Mon Dec 31 2012, 22:13
by braydh Mon Dec 31 2012, 22:13
I will find something soon or maybe even a few things when the wifes not looking
braydh- A true Stationary engine owner
- Posts : 130
Join date : 2012-10-21
Age : 59
Location : West Sussex
Re: I'm at it again! Tarpen Resto No. 3
![]() by Guest Tue Jan 01 2013, 12:16
by Guest Tue Jan 01 2013, 12:16
Stu.
Guest- Guest
Re: I'm at it again! Tarpen Resto No. 3
![]() by nutgone Tue Jan 01 2013, 23:32
by nutgone Tue Jan 01 2013, 23:32
I think, as space is at such a premium here, I may just have to do it up & turn it around as quick as possible. It makes sense anyway, as it'll give me some cash to spend on the Stuart Turner P6, which still needs a barrel & a magneto to make it a runner. Also, it's living outside now, which I don't like. So the sooner it goes to a good home the better, unless I can find a dry spot somewhere for it.
So, I guess I'll be getting the paint out again this coming week & cracking on. It appears to be pretty sound, mechanically, so probably won't need a full rebuild. I know what they look like inside now anyway. I'll whip the head & barrel off, of course, & see how I go from there. I will also dismantle it for painting, separating engine from genny, so I'll get a good feel for the condition of bearings etc. as I go.
Hopefully it won't take too much time or money. I've got plenty of the former, but bugger all of the latter!
Pics will come tomorrow.
_________________
The "F" key is dying on my computer, please remember this when reading my posts, I'm trying to avoid using it.
The name's Matt, but call me Nutts if you like, there's already enough Matt's about.
nutgone- Life Member
- Posts : 2356
Join date : 2012-07-04
Age : 44
Location : East Sussex
Re: I'm at it again! Tarpen Resto No. 3
![]() by Guest Wed Jan 02 2013, 12:13
by Guest Wed Jan 02 2013, 12:13
Stu.
Guest- Guest
Re: I'm at it again! Tarpen Resto No. 3
![]() by nutgone Wed Jan 02 2013, 13:21
by nutgone Wed Jan 02 2013, 13:21
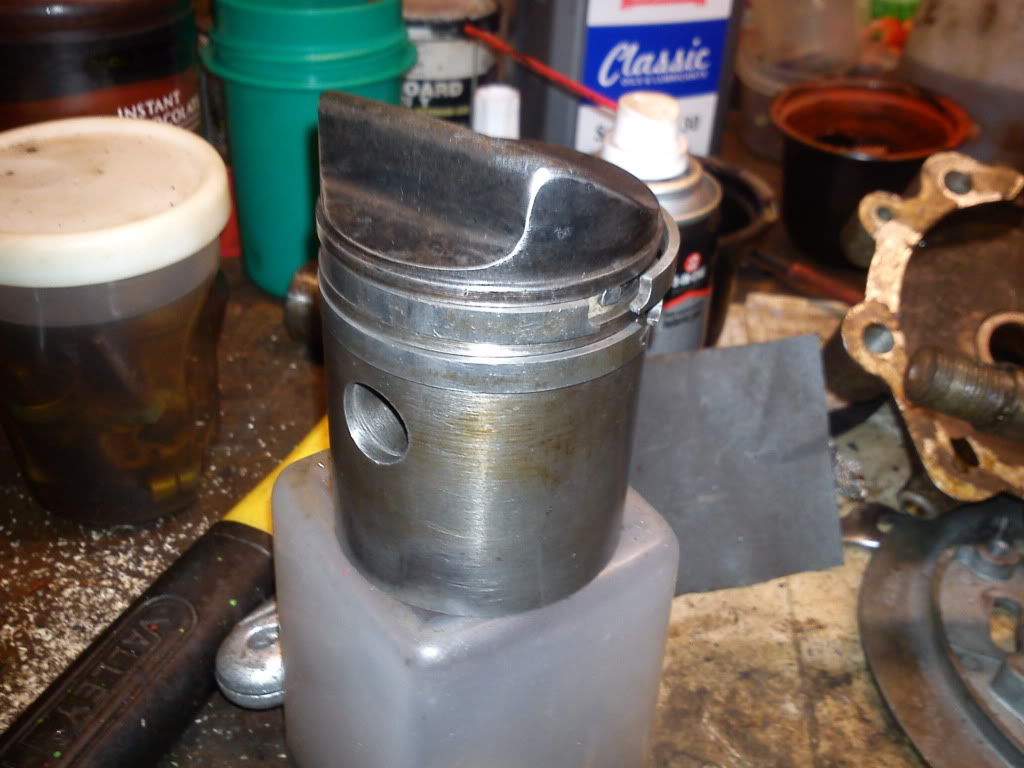
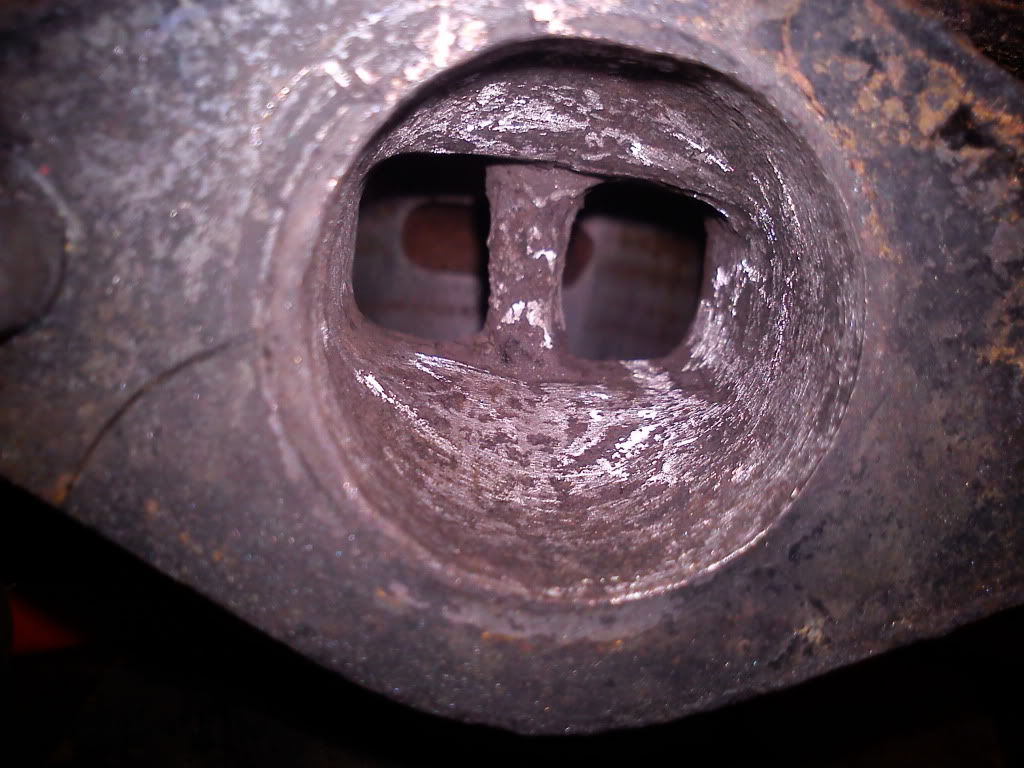
The rings are seized solid, so I'm going to soak the piston in some meths. The ports need de-coking & the barrel could really do with honing & measuring, as there was a stiff spot near bottom of stroke (that could be due to the rings).
Looks like the engine might as well be stripped down completely after all. I've got to take the mag off anyway, the head & barrel are off already & the bottom part of the engine has to come off for painting, so I may as well split the crank cases & give everything a good clean, it shouldn't take long.
I'll just have to hope it runs when it goes back together, after painting. It should do, they're pretty reliable these engines. I don't want to dismantle the genny unless I have to though, they never come apart easy & never seem to go back together very well.
I've got enough paint, primer & materials to get most of it done, it looks like the genny has been rewired not too long ago, so I should be able to get it up & running & painted without spending too much money. Then I'll have to make up another lighting board, get some rubber flex, brass lamp holders & 110v light bulbs.
Shouldn't take me too long to get it done.
_________________
The "F" key is dying on my computer, please remember this when reading my posts, I'm trying to avoid using it.
The name's Matt, but call me Nutts if you like, there's already enough Matt's about.
nutgone- Life Member
- Posts : 2356
Join date : 2012-07-04
Age : 44
Location : East Sussex
Re: I'm at it again! Tarpen Resto No. 3
![]() by Guest Wed Jan 02 2013, 13:25
by Guest Wed Jan 02 2013, 13:25
Stu.
Guest- Guest
Re: I'm at it again! Tarpen Resto No. 3
![]() by nutgone Wed Jan 02 2013, 23:26
by nutgone Wed Jan 02 2013, 23:26
However, I used as much patience as I could muster. I sprayed them with GT85 & left the whole thing for a while. I was going to get some meths to soak it in, as I've heard this is very good with stuck rings, but that would've meant moving my dad's car to get in the garage, so I thought I'd have a go without the meths.
I used the tapping method which Matt (Matt86 I believe) told us about on another thread, it was working quite well, but not well enough. These rings are a very tight fit in the groove, so I figured I needed something thinner than GT85, so I sprayed them with some brake & clutch cleaner, which penetrated very well. I was spraying with alternative squirts of GT85 * the brake & clutch cleaner, along with the tapping, by hand, with a punch, & both rings had begun to spring out at one end. Then I got my little slivers of metal (which I usually use to get rings off without breaking them) & slid one behind the top ring. It removed it a little further but I didn't want to push it too hard & break the ring.
Eventually, with a lot of patience & persuasion, I got both rings off & cleaned up the grooves, as well as all faces of the rings themselves. I still wasn't happy with the fit of the rings in the grooves though, they were very tight in there & I thought it won't be long until they're seized again. So I put some fine wet & dry paper on a flat metal surface & polished a little from the top & bottom surface of each ring. They're still tight, but better than they were.
I'm guessing this is a post war machine & the cast iron piston is probably a product of the lack of aluminium at those times. I'm pretty sure all the other Tarpens I've restored have had aluminium pistons.
Anyway, I followed this up by taking the engine off & getting back inside the workshop again (the Tarpen lives outside, but it started raining at this point, so I took the engine off to work on it in the dry).
Eventually I managed to get the flywheel off, the magneto is very clean, but I think the points need re-facing. the coil reads fine, so I'm guessing with a good clean-up we'll have life again.
I've completely stripped the carb down to its' component parts & left them soaking in my cleanest parts-wash solution, I will clean them all up & rinse with brake & clutch cleaner in the next day or so & rebuild the carb ready for reassembly of the unit.
I've also split the crank cases & removed the crank shaft. I had a few hurdles to get over to achieve this & at one point I thought I wasn't going to manage it, but after dinner I went back in there & got serious with the copper mallet. Now it's all sitting in my parts wash tray with a good spraying of parts wash solution, ready for a good scrub tomorrow.
I have taken a few pics, but I still need to get them off my phone & upload to photobucket. Might get round to that tomorrow.
I have thoroghly cleaned & reassembled the piston. Grooves all cleaned, rings all cleaned & the crown de-coked. I've also de-coked the ports & the head, which were all quite badly coked up. The dremmel helped me out here, she should breathe quite well when she's eventually fired up.
One little oddity I did come across, the exhaust seems to have been plated at some point. Not sure if it's chrome or nickel, not certain I will ever know, but it's not going to be easy to get it all off & with some still on there it's going to look patchy. You see I've stopped using high-temp black paint on steel & iron barrels, heads & exhausts, going instead for Kurust metal treatment (similar stuff to Jenolite & that stuff Andy (blackvanman) uses). it converts rust to a black coating & seems to withstand heat very well. But it only really works on ferrous metals, chrome won't go black like the rest of it, so I might just have to get some more high-temp black, I find the Plasti-cote stuff the best, but it aint cheap, & I hate buying spray cans, they're such a messy, expensive & wasteful way to paint. never mind, I need some for the Homelite anyway, that's got an ally barrel/head.
My final observation for this evening, the petrol tank is in a bit of a sorry state inside, it'll need a damn good clean. looks sound though, so no holes to repair, just needs a damn good clean.
So much for a quick restoration!
_________________
The "F" key is dying on my computer, please remember this when reading my posts, I'm trying to avoid using it.
The name's Matt, but call me Nutts if you like, there's already enough Matt's about.
nutgone- Life Member
- Posts : 2356
Join date : 2012-07-04
Age : 44
Location : East Sussex
Re: I'm at it again! Tarpen Resto No. 3
![]() by Ianhw77k Thu Jan 03 2013, 01:35
by Ianhw77k Thu Jan 03 2013, 01:35
Ianhw77k- A credit to the forum
- Posts : 455
Join date : 2012-07-02
Age : 44
Location : East Sussex
Re: I'm at it again! Tarpen Resto No. 3
![]() by steve w Thu Jan 03 2013, 07:20
by steve w Thu Jan 03 2013, 07:20

steve w- Life Member
- Posts : 503
Join date : 2012-09-15
Age : 52
Location : Nr Wolverhampton
Re: I'm at it again! Tarpen Resto No. 3
![]() by Guest Thu Jan 03 2013, 12:15
by Guest Thu Jan 03 2013, 12:15
Stu.
Guest- Guest
Re: I'm at it again! Tarpen Resto No. 3
![]() by nutgone Fri Jan 04 2013, 20:09
by nutgone Fri Jan 04 2013, 20:09
Crank cases before clean-up....

Crank cases after clean-up....

here's the carb, all cleaned up (I took it completely apart, even took the butterfly & spindle out)....

Nice clean piston....
De-coked exhaust ports & clean bore....

& here's the magneto, after removal of the flywheel....

Today I decided to clean up the head & barrel & give them a coat of Kurust (which I have only just done)....

I also decided to test the condenser before completing my reassembly of the magneto. I went to a lecture on magnetos last night, held by a local vintage motorcycle club. The bloke there told me all about testing condensers. I tested this one & it's fine for capacitance, but has lost its insulation properties quite badly, so needs replacing.
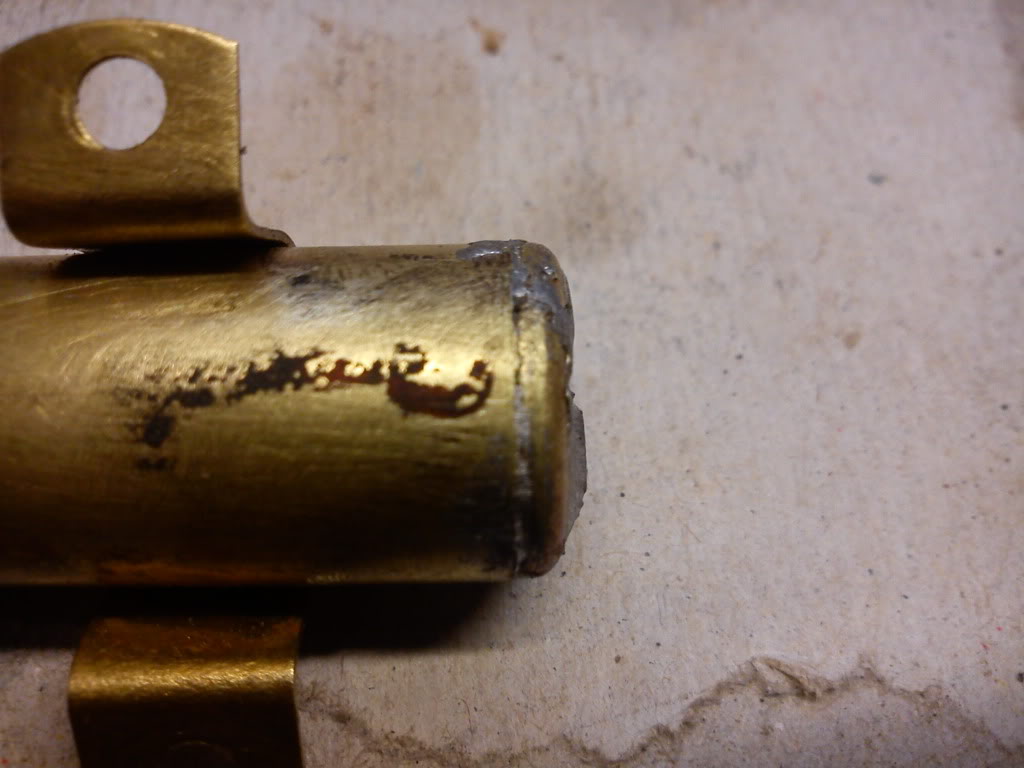
Only trouble is they don't make these any more. The points on these mags are kind of back to front & require a condenser with a terminal, rather than a wire. So I had a look through my supplies & decided the only way to do it was to pull this one apart & rebuild it with a new capacitor. basically I need to get this blue thing inside the shiny brass thing (this is acually the finished article with a spare capacitor next to it, I forgot to take pictures as I was going, as I didn't know if it would work or not)....

So I cut the bottom off the brass tube & pulled out the innards....

Then I managed to dig out the centre terminal post (this has a threaded sleeve on it which holds it into the top insulator, once this is removed the terminal screw just pushes inside & drops out the bottom.
I then soldered one lead from the capacitor onto the end of this screw, bent it over to the right direction & covered it with some rubber self amalgamating tape to insulate it against the outer brass tube.
I then pushed this inside & secured the terminal back into the top end insulator with the threaded sleeve, leaving just the other lead of the capacitor sticking out the bottom. I could have just left it like this but I wanted it to look right, so I melted the solder on the bottom piece of the tube, (which I cut off earlier) to reveal a small hole in the centre, I fed this over the wire sticking out the bottom so I could solder this end back onto the tube. then I just bent the wire over, soldered it to the base & cut off the excess.
All I had to do then was re-solder the strap on, which came off earlier during some other experimanting I was doing with a blow torch (trying to find out how it went together) leaving me with this....


I've tested it again & it reads fine, so there's no short circuits or heat damage (tested it while still hot from soldering, as they're more likely to fail when hot & readings are less likely to be favourable). I'm actually really pleased with it. If anyone has any old ones which no longer work I would like to make a few more up, just to keep as spares.
Anyway, apart from all that I put the crank cases back together, with a new gasket & spent the rest of my time cleaning up lots of nuts, bolts, washers & clips.
i haven't started de-greasing & cleaning up the bits for painting yet. I haven't got any de-greaser, but have got a very large bottle of "CIF" kitchen/bathroom cleaner, I may have to use that as it was free & I'm skint!
If anyone wants a condenser made up, by all means send me a PM & we can discuss it. I do have more capacitors, but would need the old condenser to use. I also do the Bakelite WICO A-Series magneto condensers. I'm not out to set up a business or anything, but I don't mind helping out.
_________________
The "F" key is dying on my computer, please remember this when reading my posts, I'm trying to avoid using it.
The name's Matt, but call me Nutts if you like, there's already enough Matt's about.
nutgone- Life Member
- Posts : 2356
Join date : 2012-07-04
Age : 44
Location : East Sussex
Re: I'm at it again! Tarpen Resto No. 3
![]() by braydh Fri Jan 04 2013, 20:51
by braydh Fri Jan 04 2013, 20:51
I'm still trying to get used to wearing glasses when doing things they drive me round the twist !!
Guess the magneto rebuilder gave a good talk .
Resto looking good can't wait to see it done hopefully I will get to see this one running but if I keep going to hassocks bound to see you're old one working at some point
braydh- A true Stationary engine owner
- Posts : 130
Join date : 2012-10-21
Age : 59
Location : West Sussex
Re: I'm at it again! Tarpen Resto No. 3
![]() by nutgone Fri Jan 04 2013, 21:53
by nutgone Fri Jan 04 2013, 21:53
braydh wrote:Good job on condenser they are an easy repair your soldering is better than mine.
I'm still trying to get used to wearing glasses when doing things they drive me round the twist !!
Guess the magneto rebuilder gave a good talk .
Resto looking good can't wait to see it done hopefully I will get to see this one running but if I keep going to hassocks bound to see you're old one working at some point
The magneto talk was quite an eye opener, I just wish I had a coil winding machine, as I could quite easily do my own if I did. He's one of the best in the country by all accounts, as he uses a special vacuum encapsulation method of insulating the coils which many don't use, but he is expensive.
I learnt a few new things, but most of all I realised how simple most of the process is, to me at least, but I have experience of hand winding coils. Would love to get together with anyone who has a coil winder (hand or motor driven) & try a few coils. I've already got some of the insulating varnish.
P.S. I still can't get used to my glasses, but luckily I can still see pretty well without them, I have a built-in illuminated magnifying glass on my soldering iron stand, with holding clamps for smaller jobs, didn't need it for this though, but it does come in handy sometimes.
_________________
The "F" key is dying on my computer, please remember this when reading my posts, I'm trying to avoid using it.
The name's Matt, but call me Nutts if you like, there's already enough Matt's about.
nutgone- Life Member
- Posts : 2356
Join date : 2012-07-04
Age : 44
Location : East Sussex
Re: I'm at it again! Tarpen Resto No. 3
![]() by braydh Fri Jan 04 2013, 22:28
by braydh Fri Jan 04 2013, 22:28
braydh- A true Stationary engine owner
- Posts : 130
Join date : 2012-10-21
Age : 59
Location : West Sussex
Re: I'm at it again! Tarpen Resto No. 3
![]() by nutgone Fri Jan 04 2013, 22:55
by nutgone Fri Jan 04 2013, 22:55
braydh wrote: my coil winder prototype is almost there
Well I'm up for a get-together at some point, if you want to. I've even got an old mag we can have a go on (OK, so that may be looking a little too far ahead, but it's certainly not going anywhere).
The lecture consisted mainly of rotating coil magnetos, but the method is exactly the same for the average rotating magnet & even flywheel mags. It's something I've wanted to pursue for some time now, not really as a business venture or anything, more for my own benefit & possibly (if it actually worked) helping mates out.
_________________
The "F" key is dying on my computer, please remember this when reading my posts, I'm trying to avoid using it.
The name's Matt, but call me Nutts if you like, there's already enough Matt's about.
nutgone- Life Member
- Posts : 2356
Join date : 2012-07-04
Age : 44
Location : East Sussex
Re: I'm at it again! Tarpen Resto No. 3
![]() by Guest Sat Jan 05 2013, 13:06
by Guest Sat Jan 05 2013, 13:06
I take it you've not found any other faults with the engine Nuts as your pushing ahead and looking to do some painting soon.
Stu.
Guest- Guest
Page 1 of 3 • 1, 2, 3 ![]()
» Here We Go Again! Tarpen Take 2
» Petter A1 resto(ish)
» Nutgone's Tarpen
» J A P 4F RESTO
|
|
|