Bamford K1 Corn Mill Restoration
+4
neil (LE)
Appletop
Foden
Woodsman
8 posters
Page 1 of 1
 Bamford K1 Corn Mill Restoration
In 2014 I bought a Bamford K1 corn mill, but the restoration stalled due to a lack of spare time and, after a particularly fiddly Lister D restoration https://ukengineforum.forumotion.com/t7629-before-and-after me getting a bit cheesed off with cleaning, sanding and painting bits of old metal!

This Bamford mill seemed to have so many parts too, compared with the Bentall Mk J mill I'd restored previously. This is about as far as I'd got with it, and I've been tripping over bits of it in the garage and shed ever since!
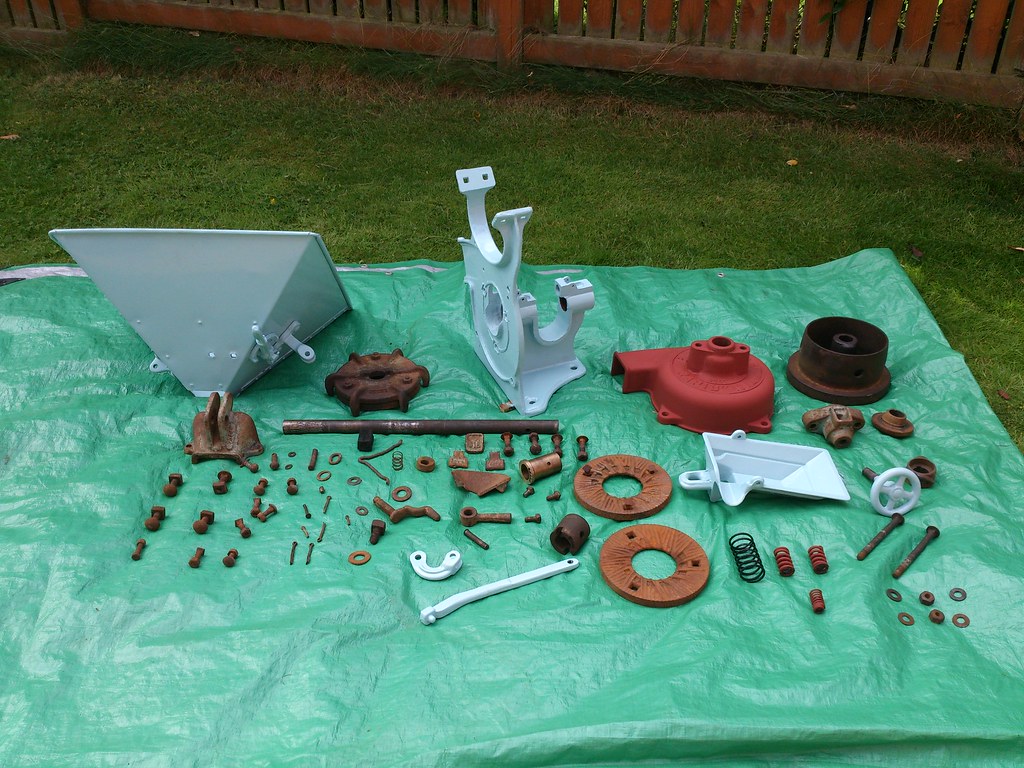
The current Corona Virus lock-down should now give me the chance to finish the restoration, so I thought I'd post a restoration thread on here. The mill itself had originally been installed in a shed, so the metalwork was in quite good condition, with not much pitting on the steel hopper. However, it must have picked up a hard object (probably a stone) during its final run and this had broken two springs - one of the safety springs on the plate tensioner, which was of an easy size to find and replace, and the internal plate spring, which fitted over the main drive shaft and was of a large and seemingly impossible size to buy off the shelf (3.5 inches long with a diameter of 4.5cm).
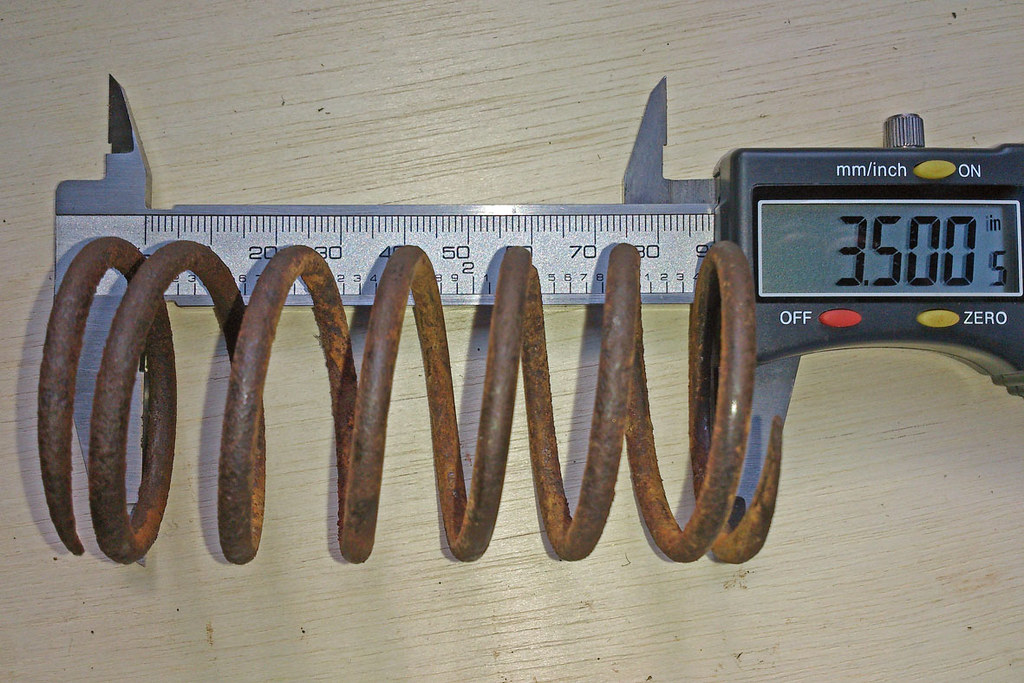
I thought I was going to have to have a spring specially made, but then I found an incomplete Bamford K1 Mill body for sale on the club stall at the 1000 Engine Rally. The main spring was one of the parts still present, so that was that problem sorted! It also gave me the other spring I needed, plus the original flywheel type pulley, which was missing from my mill, so a good result for £20!
A couple of hours in the shed yesterday made some more progress, and I found the tin of paint I'd had specially mixed to match the original colour had kept OK, and, more importantly, I could still brush paint OK! Which is just as well as I've got to repaint the hopper as the rust had tried to come through again in places, resulting in some rough stippling in places on the inside, plus a few chips round the edges of the exterior where I've been tripping over the damned thing for the last 5 years!
So a bit of work to redo there, but it will be worth it to get it looking 'factory fresh' again. All being well there should be some more updates on this thread over the coming weeks. Thanks for reading, and stay safe and well.

This Bamford mill seemed to have so many parts too, compared with the Bentall Mk J mill I'd restored previously. This is about as far as I'd got with it, and I've been tripping over bits of it in the garage and shed ever since!

The current Corona Virus lock-down should now give me the chance to finish the restoration, so I thought I'd post a restoration thread on here. The mill itself had originally been installed in a shed, so the metalwork was in quite good condition, with not much pitting on the steel hopper. However, it must have picked up a hard object (probably a stone) during its final run and this had broken two springs - one of the safety springs on the plate tensioner, which was of an easy size to find and replace, and the internal plate spring, which fitted over the main drive shaft and was of a large and seemingly impossible size to buy off the shelf (3.5 inches long with a diameter of 4.5cm).

I thought I was going to have to have a spring specially made, but then I found an incomplete Bamford K1 Mill body for sale on the club stall at the 1000 Engine Rally. The main spring was one of the parts still present, so that was that problem sorted! It also gave me the other spring I needed, plus the original flywheel type pulley, which was missing from my mill, so a good result for £20!
A couple of hours in the shed yesterday made some more progress, and I found the tin of paint I'd had specially mixed to match the original colour had kept OK, and, more importantly, I could still brush paint OK! Which is just as well as I've got to repaint the hopper as the rust had tried to come through again in places, resulting in some rough stippling in places on the inside, plus a few chips round the edges of the exterior where I've been tripping over the damned thing for the last 5 years!
So a bit of work to redo there, but it will be worth it to get it looking 'factory fresh' again. All being well there should be some more updates on this thread over the coming weeks. Thanks for reading, and stay safe and well.
_________________
Jules.

A Lister- A true Stationary engine owner

- Posts : 166
Join date : 2013-01-04
Location : South Cheshire
 Re: Bamford K1 Corn Mill Restoration
Some more progress this week, I've been busy sanding the rust off some of the seemingly hundreds of parts this mill has! It's mostly the small fiddly stuff at the moment, such as taking the rust off nuts and washers, and chasing out the threads on bolts, etc. All essential stuff, but at times it feels like I'm not getting anywhere!
I'd forgotten the joys of vintage machinery restoration, I've got two sets of clothing in the wash and the house stinks of paint again! This morning the lettering on the plate cover casting got painted, which is a job I hate doing! The casting wasn't brilliant in places either, which makes it all the more tricky to get neat edges. Never mind, I got there in the end.
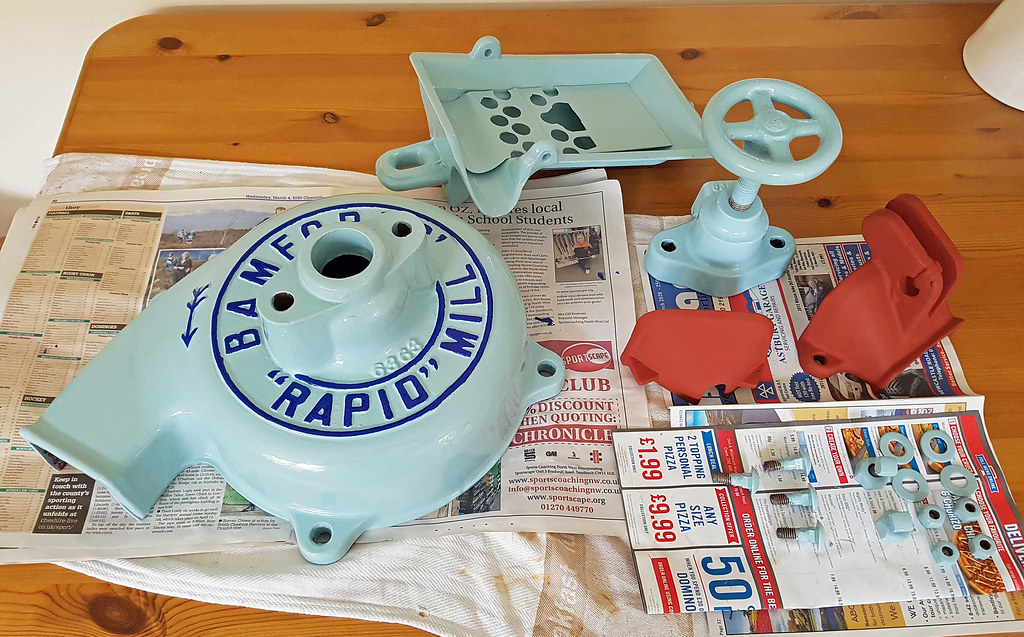
I'd forgotten the joys of vintage machinery restoration, I've got two sets of clothing in the wash and the house stinks of paint again!

_________________
Jules.

A Lister- A true Stationary engine owner

- Posts : 166
Join date : 2013-01-04
Location : South Cheshire
 Re: Bamford K1 Corn Mill Restoration
Nice paint job Jules. I look forward to seeing it completed and running.
Keep up the good work.
Keep up the good work.
_________________
Regards Paul
Tha can alus tell a Yorkshireman - but tha can't tell him much.

Woodsman- Admin
- Posts : 2815
Join date : 2014-08-24
Age : 73
Location : God's own county
 Re: Bamford K1 Corn Mill Restoration
So much easier picking out letters etc from the comfort of the kitchen table, something I am looking forward too once I get my new pad sorted out.

Appletop- Life Member

- Posts : 1483
Join date : 2010-01-02
Age : 56
Location : Just outside Diss
 Re: Bamford K1 Corn Mill Restoration
You have inspired me to get on with my Bentall mill this year Jules, it must be ten years since I last did anything to it. It's quite safe as it lives in our attic so nice and dry still. It will never mill anything again as the roller is almost smooth but it will still go round and round! 
Pete.
Pete.
_________________
Too much to do, and so little time!!

Foden- Life Member

- Posts : 1411
Join date : 2009-11-04
Age : 73
Location : North Midlands
 Re: Bamford K1 Corn Mill Restoration
Thanks for the comments and encouragement chaps. Another 5 hours restoration work done today, the pulley, grinding plates, driveshaft and all remaining nuts and bolts were given the rust removal treatment with sanding disk, rotory wire brush or Dremel sanding drum. A tedious and time-consuming job, but it's done now and the next stage is painting all the external bits and pieces amongst that lot, and giving the internal non-contact surfaces a coat of home-made rust inhibitor. Hopefully, if all goes to plan, by next weekend I can start some re-assembly work.
_________________
Jules.

A Lister- A true Stationary engine owner

- Posts : 166
Join date : 2013-01-04
Location : South Cheshire
 Re: Bamford K1 Corn Mill Restoration
Home made rust inhibitor Jule?????

Appletop- Life Member

- Posts : 1483
Join date : 2010-01-02
Age : 56
Location : Just outside Diss
 Re: Bamford K1 Corn Mill Restoration
Yes, the old fashioned 50% boiled linseed oil and 50% white spirit mix. A little of it goes a long way, but it takes two or three weeks (in mild weather) to get dry enough to handle. A couple of coats of that tends to stop surface rust coming back on cast iron and steel. It should be OK for the inside 'non wearing' surfaces of the mill such as the back of the grinding plates and the bits where the corn/milled grain won't regularly come into contact with. By the time lockdown is over and I mill some grain with it at a show it should be well dry. Also, I'm not planning on feeding myself or any animals on the milled grain so there should be no problem there with any toxins.
I'll be making sure any paint brushes I use to apply it are well cleaned with white spirit, then detergent and water, and I've not got any of the mix on any rags, cloths, etc. to stop them bursting into flames (self combusting), which can happen with linseed oil!
I'll be making sure any paint brushes I use to apply it are well cleaned with white spirit, then detergent and water, and I've not got any of the mix on any rags, cloths, etc. to stop them bursting into flames (self combusting), which can happen with linseed oil!

_________________
Jules.

A Lister- A true Stationary engine owner

- Posts : 166
Join date : 2013-01-04
Location : South Cheshire
 Re: Bamford K1 Corn Mill Restoration
I've managed to get the body and hopper of the mill finished now, and have put a few pieces back together again. However, I still have the metal leg base to de-rust, prime and paint yet, so I can build the mill on it. If I build the mill body up separately it will be too heavy to gently lift onto the base without risking scratching the new paintwork.

I got the cross brace plates from the legs done last weekend, so at least that's a start. It took ages to remove the old paint from the lettering, someone had really slapped it on thick in places. I'm now waiting for the paint to harden off before painting the lettering and raised circles mid-blue, as that's the way they were painted originally.
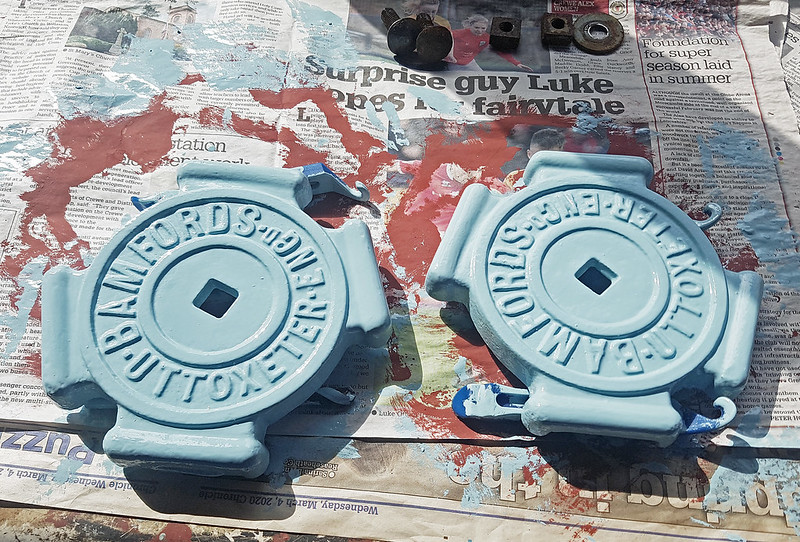
I'm not looking forward to doing those the legs as I've run out of sanding disks for the electric sander, so it will all have to be done by hand.

I got the cross brace plates from the legs done last weekend, so at least that's a start. It took ages to remove the old paint from the lettering, someone had really slapped it on thick in places. I'm now waiting for the paint to harden off before painting the lettering and raised circles mid-blue, as that's the way they were painted originally.

I'm not looking forward to doing those the legs as I've run out of sanding disks for the electric sander, so it will all have to be done by hand.
_________________
Jules.

A Lister- A true Stationary engine owner

- Posts : 166
Join date : 2013-01-04
Location : South Cheshire
 Re: Bamford K1 Corn Mill Restoration
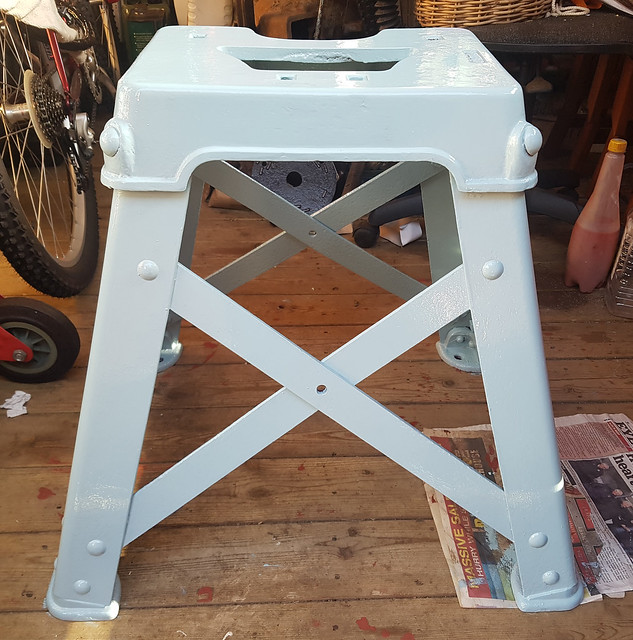
Spent some time over the weekend on the corn mill legs, not a pleasant job rubbing those down with sandpaper and a wire bush! Anyway, two coats of red oxide primer and first coat of gloss have gone on them now, just the top coat to do in a couple of days once the first coat has hardened off enough. Then it's rebuild time!

_________________
Jules.

A Lister- A true Stationary engine owner

- Posts : 166
Join date : 2013-01-04
Location : South Cheshire
 Re: Bamford K1 Corn Mill Restoration
That's looking really good, it will make a very impressive exhibit once it's completed. As I found when renovating my pump, waiting for paint to dry and then harden can be very frustrating, especially when you're keen to make some progress. Your painting and lettering looks to be of a very high standard, I would be interested to know what technique and brushes you use, especially to pick out the raised mouldings and letters. Hope the rebuild phase goes well and is scratch free!
Regards, Neil.
Regards, Neil.
neil (LE)- A credit to the forum

- Posts : 399
Join date : 2012-03-21
Age : 68
Location : N/W Kent
 Re: Bamford K1 Corn Mill Restoration
neil (LE) wrote:That's looking really good, it will make a very impressive exhibit once it's completed. As I found when renovating my pump, waiting for paint to dry and then harden can be very frustrating, especially when you're keen to make some progress. Your painting and lettering looks to be of a very high standard, I would be interested to know what technique and brushes you use, especially to pick out the raised mouldings and letters. Hope the rebuild phase goes well and is scratch free!
Regards, Neil.
Thanks for the kind words, Neil. The paint I'm using takes an age to dry, it's just standard Dulux Trade gloss paint (not the water based stuff!), which I bought as it was a very good match for the original colour. However, it's about 5 years old now and only about 1/4 of the tin is left and there are quite a few bits in it that need picking out when brushing it on!
The upside to the slow drying (it did dry faster when fresh) is that it gives time for the brush marks to flow out. The bad news is that it takes about 2 weeks to stop feeling tacky, but it eventually seems to dry to a fairly tough and chip-resistant finish. It's good enough for a corn mill, but wouldn't try it on something that gets hot and splashed with fuel like an engine.
As for painting in general, it's mainly down to good preparation and getting a nice even finish before applying the gloss coats. Where a smooth finish is required on a flat surface like a fuel tank, then letting the paint dry hard then wet sanding with very fine wet and dry sandpaper between coats. Then applying a top quality gloss with a high quality brush (I find Purdy brushes very good, but they're not cheap, so need to be cleaned thoroughly after use to keep them in good order and protect my investment!). Don't try and paint if it's too hot or cold either, or it will be like trying to apply treacle or drying too fast to get an even finish.
To be honest, I've not taken as much care with painting the mill as I would with an engine, as the castings were a bit rough in places and the original paint finish was a bit thick and 'drippy' in places, so I felt a pristine job wouldn't be in keeping. As for picking out the lettering, I find that resting my hand on something and using an artist's paintbrush and one of those little pots of Humbrol or Revell gloss paint (the sort used for Airfix models) works well for lettering and lining out.
Getting a good, brush-mark free finish is also down to patience, practice and getting the 'knack'. I'm not an expert at it, but with fresh paint and a good brush I can usually get some reasonable results. I always brush paint engines and vintage machines, unless I can tell they've originally been sprayed. I don't know if you've seen the following thread, but this was a rather fiddly restoration job I did several years ago, once again, all done by brush, and shows some of the preparation involved: https://ukengineforum.forumotion.com/t7629-before-and-after
Hope this is useful and thanks again for the encouragement.
_________________
Jules.

A Lister- A true Stationary engine owner

- Posts : 166
Join date : 2013-01-04
Location : South Cheshire
 Re: Bamford K1 Corn Mill Restoration
Jules, thank you for your very thorough and informative response to my request for information on your painting techniques. I found it reassuring that I'm not missing something and there is no magic, simple, short cut answer to achieving a good finish. It is as I thought, the route to a fine finish is mainly about the preparation and not trying to rush the process. I find preparation not too bad but I do find waiting the appropriate time between the various processes to be a challenge. In the past I have undone all my good work through being too impatient, then made matters worse by trying to paint my way out of the problem, rather than starting again by going back to bare metal, as I should have done.
Interestingly I do have Purdy brushes which I acquired when I bought my first tins of Craftmaster paints. I am finding it difficult to clean the brushes properly at the moment, as my supply of white spirits is very low and my local hardware store is still closed. I might have to stop any further painting until I can get some more thinners, or risk damaging the brushes.
I did look through your thread on the half and half Lister, what a result you achieved, very impressive. It is one of those cases where someone will say "why" and the answer is "because I can". And you certainly can, "what next", should be the question that follows.
Thanks again, regards,
Neil
neil (LE)- A credit to the forum

- Posts : 399
Join date : 2012-03-21
Age : 68
Location : N/W Kent
 Re: Bamford K1 Corn Mill Restoration
I'm running out of white spirit too, and ran out of disks for the sander and wire wheels for the drill, hence not being able to take the mill legs totally back to bare metal. The local B&Q reopened the other week but I heard the queues to get in were half way round the car park! Also, I could hardly pretend that getting a bit of stuff to paint a vintage corn mill was essential journey... perhaps I could have claimed it was mental therapy - and it was my emotional support corn mill! 
As you say, painting doesn't always go according to plan and sometimes it can take several attempts to get a good finish. I remember painting the hopper on my Lister A, that took 7 attempts to get the gloss coat right, with flatting down or wiping off in between the non successful ones. The most difficult bit was working quickly enough to be able to cut the paint back into the original wet edge once I'd got back to where I'd started from. I found working in two directions at once too difficult! I got there in the end though.

Anyway, back to corn mills. It's going to be weekend before I can put the second coat on those legs, so the paint should have hardened off enough by then. Then wait at least a week to start putting it all back together again, which is the bit I enjoy best. As for what's next, if I do restore another engine I've decided it will be one in original finish so I can just give it the 'oily rag' type finish. I'm tired of sanding and painting all the time since doing 'before and after' and all those corn mill parts. It's an easy life for me from now on!
As you say, painting doesn't always go according to plan and sometimes it can take several attempts to get a good finish. I remember painting the hopper on my Lister A, that took 7 attempts to get the gloss coat right, with flatting down or wiping off in between the non successful ones. The most difficult bit was working quickly enough to be able to cut the paint back into the original wet edge once I'd got back to where I'd started from. I found working in two directions at once too difficult! I got there in the end though.

Anyway, back to corn mills. It's going to be weekend before I can put the second coat on those legs, so the paint should have hardened off enough by then. Then wait at least a week to start putting it all back together again, which is the bit I enjoy best.
_________________
Jules.

A Lister- A true Stationary engine owner

- Posts : 166
Join date : 2013-01-04
Location : South Cheshire
 Re: Bamford K1 Corn Mill Restoration
A Lister wrote:The local B&Q reopened the other week but I heard the queues to get in were half way round the car park! Also, I could hardly pretend that getting a bit of stuff to paint a vintage corn mill was essential journey... perhaps I could have claimed it was mental therapy - and it was my emotional support corn mill!!
Well I've been Jules, not a big queue, about 10 mins to get in for some bags of ready mix mortar.....
As regards brush cleaner, I've resorted to petrol when I've no white spirit available.
_________________
blue cat
blue cat- Life Member

- Posts : 1065
Join date : 2013-10-10
 Re: Bamford K1 Corn Mill Restoration
A Lister wrote:I'm running out of white spirit too, and ran out of disks for the sander and wire wheels for the drill, hence not being able to take the mill legs totally back to bare metal. The local B&Q reopened the other week but I heard the queues to get in were half way round the car park! Also, I could hardly pretend that getting a bit of stuff to paint a vintage corn mill was essential journey... perhaps I could have claimed it was mental therapy - and it was my emotional support corn mill!
Tell them you need it to make flour for bread
_________________
Stuart
Robotstar5- Life Member

- Posts : 1109
Join date : 2018-09-25
 Re: Bamford K1 Corn Mill Restoration
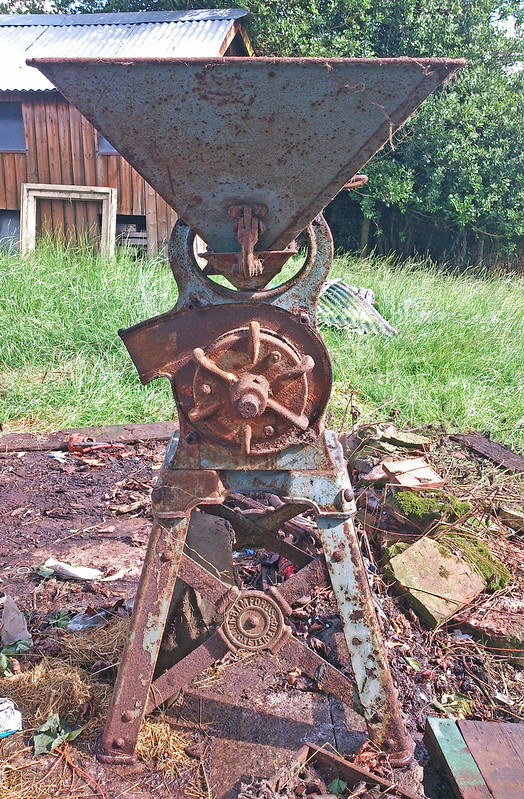
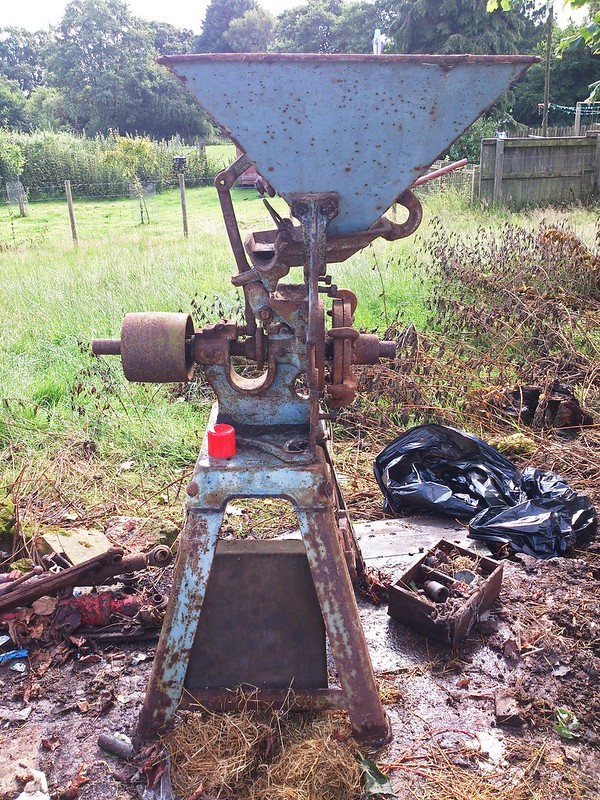
Just a quick update to say that this project did indeed get completed, around a year later the mill was finally finished and assembled (including the split pin and washers on that first pivot point you see when running your eyes down from the top of the hopper, not shown on this photo). How time flies when you're busy and get side tracked by work and life in general. 

Anyway, it looks (and runs) a bit better than it did here when I first got it:

Anyway, it looks (and runs) a bit better than it did here when I first got it:


Last edited by A Lister on Sat Mar 16 2024, 11:36; edited 1 time in total
_________________
Jules.

A Lister- A true Stationary engine owner

- Posts : 166
Join date : 2013-01-04
Location : South Cheshire
 Re: Bamford K1 Corn Mill Restoration
Good that you got it finished Jules, looks really good, I used to rally one of these Bamford mills back in the day (1970's).
_________________
blue cat
blue cat- Life Member

- Posts : 1065
Join date : 2013-10-10
 Re: Bamford K1 Corn Mill Restoration
Considering that you obviously rushed the job Jules (  ) it has turned out first class. Credit to you, all you need now are a few Shredded Wheat so you can move it around!
Pete.
Pete.
_________________
Too much to do, and so little time!!

Foden- Life Member

- Posts : 1411
Join date : 2009-11-04
Age : 73
Location : North Midlands
 Re: Bamford K1 Corn Mill Restoration
blue cat wrote:Good that you got it finished Jules, looks really good, I used to rally one of these Bamford mills back in the day (1970's).
Thanks, I still have the Bentall Mk J mill, which I got in 1982 and used to rally it quite often. It's good as I can dismantle it into 3 sections by undoing just 5 bolts to make transporting it easier (the mill body and hopper go in the back of the vehicle and the legs go in the trailer with the engine). That's the reason I bought it, as I'd only got access to a Mini Van at the time, so whatever I bought had to fit in that; ironically, these days Mini Vans are being exhibited as classic cars at the same shows as our stationary engines... which makes me feel quite old!
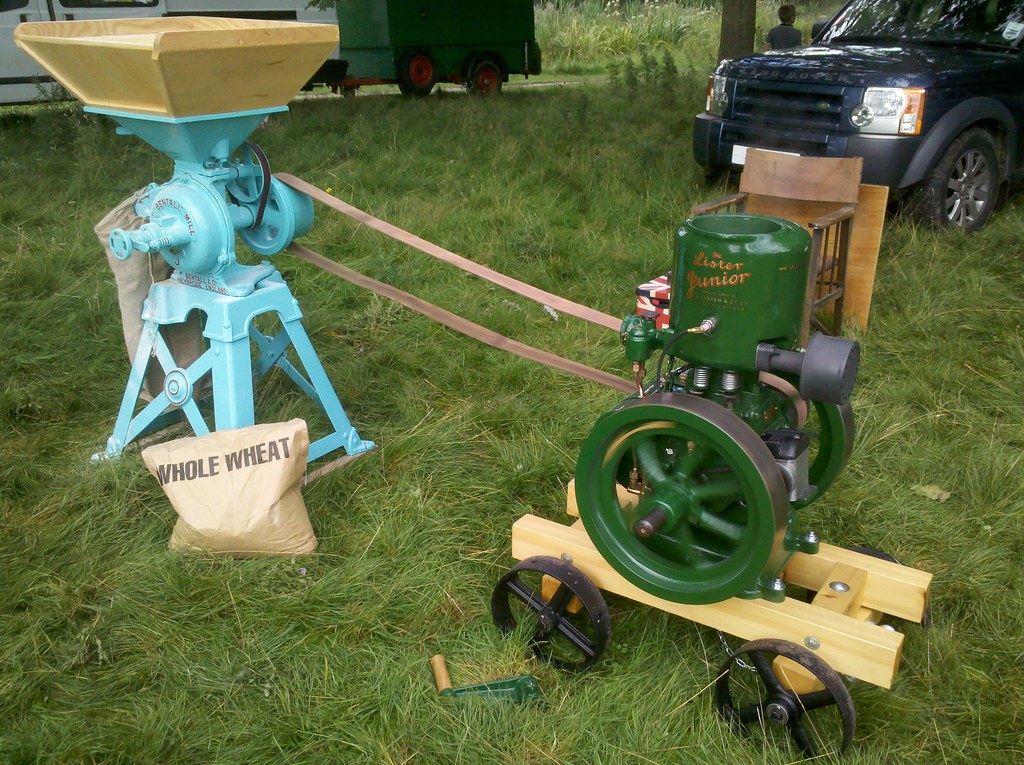
That Bamford is a different kettle of fish weight wise though (probably due to the fact that it's got about 3 times the number of parts on it as the Bentall - no wonder Bamford's went bust!), so I'll need to put wheels on the timbers it's on to move it around. I've already got the cast iron wheels so just need to get some suitable axles made for them.
_________________
Jules.

A Lister- A true Stationary engine owner

- Posts : 166
Join date : 2013-01-04
Location : South Cheshire
 Re: Bamford K1 Corn Mill Restoration
Foden wrote:Considering that you obviously rushed the job Jules () it has turned out first class. Credit to you, all you need now are a few Shredded Wheat so you can move it around!
Pete.
Hi Pete, not seen you for ages, hope you're doing OK? I don't know about Shredded Wheat, I could do with a new back! Bloody nuisance it is!
_________________
Jules.

A Lister- A true Stationary engine owner

- Posts : 166
Join date : 2013-01-04
Location : South Cheshire
 Re: Bamford K1 Corn Mill Restoration
Hi a lister. Lovley job. All looking well. I no the feeling tryin to get around to things. Bit it looks a great paint job on all. I got paint mixed for an engine. Painted the block with brush as its rough cast and looks well but now im facing the tank and bit afraid. Not set up for spray painting. Any tips🤪
Kingdom- Expert

- Posts : 64
Join date : 2023-05-02
 Similar topics
» Bamford Corn Mill - need help/advice please! Disassembly of plates
» Bentall Corn Mill
» Bentall Corn Mill
» 'Imperial' Corn Mill
» Bentall corn mill
» Bentall Corn Mill
» Bentall Corn Mill
» 'Imperial' Corn Mill
» Bentall corn mill
Page 1 of 1
Permissions in this forum:
You cannot reply to topics in this forum