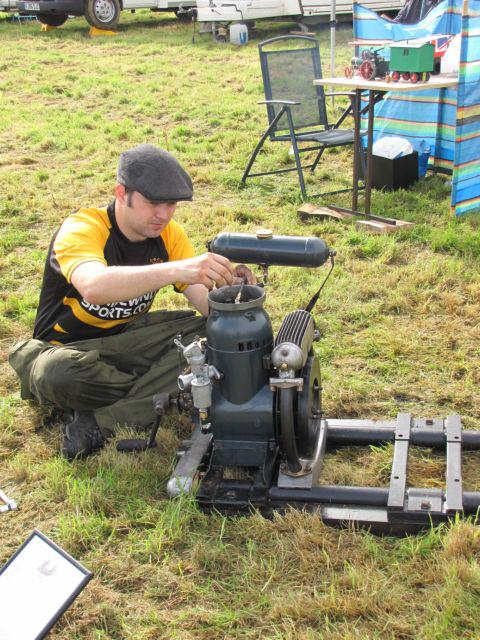
Scott Generating Set Restoration (Continues)
+9
Robotstar5
nickh
RichieR
oldgit
Andrew1971
maryalice
blue cat
StuartTurnerSteve
Woodsman
13 posters
Page 1 of 13
Page 1 of 13 • 1, 2, 3 ... 11, 12, 13 
 Scott Generating Set Restoration (Continues)
I have noticed it seems to be a little quiet on the forum, on the restoration front, during these periods of restrictions throughout the country. As we are now fully locked down again, I thought I would share some updates with you, hopefully without being too boring, letting you know how the Scott generating set restoration is progressing.
Engine Strip Down
I posted under "The most exhausting Scott" how I had taken the set apart, breaking it down into its major components and had then focused on the exhaust system, as a start to the restoration. I have now moved onto the Scott engine itself. Initially I wasn't certain if I would totally strip it down or just undertake an external cosmetic job. In the end, once I had looked into the crankcase and seen the internal state, the decision was made, it had to be fully stripped down.
I know there was a complete series of posts in the past, following the full restoration of a Scott PAB engine, so I won't go into too much detail on the engine rebuild itself but will include some pictures of the progress so far, before looking at the restoration of the rest of the set.


General external condition of engine, once cowling had been removed.

Underside of engine showing the crankcase drain valve.

Head removed, showing the piston crown.
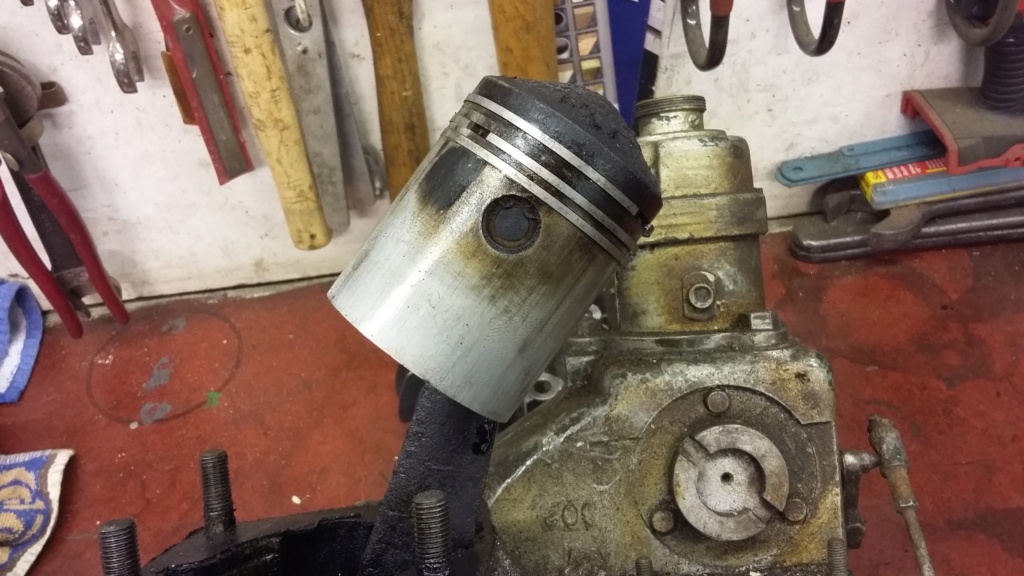
Cylinder removed, exposing the state of the piston.
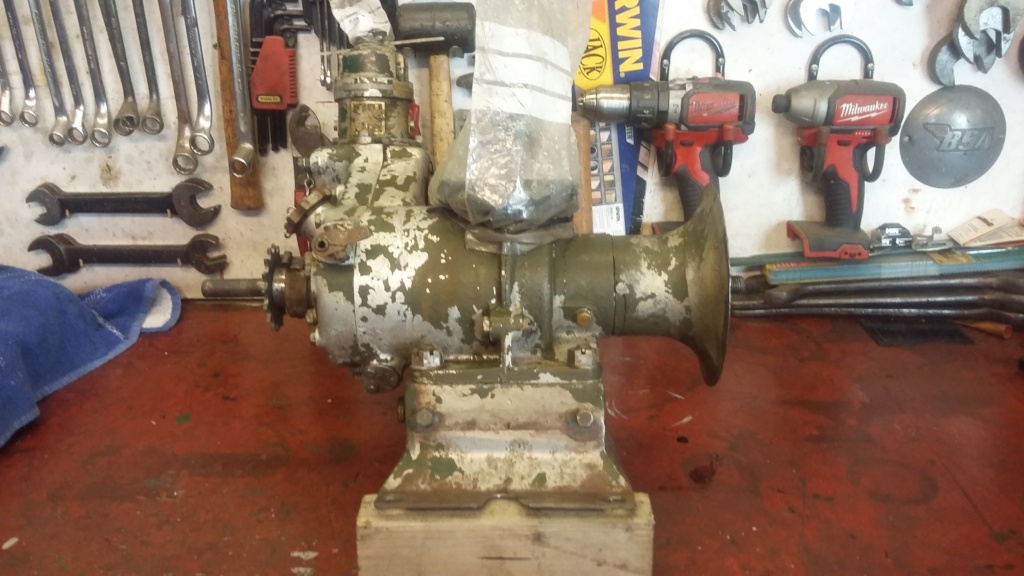
Engine block fully cleaned prior to disassembly. Note protection over the crankcase and tacho generator.
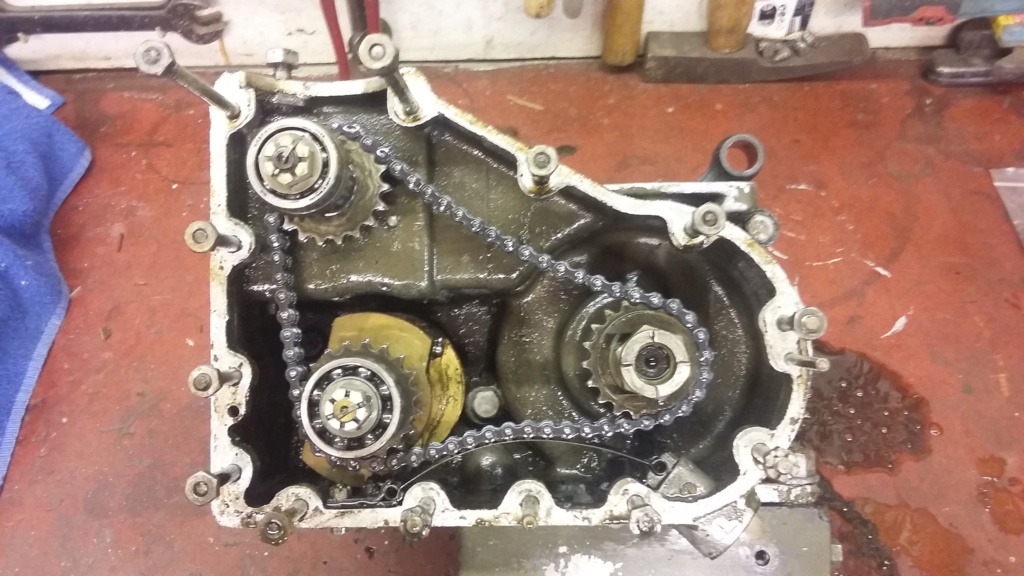
Auxiliary drive cover removed, showing internal mechanism.

Crank shaft being pressed out. (Vice being used as a make shift press, it worked!)
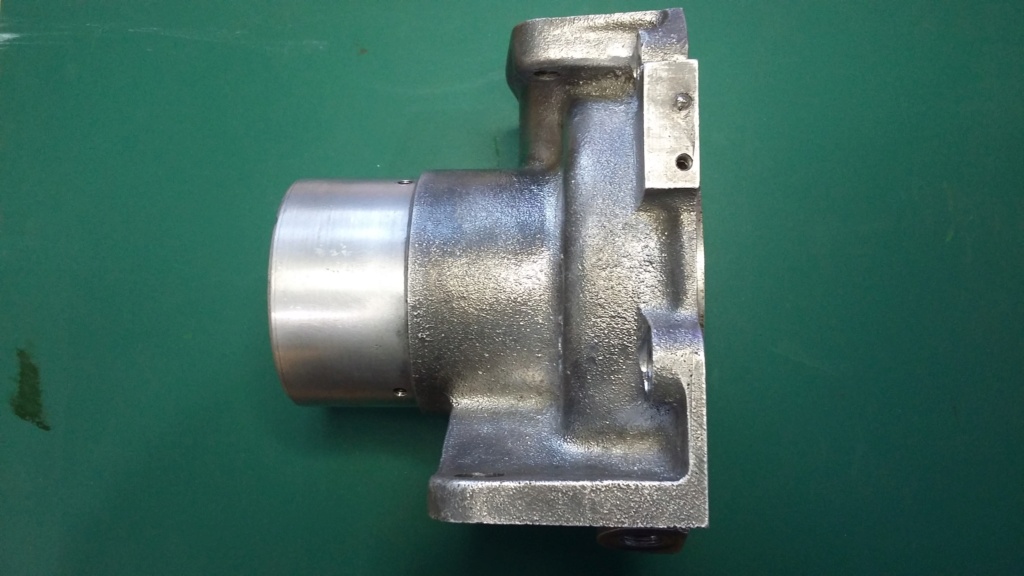


Engine castings cleaned up ready for painting.


Primer applied.
To be continued, hopefully.
Engine Strip Down
I posted under "The most exhausting Scott" how I had taken the set apart, breaking it down into its major components and had then focused on the exhaust system, as a start to the restoration. I have now moved onto the Scott engine itself. Initially I wasn't certain if I would totally strip it down or just undertake an external cosmetic job. In the end, once I had looked into the crankcase and seen the internal state, the decision was made, it had to be fully stripped down.
I know there was a complete series of posts in the past, following the full restoration of a Scott PAB engine, so I won't go into too much detail on the engine rebuild itself but will include some pictures of the progress so far, before looking at the restoration of the rest of the set.


General external condition of engine, once cowling had been removed.

Underside of engine showing the crankcase drain valve.

Head removed, showing the piston crown.

Cylinder removed, exposing the state of the piston.

Engine block fully cleaned prior to disassembly. Note protection over the crankcase and tacho generator.

Auxiliary drive cover removed, showing internal mechanism.

Crank shaft being pressed out. (Vice being used as a make shift press, it worked!)


Engine castings cleaned up ready for painting.


Primer applied.
To be continued, hopefully.
neil (LE)- A credit to the forum

- Posts : 398
Join date : 2012-03-21
Age : 67
Location : N/W Kent
 Re: Scott Generating Set Restoration (Continues)
I like the idea of using the vice as a press, will have to remember that one 

_________________
Stuart
Robotstar5- Life Member

- Posts : 1084
Join date : 2018-09-25
 Re: Scott Generating Set Restoration (Continues)
Once you get past the grotty parts clean up and onto some masking and painting you know your well on the way.
I'll second the method of vice use!
Alan
I'll second the method of vice use!
Alan
Alanengine- A credit to the forum

- Posts : 461
Join date : 2020-11-21
 Re: Scott Generating Set Restoration (Continues)
Thirded(?) on the vice/press idea! 
_________________
Specialist in precision guesswork.

mattblack- Life Member

- Posts : 827
Join date : 2019-06-21
Location : Leicester, me duck...
 Re: Scott Generating Set Restoration (Continues)
Cheers all, yes the vice trick did work unexpectedly well, even if it was rather unconventional. A case of needs must, finding a way.
Continuing with the engine restoration, the tin engine shrouds and the aluminium cowling were removed and cleaned up ready for painting. These were primed and set aside awaiting better weather, for painting of the top coats.

Before.

After.

Original. (Which I have retained)

Air cowling. A substantial aluminium casting, especially when it is remembered this was being produced during the war, with all the material shortages of the time.

Aluminium cowling showing the fins which interlock with the head and cylinder fins, causing the air to be directed down between the two, producing the forced induction cooling.

Cylinder and head showing how deep the fins are.
More restoration progress updates to follow, for those interested.
Neil
Continuing with the engine restoration, the tin engine shrouds and the aluminium cowling were removed and cleaned up ready for painting. These were primed and set aside awaiting better weather, for painting of the top coats.

Before.

After.

Original. (Which I have retained)

Air cowling. A substantial aluminium casting, especially when it is remembered this was being produced during the war, with all the material shortages of the time.

Aluminium cowling showing the fins which interlock with the head and cylinder fins, causing the air to be directed down between the two, producing the forced induction cooling.

Cylinder and head showing how deep the fins are.
More restoration progress updates to follow, for those interested.
Neil
neil (LE)- A credit to the forum

- Posts : 398
Join date : 2012-03-21
Age : 67
Location : N/W Kent
 Re: Scott Generating Set Restoration (Continues)
Coming on then.
I think it's amazing how all the fins appear to have survived - they look quite 'delicate'!
Alan
I think it's amazing how all the fins appear to have survived - they look quite 'delicate'!
Alan
Alanengine- A credit to the forum

- Posts : 461
Join date : 2020-11-21
 Re: Scott Generating Set Restoration (Continues)
Alan, yes in normal circumstances the fins would appear to be vulnerable to damage. However due to the fact the engine employs forced induction cooling, the fins are totally enclosed within the aluminium shroud and the cowling which provides total protection from damage, in normal use. The only time there is a risk, is during a full engine rebuild as now, I'd better be careful!

Engine fully encased, protecting the fins from damage.
While I had the cylinder separated from the rest of the engine, I thought I would perform a basic check on the bore to assess wear. I placed one of the piston rings into the bore and pushed it down with the base of the piston, to ensure it was level. I expected to see a gap of a few thou' allowing an estimation as to the amount of wear to be made. What I actually observed initially caused me great concern, there was a large gap in excess of 1/8". It took a little while before it occurred to me what the issue was. Being a two stroke, the rings are prevented from moving to ensure the ring ends don't foul the ports. There are pins inserted in the ring grooves to hold the rings in the correct position, which means the rings are cut short to take the pins into account, causing the large gap when the rings are placed in the bore. I will have to think of another method to assess the ring/bore wear.
Mind the Gap!
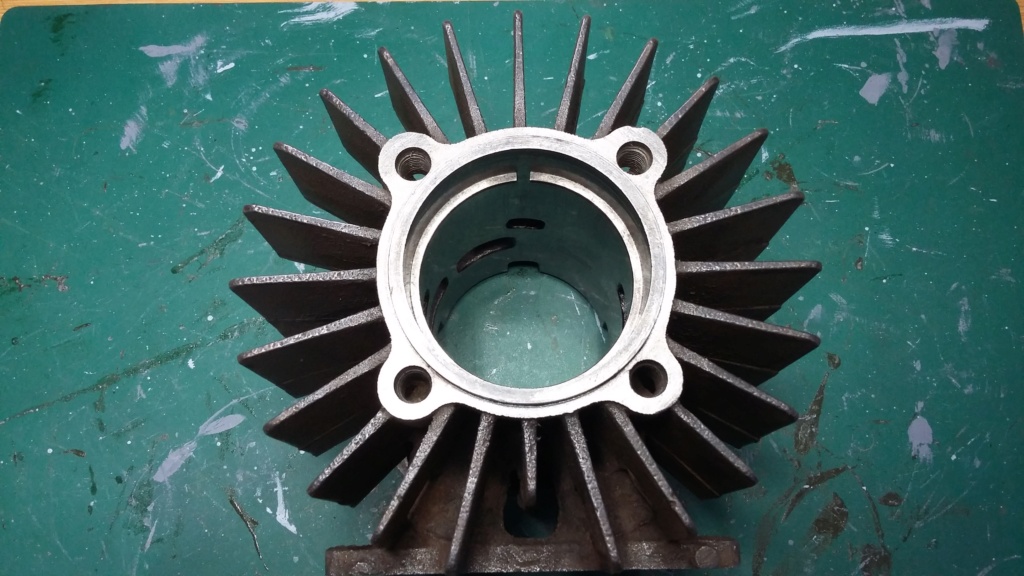
Ring in bore, showing the large gap which initially caused concern.
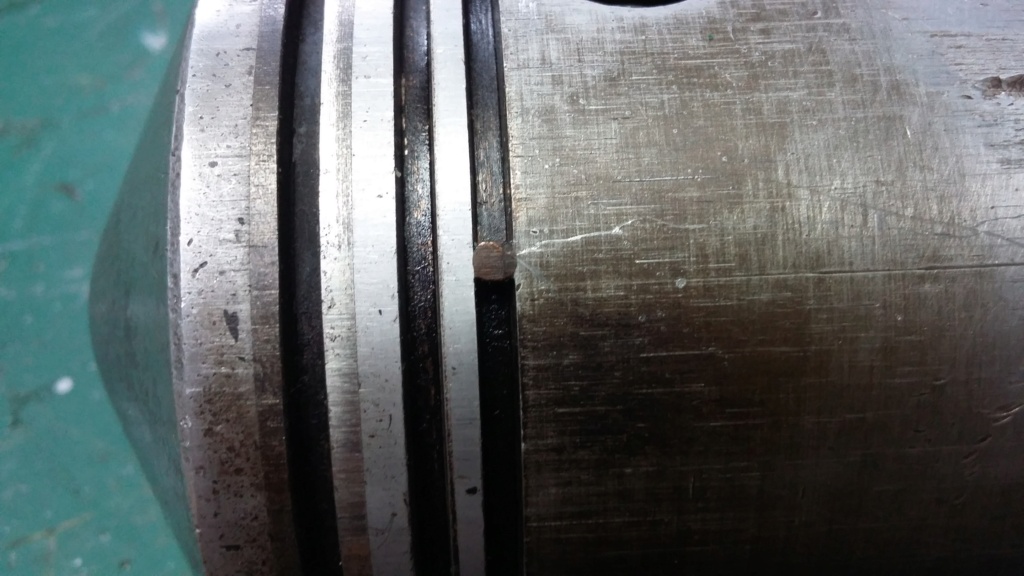
Piston, showing the peg in the groove, the reason for the large ring gap.
Work on the set has continued. I spent the day cleaning up lots of the fasteners and clearing the threads with taps and dies ready for the time when it can all go back together. This is something which I can do now, while the weather doesn't allow for painting or other large scale work and is usually left until I'm in a hurry to re-assemble everything, which can mean it's not completed properly!
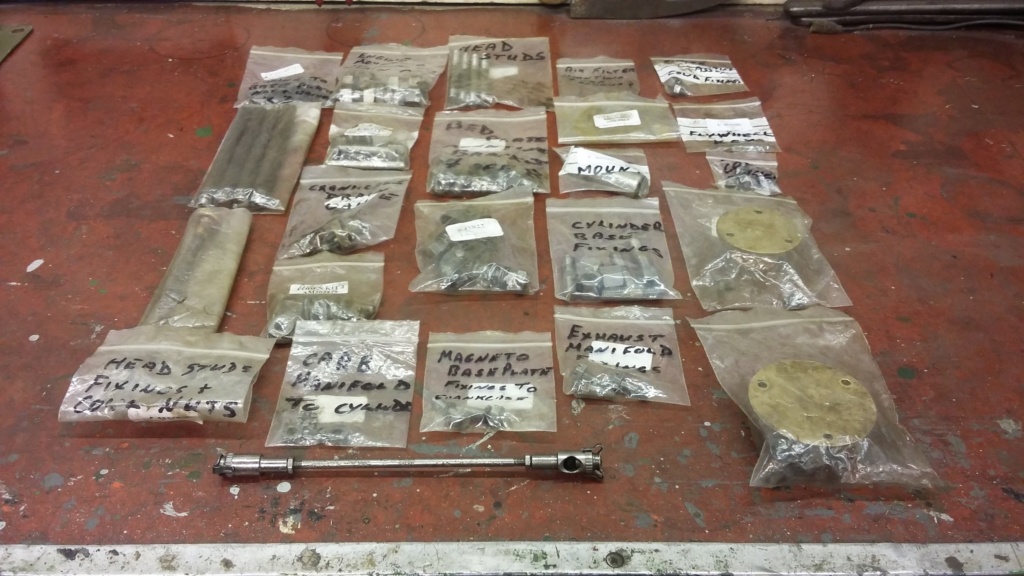
Small items cleaned, threads checked and all bagged up.
Plenty more to come if you're interested.
Neil.

Engine fully encased, protecting the fins from damage.
While I had the cylinder separated from the rest of the engine, I thought I would perform a basic check on the bore to assess wear. I placed one of the piston rings into the bore and pushed it down with the base of the piston, to ensure it was level. I expected to see a gap of a few thou' allowing an estimation as to the amount of wear to be made. What I actually observed initially caused me great concern, there was a large gap in excess of 1/8". It took a little while before it occurred to me what the issue was. Being a two stroke, the rings are prevented from moving to ensure the ring ends don't foul the ports. There are pins inserted in the ring grooves to hold the rings in the correct position, which means the rings are cut short to take the pins into account, causing the large gap when the rings are placed in the bore. I will have to think of another method to assess the ring/bore wear.
Mind the Gap!

Ring in bore, showing the large gap which initially caused concern.

Piston, showing the peg in the groove, the reason for the large ring gap.
Work on the set has continued. I spent the day cleaning up lots of the fasteners and clearing the threads with taps and dies ready for the time when it can all go back together. This is something which I can do now, while the weather doesn't allow for painting or other large scale work and is usually left until I'm in a hurry to re-assemble everything, which can mean it's not completed properly!

Small items cleaned, threads checked and all bagged up.
Plenty more to come if you're interested.
Neil.
neil (LE)- A credit to the forum

- Posts : 398
Join date : 2012-03-21
Age : 67
Location : N/W Kent
 Re: Scott Generating Set Restoration (Continues)
Nice orderly work process!
Probably everyone does this already but when going over fasteners it's quite common to find some which are not totally chewed up and probably scrap, but have minor chew marks and bruises on them. I usually place them on the back of the vice and using a 1/4 lb hammer 'plannish' the burred parts back into position.
A quick whizz on the wire wheel and they can look so much better!
Alan
Alanengine- A credit to the forum

- Posts : 461
Join date : 2020-11-21
 Re: Scott Generating Set Restoration (Continues)
If you measure the pins in the piston you can take that value from the measured ring gap?.
_________________
Stuart

Robotstar5- Life Member

- Posts : 1084
Join date : 2018-09-25
 Re: Scott Generating Set Restoration (Continues)
Hi Stuart, I did wonder about that approach but don't think I would be able to obtain a sufficiently accurate measurement. Unfortunately the ring gap is now in excess of the feeler gauges I have and therefore any attempt to measure precisely enough, to be able to assess wear around different points of the bore to an accuracy of a few thou' seems unlikely. I'll see if I can find a better way to measure the gap and then do as you suggest.
Chassis Clean and Preparation.
During the second lock down period, the chassis was stripped down to see what condition it was in and what renovations might be needed. Initially apart from being coated in many years of grime, it didn't look too bad. Unfortunately the underside was not in same condition as the top. There was a fairly serious amount of rust penetration along the bottom of one of the chassis sides and the cross bracing was also very bent and twisted. After a good degrease and pressure wash, a closer examination of the state of the chassis was undertaken and decisions made as to what remedial work would be require.
Following the clean and examination, it was apparent that one side was beyond saving and would need to be replaced, with new metal being welded in to replace it. The other side was deemed solid enough to retain. The damaged side was cut out with an angle grinder, allowing the side to be straightened ready for the new piece to be welded in.
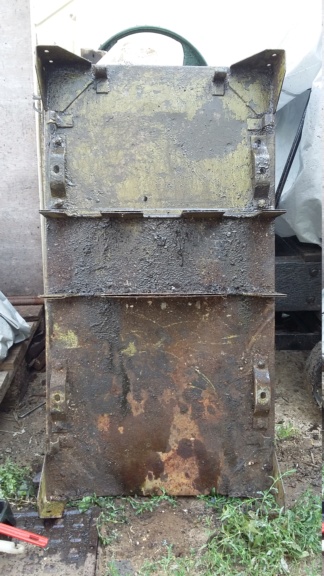

Chassis still covered with years of grime. Oil, grease and two stroke fuel helps to preserve the metalwork on the top surface.
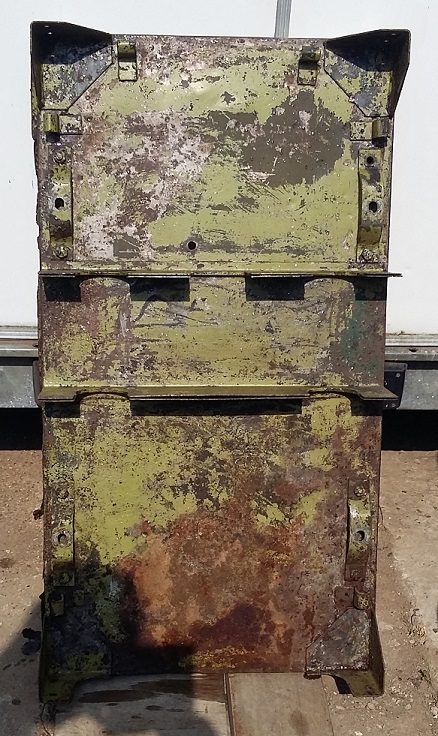
Grime degreased and pressure washed off, exposing fairly solid metal


The same cannot be said about the underside! The cross bracing is also badly damaged and twisted.
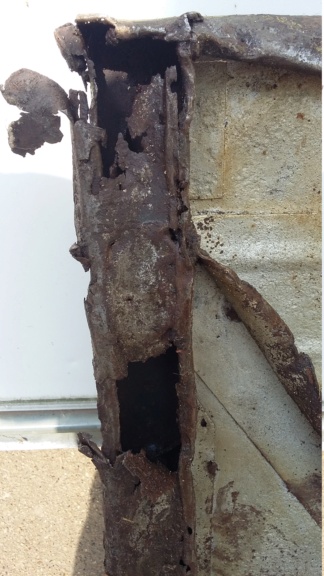

Too far gone for filler?

Starting to straighten the cross bracing. (Using fairly unconventional tools!)
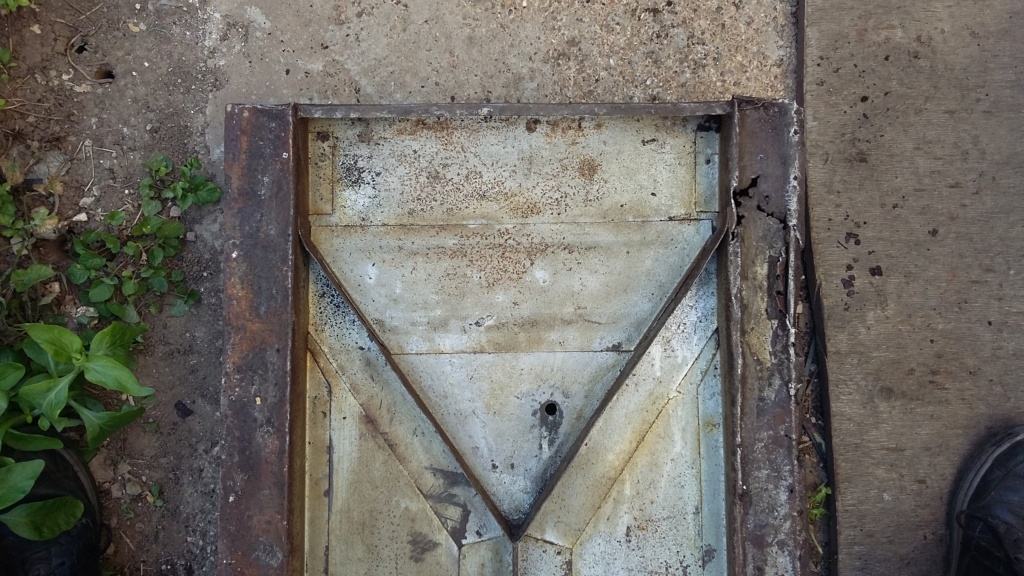
Looking better.
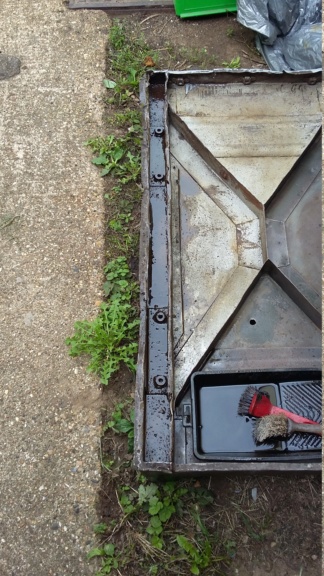
Rusty base cut away. Internal of the box section being cleaned out, ready to be prepared for welding.
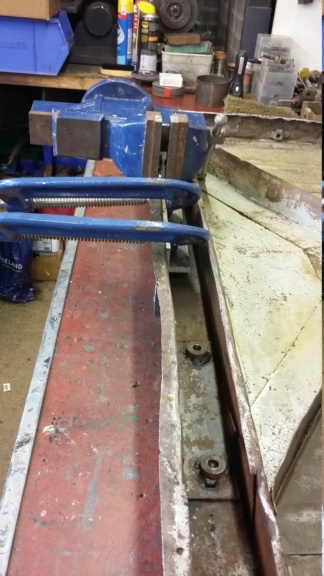
Straightening the box section edge. Next stage is to weld the new piece in.
To be continued....
Neil
Chassis Clean and Preparation.
During the second lock down period, the chassis was stripped down to see what condition it was in and what renovations might be needed. Initially apart from being coated in many years of grime, it didn't look too bad. Unfortunately the underside was not in same condition as the top. There was a fairly serious amount of rust penetration along the bottom of one of the chassis sides and the cross bracing was also very bent and twisted. After a good degrease and pressure wash, a closer examination of the state of the chassis was undertaken and decisions made as to what remedial work would be require.
Following the clean and examination, it was apparent that one side was beyond saving and would need to be replaced, with new metal being welded in to replace it. The other side was deemed solid enough to retain. The damaged side was cut out with an angle grinder, allowing the side to be straightened ready for the new piece to be welded in.


Chassis still covered with years of grime. Oil, grease and two stroke fuel helps to preserve the metalwork on the top surface.

Grime degreased and pressure washed off, exposing fairly solid metal


The same cannot be said about the underside! The cross bracing is also badly damaged and twisted.


Too far gone for filler?

Starting to straighten the cross bracing. (Using fairly unconventional tools!)

Looking better.

Rusty base cut away. Internal of the box section being cleaned out, ready to be prepared for welding.

Straightening the box section edge. Next stage is to weld the new piece in.
To be continued....
Neil
neil (LE)- A credit to the forum

- Posts : 398
Join date : 2012-03-21
Age : 67
Location : N/W Kent
 Re: Scott Generating Set Restoration (Continues)
neil (LE) wrote:Hi Stuart, I did wonder about that approach but don't think I would be able to obtain a sufficiently accurate measurement. Unfortunately the ring gap is now in excess of the feeler gauges I have and therefore any attempt to measure precisely enough, to be able to assess wear around different points of the bore to an accuracy of a few thou' seems unlikely. I'll see if I can find a better way to measure the gap and then do as you suggest. Neil
What about getting a slip gauge under size of the smallest gap then use normal feeler gauges against it to accurately measure the gap(s)?
https://www.zoro.co.uk/shop/measuring-and-test-equipment/gauge-blocks-steel/0-16inch-grade-2-steel-slip-gauge-e36/p/ZT1361470X?utm_source=google&utm_medium=cpc&utm_campaign=dsa-generic&utm_content=measuring-and-test-equipment&targetid=dsa-900453568700&gclid=EAIaIQobChMI_qu42qKb7gIVBe_tCh3L9AXPEAAYAiAAEgJ1S_D_BwE
_________________
Stuart

Robotstar5- Life Member

- Posts : 1084
Join date : 2018-09-25
 Re: Scott Generating Set Restoration (Continues)
Hi Stuart, thankyou for your suggestion and the link for the slip gauges. Interestingly a set of these came up as a recommendation on Ebay for me, how did they know! I must admit I was interested and may take another look to see what is available, at what price as well as trying to establish if Zoro are a safe on line company to purchase from.
Whilst awaiting for the welding to be undertaken, attention turned to the item identified by Scott's as the canopy. Nowadays it might be called the control desk or the instrument table. This is a complete unit which can be separated from the chassis by lifting it off, once a few plugs and sockets, fuel lines and the starting chain have been removed. This can be achieved within 30 minutes, once you know the procedure. The canopy houses the meters, power switching, voltage regulator, oil and petroil tanks and the starting chain mechanism.
Once the canopy was separated, it was soon decided to completely strip it down before cleaning it up for painting. This would require removing all of the major items, the electrical wiring, meters, controls, and bezels of which there are numerous.
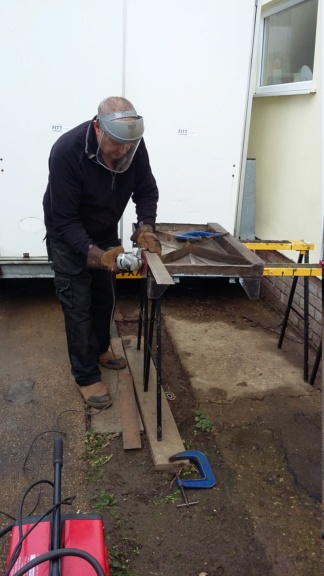
The chassis being prepared for welding by a friend between lockdowns. Picture of the completed repair will follow once the weather improves and I can get access.

Canopy separated from chassis ready to be lifted off.

Canopy as removed.

Strip down progressing. Oil tank, meter glass and starter gear still to be removed.
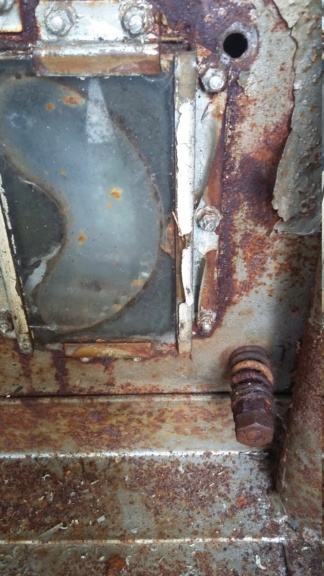
Poor condition of the meter glass mounts. Needed careful removal to avoid breakages!
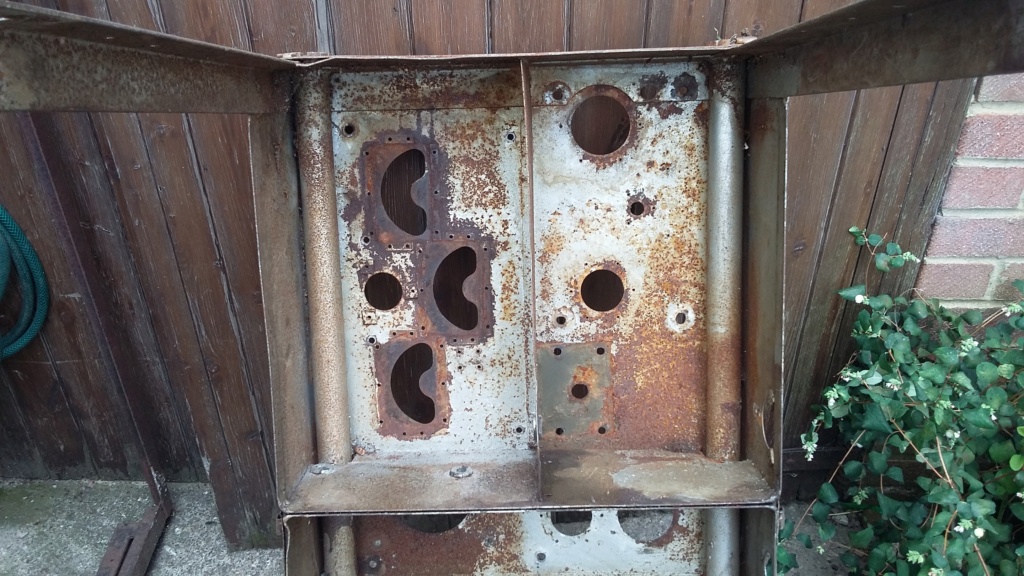
Meter glass mounts successfully removed.


Canopy top and underside fully striped. Awaiting next phase of preparation of rust removal, prior to painting.
Now the strip down is complete, I need to decide how to progress the rust removal and paint preparation process. So far I have manually undertaken cleaning up all the metalwork, using basic tools such as wire brushes and wire wheels and cups in hand drills. I have considered getting the canopy grit/sand/media blasted, whichever would be appropriate but I am concerned this could cause damage in the hands of a contractor more use to heavier gauge material and I don't know of a tame blasting company that i could rely on. Also at the present time during lockdown, I cannot get out and about to check out any possible contractors to use, so I might be forced into continuing to do it myself. At least I would be able to say it was all my own work!
To be continued....
Neil.
Whilst awaiting for the welding to be undertaken, attention turned to the item identified by Scott's as the canopy. Nowadays it might be called the control desk or the instrument table. This is a complete unit which can be separated from the chassis by lifting it off, once a few plugs and sockets, fuel lines and the starting chain have been removed. This can be achieved within 30 minutes, once you know the procedure. The canopy houses the meters, power switching, voltage regulator, oil and petroil tanks and the starting chain mechanism.
Once the canopy was separated, it was soon decided to completely strip it down before cleaning it up for painting. This would require removing all of the major items, the electrical wiring, meters, controls, and bezels of which there are numerous.

The chassis being prepared for welding by a friend between lockdowns. Picture of the completed repair will follow once the weather improves and I can get access.

Canopy separated from chassis ready to be lifted off.

Canopy as removed.

Strip down progressing. Oil tank, meter glass and starter gear still to be removed.

Poor condition of the meter glass mounts. Needed careful removal to avoid breakages!

Meter glass mounts successfully removed.


Canopy top and underside fully striped. Awaiting next phase of preparation of rust removal, prior to painting.
Now the strip down is complete, I need to decide how to progress the rust removal and paint preparation process. So far I have manually undertaken cleaning up all the metalwork, using basic tools such as wire brushes and wire wheels and cups in hand drills. I have considered getting the canopy grit/sand/media blasted, whichever would be appropriate but I am concerned this could cause damage in the hands of a contractor more use to heavier gauge material and I don't know of a tame blasting company that i could rely on. Also at the present time during lockdown, I cannot get out and about to check out any possible contractors to use, so I might be forced into continuing to do it myself. At least I would be able to say it was all my own work!
To be continued....
Neil.
neil (LE)- A credit to the forum

- Posts : 398
Join date : 2012-03-21
Age : 67
Location : N/W Kent
 Re: Scott Generating Set Restoration (Continues)
neil (LE) wrote:Hi Stuart, thankyou for your suggestion and the link for the slip gauges. Interestingly a set of these came up as a recommendation on Ebay for me, how did they know! I must admit I was interested and may take another look to see what is available, at what price as well as trying to establish if Zoro are a safe on line company to purchase from. Neil.
Zoro are fine to purchase from, the only problem I had was a badly packed plastic drill box that got damaged in the post, but they replaced it straight away

A word of warning on old wiring, some wires used in hot areas could have Asbestos in the insulation, if you need to keep any looking original you can stabilise them with something like Shellac.
_________________
Stuart

Robotstar5- Life Member

- Posts : 1084
Join date : 2018-09-25
 Re: Scott Generating Set Restoration (Continues)
Thanks Stuart, I will certainly look to see what I can get from Zoro, the wife owes me a late Christmas present. With regard to the wiring, I have already removed most of it, hopefully without causing me any danger. I intend to replace most of the wiring and will be using new black single multi-strand wire, most probably low smoke and fume, as approved for the railway industry. Most of the wiring is contained within flexible conduit, or is up underneath the canopy top, so is not visible under normal operating conditions.
Neil.
Neil.
neil (LE)- A credit to the forum

- Posts : 398
Join date : 2012-03-21
Age : 67
Location : N/W Kent
 Re: Scott Generating Set Restoration (Continues)
neil (LE) wrote:Thanks Stuart, I will certainly look to see what I can get from Zoro, the wife owes me a late Christmas present. With regard to the wiring, I have already removed most of it, hopefully without causing me any danger. I intend to replace most of the wiring and will be using new black single multi-strand wire, most probably low smoke and fume, as approved for the railway industry. Most of the wiring is contained within flexible conduit, or is up underneath the canopy top, so is not visible under normal operating conditions.
Neil.
Hope she has a deep purse, it's one of those places where you find things you never realised you needed until you saw it there
_________________
Stuart

Robotstar5- Life Member

- Posts : 1084
Join date : 2018-09-25
 Re: Scott Generating Set Restoration (Continues)
Re rust removal, I've had great success with citric acid - see previous threads.
Aluminium bits I take to my local motorbike restorer who has a vapour blasting unit - much gentler.
Aluminium bits I take to my local motorbike restorer who has a vapour blasting unit - much gentler.
_________________
Regards Paul
Tha can alus tell a Yorkshireman - but tha can't tell him much.

Woodsman- Admin
- Posts : 2685
Join date : 2014-08-24
Age : 73
Location : God's own county
 Re: Scott Generating Set Restoration (Continues)
Paul, thank you for the advice on using citric acid for rust removal, it is something I have heard of before, although never used. However I think the items I need to de-rust may be too large to soak in citric acid, so I imagine I will be stuck with the manual approach to the metal preparation, unless I am able to find a suitable company to undertake the blasting for me.
Electrical Wiring Assessment.
As part of the canopy strip down, the wiring had to be removed from the items housed in the canopy. This included the meters, the voltage control rheostat, panel light and switch along with the main circuit breaker and wiring termination block. Most of the wiring was found to be very stiff, having work hardened over the years, with many breaks in the insulation, so a complete rewire will be the best option. I hope to be able to complete this using individual black stranded wire as per the original but utilising modern standards. Although the set was originally designed to produce a three phase output of 12.5 amps per phase at 130 volts, I don't expect to operate the unit at anything approaching this load. So I will be rewiring with cabling suitable for the maximum load but intend to reduce the settings on the breaker unit to a much lower load, to protect the alternator windings.
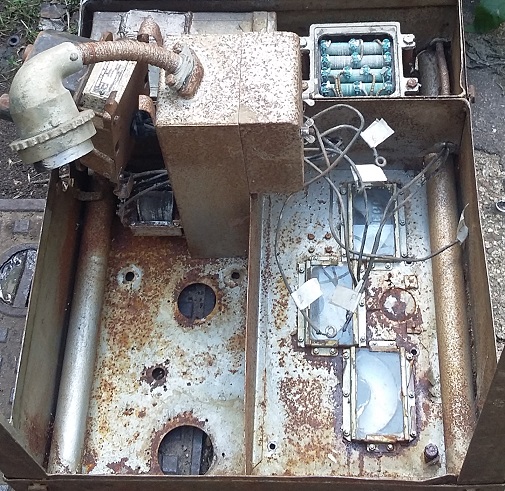
Main connector plug attached to the terminal block housing with the circuit breaker, voltage control and meter wiring still in place.

The main wiring connection block, with the panel light transformer and switch at the top.

Top side of housing with the Allen West isolator and second transformer, for the output warning light.
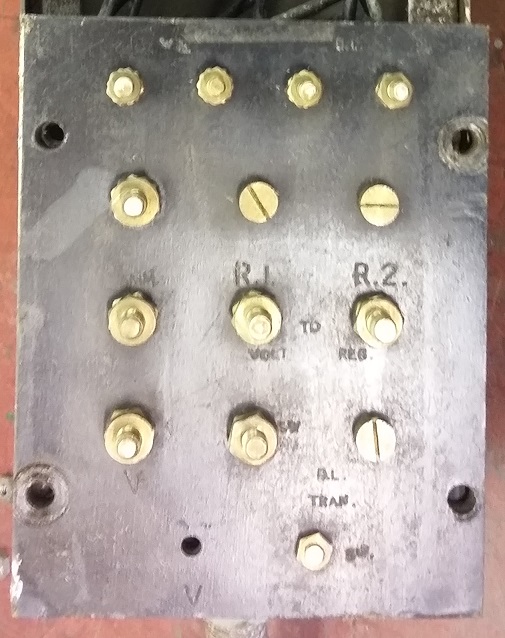
Sign writing visible on the terminal block once it was cleaned up.

Reverse side of the termination block.
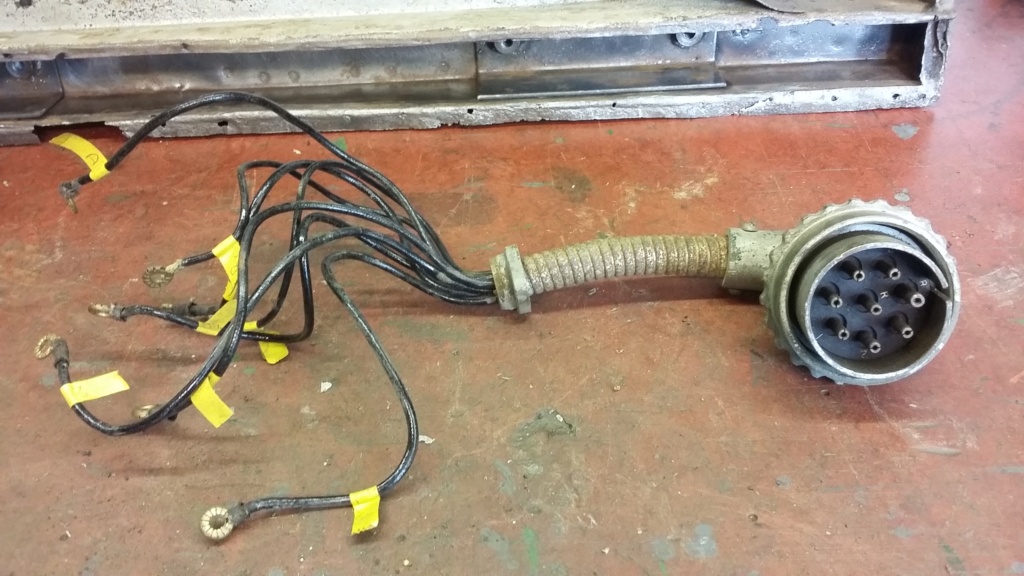
Main alternator connection plug, disconnected from the terminal block.

Terminal block removed from housing.
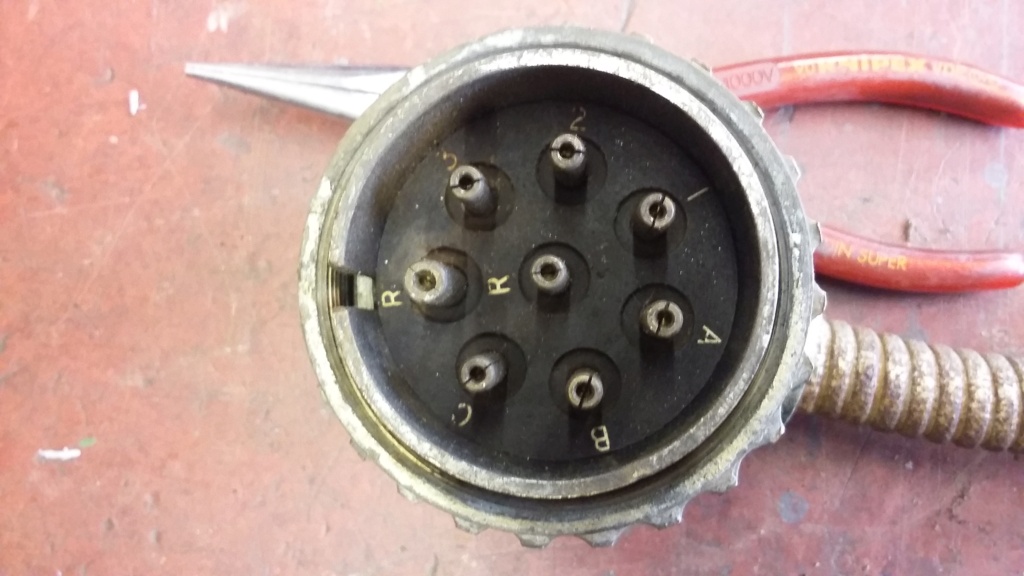
Alternator connection plug, pin identification.

Alternator plug, internal connections.

Alternator end connector, further details to follow.
The main rewiring will take place once the chassis and canopy have been finished, although a certain amount will be undertaken once the alternator and exciter are ready for testing. There are still many different aspects to this renovation to be completed, involving an array of different disciplines. I hope I'm able to continue to spend time in the workshop and complete the rebuild. If I am, I will post updates, for those who are interested.
To be continued, hopefully.....
Electrical Wiring Assessment.
As part of the canopy strip down, the wiring had to be removed from the items housed in the canopy. This included the meters, the voltage control rheostat, panel light and switch along with the main circuit breaker and wiring termination block. Most of the wiring was found to be very stiff, having work hardened over the years, with many breaks in the insulation, so a complete rewire will be the best option. I hope to be able to complete this using individual black stranded wire as per the original but utilising modern standards. Although the set was originally designed to produce a three phase output of 12.5 amps per phase at 130 volts, I don't expect to operate the unit at anything approaching this load. So I will be rewiring with cabling suitable for the maximum load but intend to reduce the settings on the breaker unit to a much lower load, to protect the alternator windings.

Main connector plug attached to the terminal block housing with the circuit breaker, voltage control and meter wiring still in place.

The main wiring connection block, with the panel light transformer and switch at the top.

Top side of housing with the Allen West isolator and second transformer, for the output warning light.

Sign writing visible on the terminal block once it was cleaned up.

Reverse side of the termination block.

Main alternator connection plug, disconnected from the terminal block.

Terminal block removed from housing.

Alternator connection plug, pin identification.

Alternator plug, internal connections.

Alternator end connector, further details to follow.
The main rewiring will take place once the chassis and canopy have been finished, although a certain amount will be undertaken once the alternator and exciter are ready for testing. There are still many different aspects to this renovation to be completed, involving an array of different disciplines. I hope I'm able to continue to spend time in the workshop and complete the rebuild. If I am, I will post updates, for those who are interested.
To be continued, hopefully.....
neil (LE)- A credit to the forum

- Posts : 398
Join date : 2012-03-21
Age : 67
Location : N/W Kent
 Re: Scott Generating Set Restoration (Continues)
Mix citric acid solution with cheap wallpaper paste. Makes a nice gel that will stick even to vertical surfaces.
_________________
Regards Paul
Tha can alus tell a Yorkshireman - but tha can't tell him much.

Woodsman- Admin
- Posts : 2685
Join date : 2014-08-24
Age : 73
Location : God's own county
 Re: Scott Generating Set Restoration (Continues)
Well I must admit I had never thought about mixing the citric acid with paste, to make it stick. A very clever and simple idea, something that I will ensure I remember for future use. However I don't think it will be suitable for my situation, as I need to be able to strip the remnants of the old paint, as well as de-rusting the surface where the paint has already gone. I have found the original Olive Drab paint to be very hard and does not strip off very easily. I have so far succeeded by using the manual method and due to the restrictions of the lock down, I think I will persevere with this method. Luckily, partly due to the lock down, I have plenty of time to continue to work on the set, so hopefully I will be able to continue to progress the metal preparation, in time for better weather to commence the painting.
The Mystery of the Missing Meters
When I acquired the set, it was described as generally complete, except for the meters housed in the canopy. These being the 0- 180v voltmeter, 0 - 25A ammeter and the engine speed / alternator frequency meter. Although this was disappointing, I felt I should be able to source suitable replacements during the restoration of the set, although this could prove difficult and or expensive, especially the frequency meter. Due to other projects, the set was not worked on for about 6 months. When the time came to commence the restoration, a complete strip down was deemed necessary, due to the general condition. On removing the canopy, a very unexpected discovery was made, on closer examination it could be seen the mounting frame for the meter cluster was still fitted and better still so were the meters! So why was the set described as missing the meters, well the reason was as basic as years of build up of dirt and dust obscuring the outline of the meters through the thick glass on the canopy. The meters themselves are not fixed to the canopy top but are housed a few inches below, in a separate anti-vibration frame. This made it look like there was nothing below the canopy meter glass, just a dark shadow. When I got over the shock of my good fortune, I removed the meter cluster and proceeded to take the individual meters out of the frame and clean them up and complete there refurbishment.

The picture used to indicate the meters were missing.
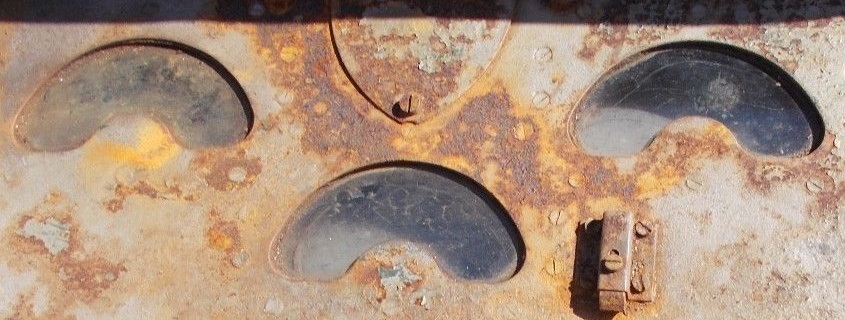
A close up view of another picture, just shows the outline of the meter faces below.

Meter frame being removed from canopy.
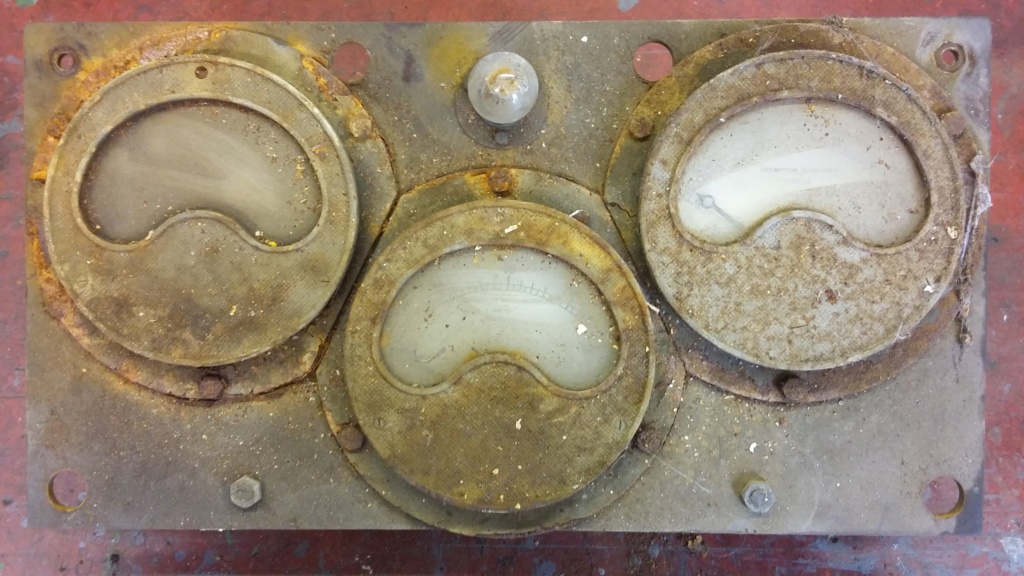
Meter cluster as removed from canopy.
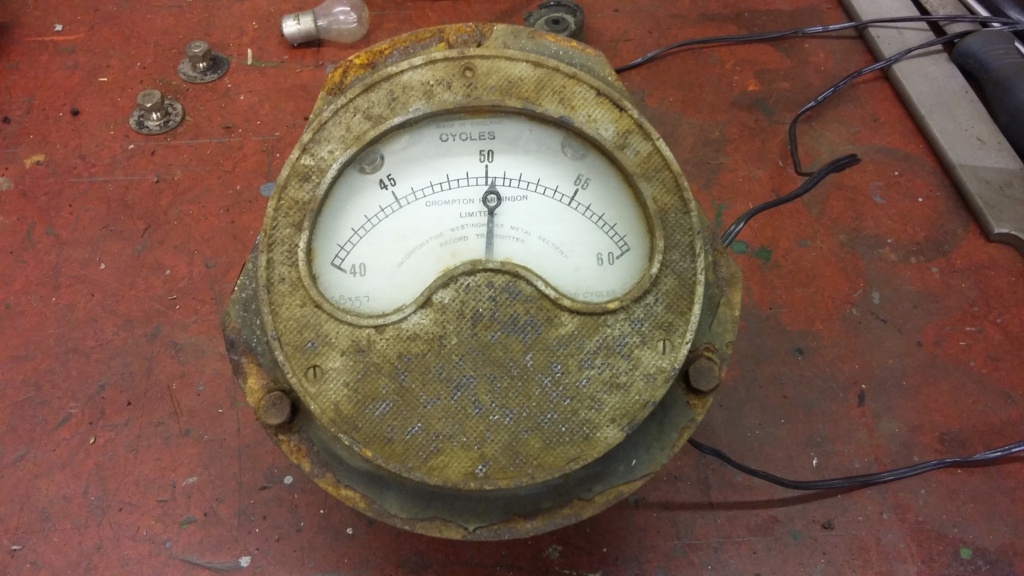
A successful test of frequency meter using a 15v transformer as signal source.
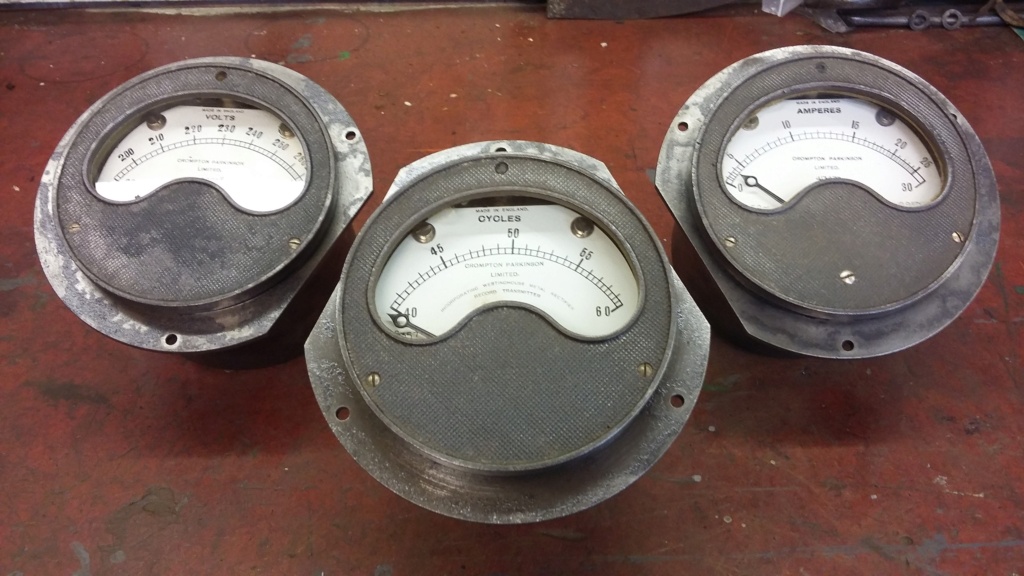
Meters cleaned up ready for painting

Black satin paint being applied.

Finished meters refitted into housing.
All that was required to finish the meter frame was to acquire and fit replacement anti-vibration mounts. These are now fitted and the frame is ready to be fitted back into the canopy when the painting has been completed.
More electrical progress to follow....
Neil
The Mystery of the Missing Meters
When I acquired the set, it was described as generally complete, except for the meters housed in the canopy. These being the 0- 180v voltmeter, 0 - 25A ammeter and the engine speed / alternator frequency meter. Although this was disappointing, I felt I should be able to source suitable replacements during the restoration of the set, although this could prove difficult and or expensive, especially the frequency meter. Due to other projects, the set was not worked on for about 6 months. When the time came to commence the restoration, a complete strip down was deemed necessary, due to the general condition. On removing the canopy, a very unexpected discovery was made, on closer examination it could be seen the mounting frame for the meter cluster was still fitted and better still so were the meters! So why was the set described as missing the meters, well the reason was as basic as years of build up of dirt and dust obscuring the outline of the meters through the thick glass on the canopy. The meters themselves are not fixed to the canopy top but are housed a few inches below, in a separate anti-vibration frame. This made it look like there was nothing below the canopy meter glass, just a dark shadow. When I got over the shock of my good fortune, I removed the meter cluster and proceeded to take the individual meters out of the frame and clean them up and complete there refurbishment.

The picture used to indicate the meters were missing.

A close up view of another picture, just shows the outline of the meter faces below.

Meter frame being removed from canopy.

Meter cluster as removed from canopy.

A successful test of frequency meter using a 15v transformer as signal source.

Meters cleaned up ready for painting

Black satin paint being applied.

Finished meters refitted into housing.
All that was required to finish the meter frame was to acquire and fit replacement anti-vibration mounts. These are now fitted and the frame is ready to be fitted back into the canopy when the painting has been completed.
More electrical progress to follow....
Neil
neil (LE)- A credit to the forum

- Posts : 398
Join date : 2012-03-21
Age : 67
Location : N/W Kent
 Re: Scott Generating Set Restoration (Continues)
Looking smart! Bit gutted I've lost the photos of my PAB strip down.
StuartTurnerSteve- Life Member

- Posts : 534
Join date : 2020-01-02
 Re: Scott Generating Set Restoration (Continues)
Thanks Steve, what happened to your PAB pictures?
neil (LE)- A credit to the forum

- Posts : 398
Join date : 2012-03-21
Age : 67
Location : N/W Kent
 Re: Scott Generating Set Restoration (Continues)
It's being reunited with a Bofors. Didn't really want to sell it but seemed a worthy cause.
Don't have any Scotts now, had a Scott SE as well but never got on with it, that's not in a museum in Northern Ireland.
Don't have any Scotts now, had a Scott SE as well but never got on with it, that's not in a museum in Northern Ireland.
StuartTurnerSteve- Life Member

- Posts : 534
Join date : 2020-01-02
 Re: Scott Generating Set Restoration (Continues)
Thread is still here, not quite to the level as yours.
https://ukengineforum.forumotion.com/t3454-great-scott?highlight=scott
https://ukengineforum.forumotion.com/t3454-great-scott?highlight=scott
StuartTurnerSteve- Life Member

- Posts : 534
Join date : 2020-01-02
 Re: Scott Generating Set Restoration (Continues)
Thank you Steve for the link to your thread, always interesting to see a different engine, especially when there seem to be so few. One question I have, is how you started your engine, in normal use there was a chain from the starter pinion on the engine, to a gear fitted to the canopy which the starting handle locked into, to turn the engine over. The reason I ask, is I would like to be able to test run the engine before fitting the canopy, at present I cannot do this, unless I can find a way to bypass the use of the starter sprocket and chain.
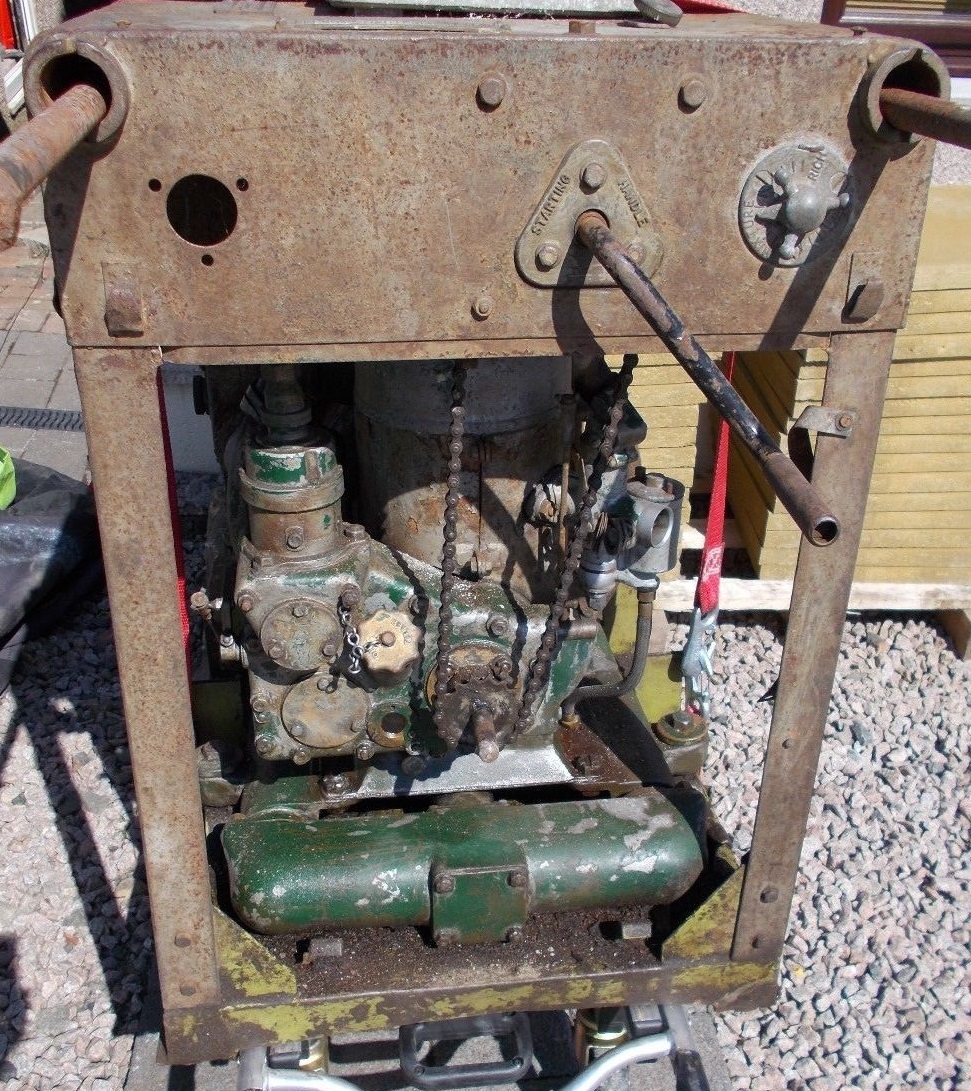
Normal starting handle configuration.
Power Switching
In use the generator power was switched onto the load through a voltage sensing contactor set called a starter, supplied by Allen West of Brighton. I believe these are used when switching a supply onto a heavy inductive load. The set is designed to generate 130 volts 50 Hz, 3 phase at 12.5 amps per phase, which supplied power to the servo motors on the Bofors to aim the gun, based on the output of the Kerrison predictor.
Due to the unusual supply output of the set, there was very little use that they could be put to once they were decommissioned from military service. In an attempt to make them more viable for civilian use, it seems some have been modified, to alter the output to a more useful 230 volts. I've yet to confirm exactly how this was achieved but it seems as though two phases have been overlaid to provide a pseudo ac output, although I'm not sure what the waveform looks like. The third phase output is used to feed the voltmeter, so although the scale signwriting has been altered to read 100 volts higher, it is actually still measuring and reading 130 volts, confusing or what.
I believe that due to the doubling of the voltage, the starter box has suffered from damaged wiring and coils caused by it being overloaded. Although I do not need to use this type of contactor set, as I have no intention of presenting loads anything approaching those found in service, I thought it would be good to retain as much of the original as possible and I intend to back convert it to its designed output of 130 volts 3 phase. On examining the state of the internals it looked like it had seen better days and I might have to find an alternative way to switch the output. However after searching around, I eventually found a Military Surplus supplier who had some original Allen West starters in stock, at £15 each. I bought two, at that price it would have been rude not to. Although designed to operate 400 volts 3 phase rather than 130 volts, I believe I can make them work. When I received the package I was absolutely amazed at what I had been able to buy; two totally original units straight out of the stores, still in their wrappings, dated around 1955 with an examination date of 1965.

The Allen West starter contactor control box on the set.
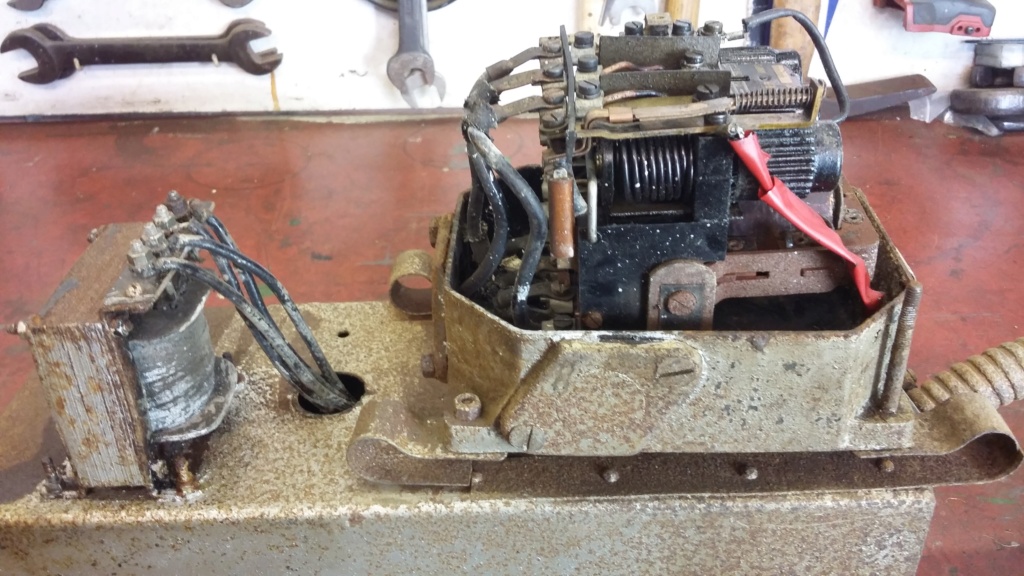
Internals of the Allen West starter. The red tape was covering melted insulation and the coil seems to be blackened.
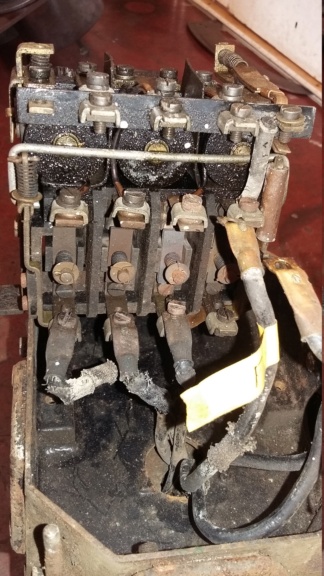
Poor state of the internal wiring.

Contactor set removed from housing. Note the blackened coil on the left.

Outer packaging, showing an inspection date of 1965. Also note comment "Rattling noise unavoidable"

Carton dated 1955

Fully hermetically sealed.

I know times are hard, where is the nearest Ordinance Depot. to return the packaging to?

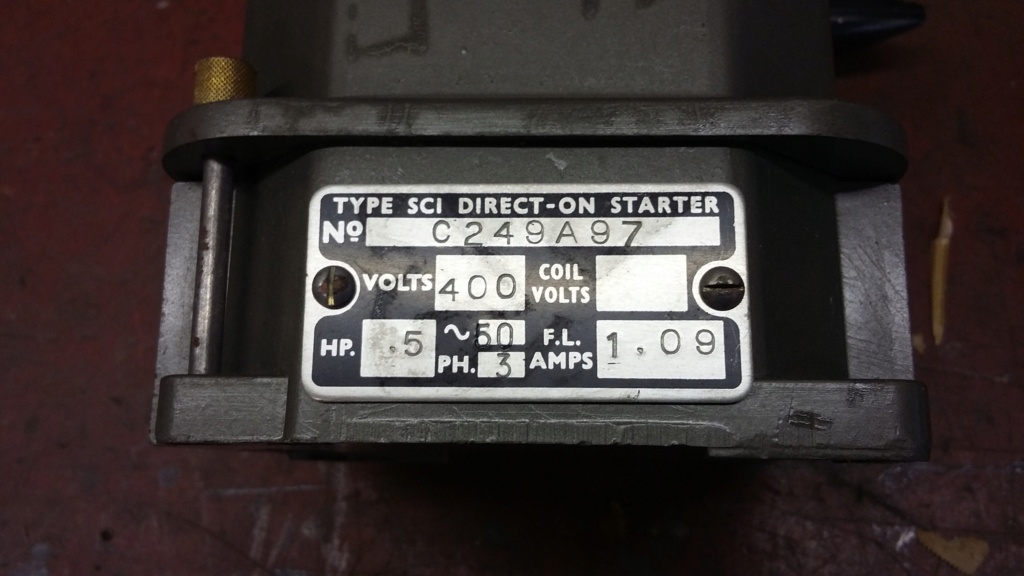
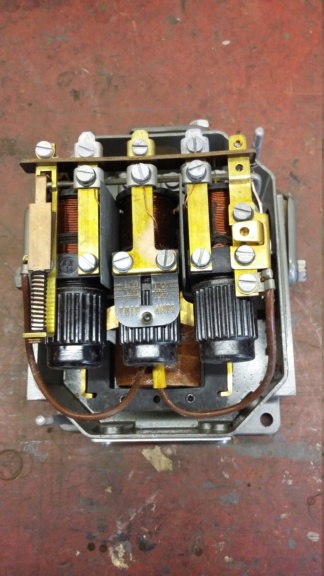


What was inside the box, a brand new unit, including the dash pot oil and instructions.

The old unit with the two new £15 replacements.
A lucky find, hopefully a good step forward towards the eventual restoration of the complete set.
More to come for those interested...
Neil.

Normal starting handle configuration.
Power Switching
In use the generator power was switched onto the load through a voltage sensing contactor set called a starter, supplied by Allen West of Brighton. I believe these are used when switching a supply onto a heavy inductive load. The set is designed to generate 130 volts 50 Hz, 3 phase at 12.5 amps per phase, which supplied power to the servo motors on the Bofors to aim the gun, based on the output of the Kerrison predictor.
Due to the unusual supply output of the set, there was very little use that they could be put to once they were decommissioned from military service. In an attempt to make them more viable for civilian use, it seems some have been modified, to alter the output to a more useful 230 volts. I've yet to confirm exactly how this was achieved but it seems as though two phases have been overlaid to provide a pseudo ac output, although I'm not sure what the waveform looks like. The third phase output is used to feed the voltmeter, so although the scale signwriting has been altered to read 100 volts higher, it is actually still measuring and reading 130 volts, confusing or what.
I believe that due to the doubling of the voltage, the starter box has suffered from damaged wiring and coils caused by it being overloaded. Although I do not need to use this type of contactor set, as I have no intention of presenting loads anything approaching those found in service, I thought it would be good to retain as much of the original as possible and I intend to back convert it to its designed output of 130 volts 3 phase. On examining the state of the internals it looked like it had seen better days and I might have to find an alternative way to switch the output. However after searching around, I eventually found a Military Surplus supplier who had some original Allen West starters in stock, at £15 each. I bought two, at that price it would have been rude not to. Although designed to operate 400 volts 3 phase rather than 130 volts, I believe I can make them work. When I received the package I was absolutely amazed at what I had been able to buy; two totally original units straight out of the stores, still in their wrappings, dated around 1955 with an examination date of 1965.

The Allen West starter contactor control box on the set.

Internals of the Allen West starter. The red tape was covering melted insulation and the coil seems to be blackened.

Poor state of the internal wiring.

Contactor set removed from housing. Note the blackened coil on the left.

Outer packaging, showing an inspection date of 1965. Also note comment "Rattling noise unavoidable"

Carton dated 1955

Fully hermetically sealed.

I know times are hard, where is the nearest Ordinance Depot. to return the packaging to?


What was inside the box, a brand new unit, including the dash pot oil and instructions.

The old unit with the two new £15 replacements.
A lucky find, hopefully a good step forward towards the eventual restoration of the complete set.
More to come for those interested...
Neil.
neil (LE)- A credit to the forum

- Posts : 398
Join date : 2012-03-21
Age : 67
Location : N/W Kent
StuartTurnerSteve- Life Member

- Posts : 534
Join date : 2020-01-02
Page 1 of 13 • 1, 2, 3 ... 11, 12, 13 
 Similar topics
» Scott PAB Restoration
» Kubota diesel KND3
» Trolley for Villiers Mk15 wooden toolbox new pics 5-9-2016
» Petter generating set - might turn into a project
» Douglas FT35 generating set
» Kubota diesel KND3
» Trolley for Villiers Mk15 wooden toolbox new pics 5-9-2016
» Petter generating set - might turn into a project
» Douglas FT35 generating set
Page 1 of 13
Permissions in this forum:
You cannot reply to topics in this forum|
|
|
