
Trolley for Villiers Mk15 wooden toolbox new pics 5-9-2016
Page 2 of 2 •  1, 2
1, 2
Re: Trolley for Villiers Mk15 wooden toolbox new pics 5-9-2016
![]() by Woodsman Sat Sep 19 2015, 10:23
by Woodsman Sat Sep 19 2015, 10:23
_________________
Regards Paul
Tha can alus tell a Yorkshireman - but tha can't tell him much.

Woodsman- Admin
- Posts : 2678
Join date : 2014-08-24
Age : 72
Location : God's own county
Re: Trolley for Villiers Mk15 wooden toolbox new pics 5-9-2016
![]() by StewartH Mon Sep 21 2015, 10:21
by StewartH Mon Sep 21 2015, 10:21
I'm really enjoying the updates - keep it up!
if in doubt on any of your woodwork/ carpentry jobs for the trolley have a look on youtube - there are loads of crafts people happy to show you how to make those really lovely looking joints with all the tips and tricks of the trade - they say "you can't teach an old dog new tricks" - well that's untrue! - I watched a few videos and now produce scarf joints like an old pro!
Best
Hamish

StewartH- A credit to the forum

- Posts : 410
Join date : 2013-07-04
Location : Hampshire
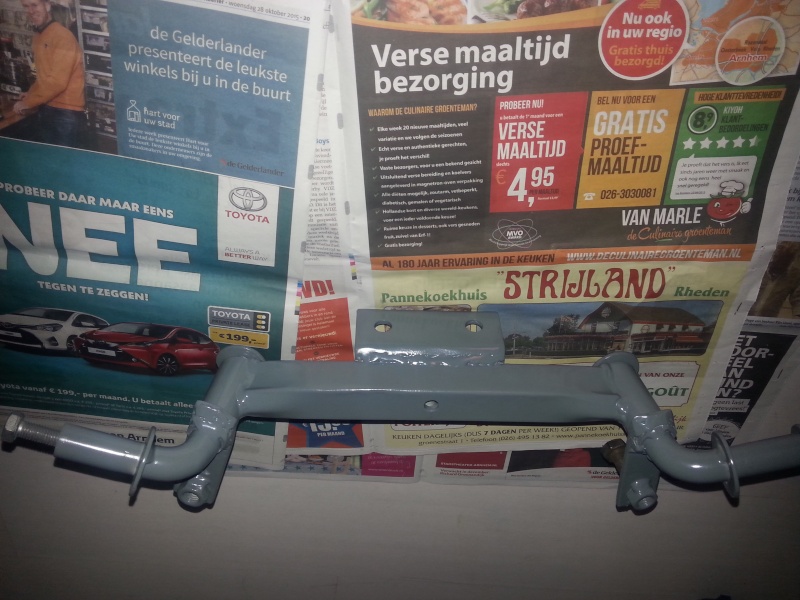
reduced width of the axle
![]() by Mark15 user Tue Sep 22 2015, 20:42
by Mark15 user Tue Sep 22 2015, 20:42
I've put in a smaller rectangular profile (25x25x2) to create more strength.

The next step is to weld the axle together.
Position of the steering arms has to be determined and welded on the king pins as well and a new steering rod has to be machined.
An U profile will be welded on top of the axle to clamp it on the wooden beam.
The top of the king pin will be shortened. I will weld on a M20 ring to enclose the kingpins on the shafts
Step by step I´m getting there.
Best regards,
Steef Pronk

Mark15 user- A true Stationary engine owner
- Posts : 137
Join date : 2014-09-06
Age : 54
Location : Holland
Wheel suspension work in progress
![]() by Mark15 user Sun Oct 04 2015, 20:37
by Mark15 user Sun Oct 04 2015, 20:37
This weekend I worked on the front and rear axle to have a final setup before welding everything together.
I've created a steering mechanism for the draw bar from old iron of the go kart.
The rusty M12 bolts are temporary to check the fit.
The position of the pitmanarms on the picture is not final yet; this will be corrected during the welding

The U-shaped support with 2 holes was made by removing one side from a square bar 50x50x4mm.
The steering shaft rotates on a M10 stud.

After that the setup for the rear axle was shaped.
I've used a 20mm shaft which will be placed in a 30x30mm square bar.
The original idea was to mount the rear axle the same way to the wooden frame as the front axle;
I've changed the design to connect the rear axle to the longitudinal beams instead of the radial beam.

To avoid tilting of the axle a reinforcement will be added in the connection between the L profile and the vertical square profiles.
After the welding the blue paint and rust will be removed. I will repaint the axles in a dark grey color.
Will give an update when the welding is finished
Best regards,
Steef Pronk
Last edited by Mark15 user on Mon Oct 05 2015, 13:59; edited 8 times in total (Reason for editing : pictures added)
Mark15 user- A true Stationary engine owner
- Posts : 137
Join date : 2014-09-06
Age : 54
Location : Holland
Re: Trolley for Villiers Mk15 wooden toolbox new pics 5-9-2016
![]() by kevjhnsn Fri Oct 09 2015, 22:44
by kevjhnsn Fri Oct 09 2015, 22:44
crack on with it so i can see the finihed trolley
thanks kev
_________________
 " IF YOU DONT DO ANYTHING " "" YOU'LL NEVER MAKES MISTAKES ""
kevjhnsn- Life Member
- Posts : 3596
Join date : 2011-02-10
Age : 45
Location : south cheshire
Welding, painting and final assembly of the front axle
![]() by Mark15 user Wed Nov 04 2015, 20:07
by Mark15 user Wed Nov 04 2015, 20:07
Some progress on the trolley.
After the fixation of the steering arms the front axle was welded together.
Forgot to make pictures of the fixation; used a small 25x25mm aquare steel tube.
With 2 screw clamps I've connect the wheel shafts with the square steel tubes.
This ensured the straight position. I've made a jig to get the steering arms on the desired position.
Was a long time ago since I did some welding; but after some exercise I was able to weld the components of the axle together
It seems that the wheels can make the desired movement.

The welding sputters were removed as well as some necessary deburring. Also some grinding of the components was necessary.
On some spots the blue coating was peeled of and this had caused rust on the metal.

As topcoat a dark grey color was choosen. This seems to be a good combination with the wood and black wheels
After the painting the axle was mounted to the frame.
I used 2 M10 bolts as connection,

Next step is making the drawbar and weld the rear axle together.
Best regards,
Steef Pronk
Last edited by Mark15 user on Fri Nov 06 2015, 09:23; edited 8 times in total
Mark15 user- A true Stationary engine owner
- Posts : 137
Join date : 2014-09-06
Age : 54
Location : Holland
Welding the rear axle
![]() by Mark15 user Fri Jan 08 2016, 15:24
by Mark15 user Fri Jan 08 2016, 15:24
Welded the rear axle together today.
Alligned the rear axle by using two angled steel profiles.
I could use the M10 holes which are normaly locking the wheels

The solid shaft fits perfect in the 30x30x3 square tube profile.
It seems that many parts of the earlier bought Go kart will become a second life now.
(Shaft, square tube, angled profiles)
After adjustment and allignment I've first tackwelded the axle together.


Working order:
1.) Tackwelding of vertical square tube profiles on U profiles
2.) Tackwelding of U profiles + vertical square tube profile to horizontal square U profile
3.) Finishing welding
4.) Tackwelding of reinforcement tube profiles (45 degrees)

5.) Finish welding of reinforcement tube profiles.


I could use the welding machine of a local hobby club located near by my hometown.
Very friendly and helpfull people
Most of them are retired craftsmen specialized in woodworking or metalworking.
(The average age is over 70; so I'm a junior member with my 45 years
After the welding I've ground the surface and gave it a quick spray of rustprotect.

Next step is to spray the dark grey topcoat.
After that the "floor"will be installed.
Keep you posted.
Best regards,
Steef Pronk
Mark15 user- A true Stationary engine owner
- Posts : 137
Join date : 2014-09-06
Age : 54
Location : Holland
Start the floor puzzle
![]() by Mark15 user Sun Jan 31 2016, 19:53
by Mark15 user Sun Jan 31 2016, 19:53
I got an opportunity to get some wood for free.
Started to figure out how to buid up the floor.
Here is the first attempt.

Base will be formed by a multiplex plate to give it more strength
Please note this is only an impression.
Of course the wood has to be cut to length, sanded and a have a new coat.
Hope you like the idea. As always I'm open minded for your suggestions.
Best regards,
Steef Pronk
Mark15 user- A true Stationary engine owner
- Posts : 137
Join date : 2014-09-06
Age : 54
Location : Holland
Re: Trolley for Villiers Mk15 wooden toolbox new pics 5-9-2016
![]() by Woodsman Mon Feb 01 2016, 09:26
by Woodsman Mon Feb 01 2016, 09:26
_________________
Regards Paul
Tha can alus tell a Yorkshireman - but tha can't tell him much.
Woodsman- Admin
- Posts : 2678
Join date : 2014-08-24
Age : 72
Location : God's own county
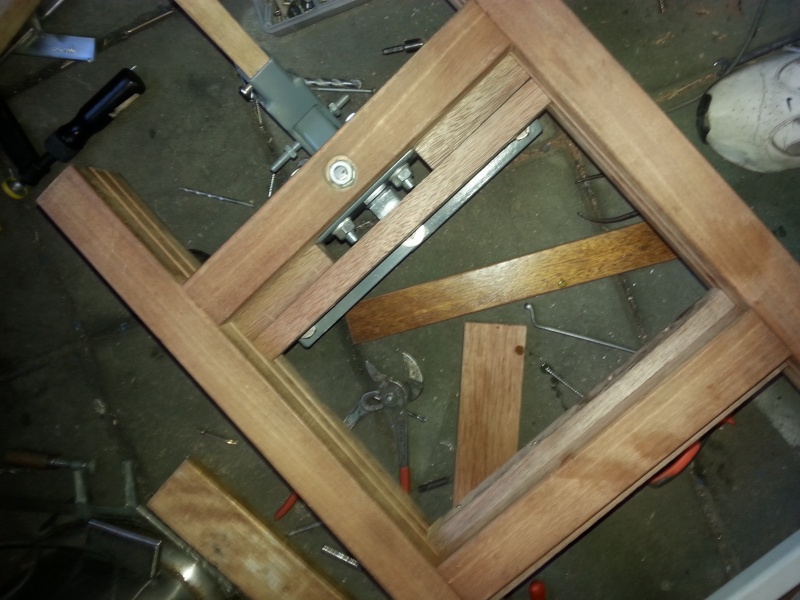
Drawbar woodworking and metalworking
![]() by Mark15 user Tue Feb 02 2016, 09:07
by Mark15 user Tue Feb 02 2016, 09:07
Started the work on the drawbar.
First designed the shape in my CAD system.

Steel holder is made by a rectangular tube 30x30x3 and 2 strips 25x5 mm.
The drawbar itself is shaped out of a piece of wood by flattening and shaping.
The planer thicknesser of the hobbyclub did the heavy work
As topcoat for the drawbar I will use clear yacht finish.
The steelholder will be painted in the same dark grey color as the axles.
Below some pictures of the progress sofar. The hole for the wooden drawbar to be drilled.


A side view of the trolley

Next project will be the finish of the floor
Best regards,
Steef Pronk
Mark15 user- A true Stationary engine owner
- Posts : 137
Join date : 2014-09-06
Age : 54
Location : Holland
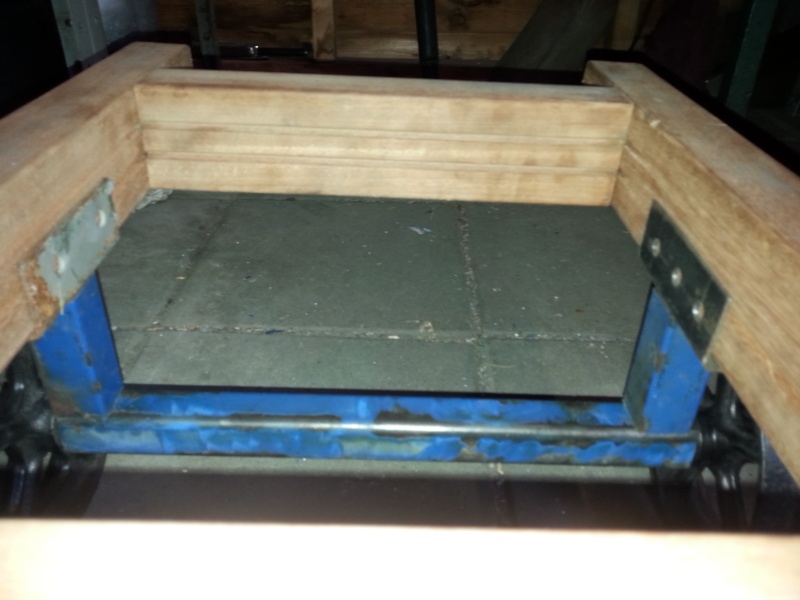
Work on the floor in progress
![]() by Mark15 user Thu Feb 11 2016, 16:10
by Mark15 user Thu Feb 11 2016, 16:10
Work on the floor is in progress.
Thanks to the hobby club I can use their machines to make the woodworking a little bit easier.
I've made small round chamfers on the tiles to create a "seam".
The tiles are cut to length but not fixed yet.
I will make support beams in the centre of the frame.
See below the pictures of the progress sofar.

Best regards,
Steef
Mark15 user- A true Stationary engine owner
- Posts : 137
Join date : 2014-09-06
Age : 54
Location : Holland
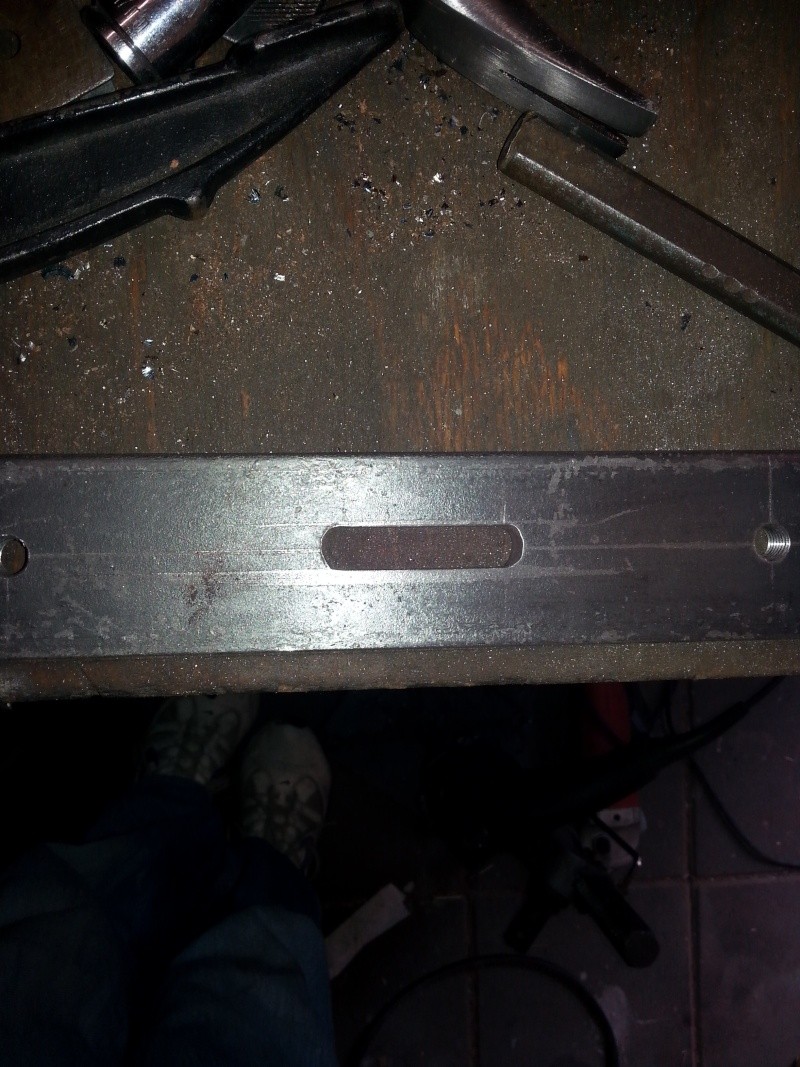
center support floor
![]() by Mark15 user Fri Feb 12 2016, 18:16
by Mark15 user Fri Feb 12 2016, 18:16
I've got some sparetime to create the center support for the floor.
See the pictures below.


I've decided to make the screw connections from the bottom side.
Then there are no screw heads visible on the floor.
Means some additional work but has a more decent look.
Center support at the front axle side will shaped the same way.
For the mounting of the pump I'm thinking to use the spanners in the picture below.
Need to figure out which type is needed.
Next step will be the (final) lining of the Villiers engine with the pump.
Have to find a pair of pulleys to get the right RPM.
Keep you updated.
Best regards,
Steef Pronk
Mark15 user- A true Stationary engine owner
- Posts : 137
Join date : 2014-09-06
Age : 54
Location : Holland
Re: Trolley for Villiers Mk15 wooden toolbox new pics 5-9-2016
![]() by Woodsman Sat Feb 13 2016, 09:37
by Woodsman Sat Feb 13 2016, 09:37
_________________
Regards Paul
Tha can alus tell a Yorkshireman - but tha can't tell him much.
Woodsman- Admin
- Posts : 2678
Join date : 2014-08-24
Age : 72
Location : God's own county
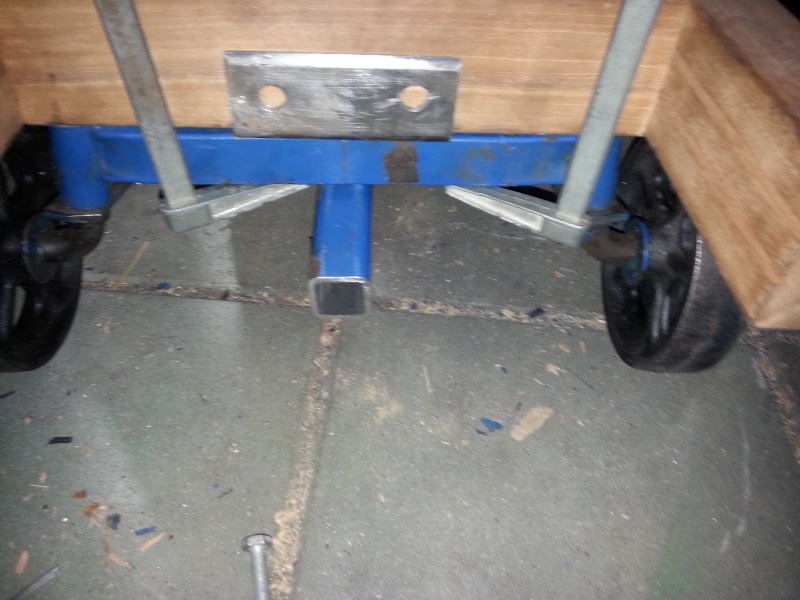
Creating engine support beams
![]() by Mark15 user Wed Feb 24 2016, 09:25
by Mark15 user Wed Feb 24 2016, 09:25
The support beams for the engine were mounted yesterday.
See the pictures below.
Took some time to figure out the connection the front; however it is now a solid connection.

It is still possible to do an oil change with the motor mounted on the trolley.

Best regards,
Steef Pronk
Mark15 user- A true Stationary engine owner
- Posts : 137
Join date : 2014-09-06
Age : 54
Location : Holland
Mounting the floor and milking set
![]() by Mark15 user Mon Feb 29 2016, 17:24
by Mark15 user Mon Feb 29 2016, 17:24
To create a smooth surface of the floor my first thought was to make screw connections on the bottom side.
However due to the thickness of the planks (8 mm) there is too less depth to make a rigid connection.
Besides that there is also a risk of cracking the planks by the screws.
I really felt "lost"and tried to figure out what to do.
Then I got a tip from a retired craftsman. "Why not glueing them ?"
First I was a little bit skeptic, but he showed me some glued wooden connections.
He gave me a glue which is used by professional woodworkers.
I tried some samples and was amazed by the strength (as well as the "bubbling effect" of the glue)
After that I've started to glue the planks.
To ensure a good connection I've sanded the wood with a coarse sandpaper before glueing.
As I have only four clamps it takes some time. (Drying 24 hours; better safe than sorry)
Finally I've bought a milking set. Was desperately seeking for a Benco milking set; however this was impossible to get.
To get the milking set ready for the show in Nuenen, I've decided to look for an alternative.
After a long search I've found a Westfalia milking set which has an old fashion look.
The vacuum and milking hoses have to be replaced as well as the inflation liners.
However after a first cleaning it seems not in a bad shape.

Picture of the trolley with the milking set

Please ignore the connection of the hose on the vessel. This is only temporary.
Need to buy a reducer from 1" to 3/8" to fit the tap.
Next step is to adapt some pulleys for the V belt connection.
Still waiting for the RPM counter; hoping to have it next week to determine the correct ratio.
Best regards,
Steef Pronk
Mark15 user- A true Stationary engine owner
- Posts : 137
Join date : 2014-09-06
Age : 54
Location : Holland
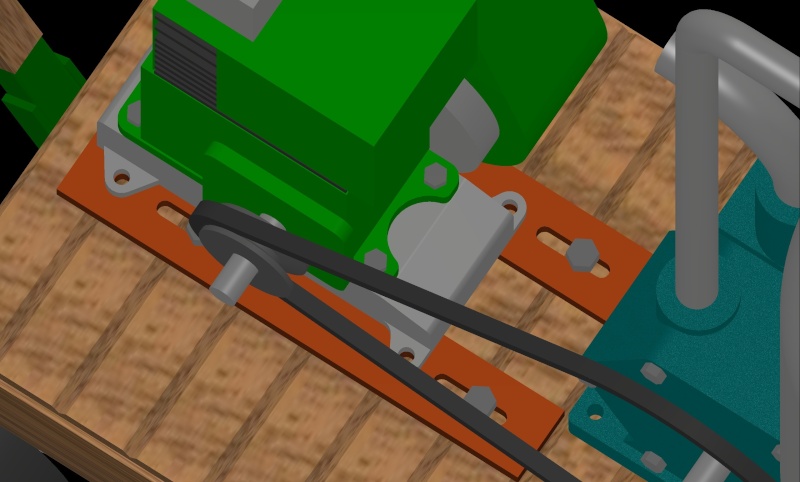
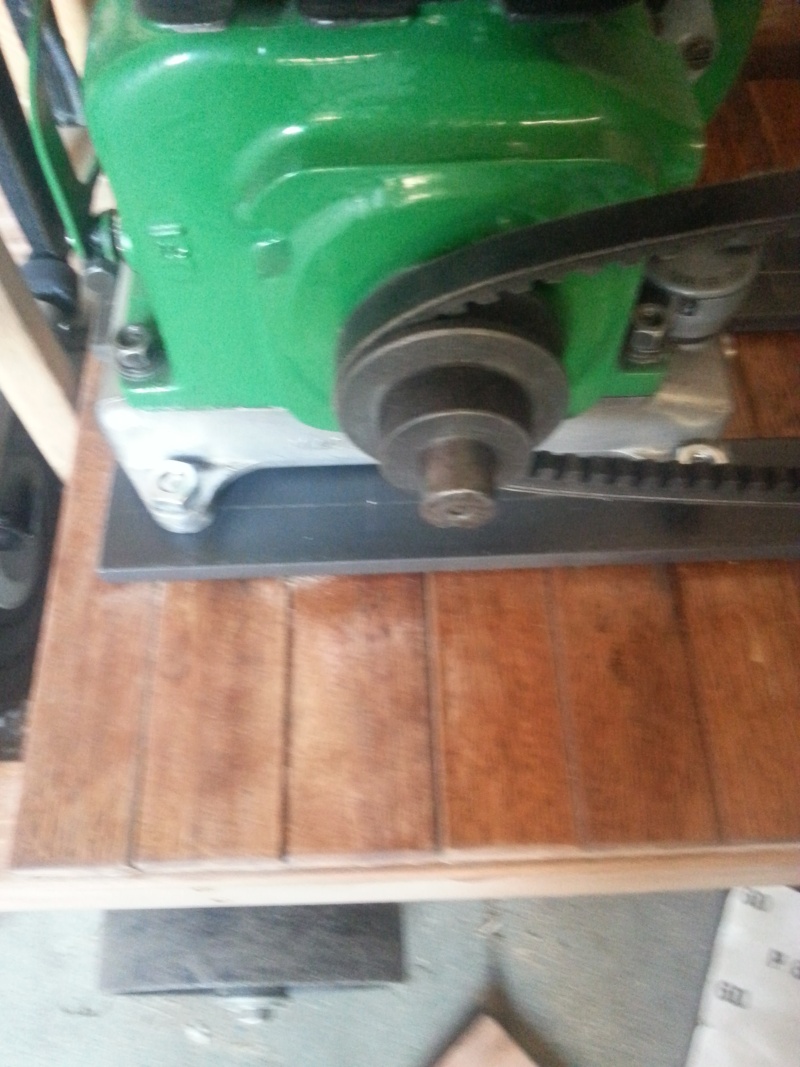
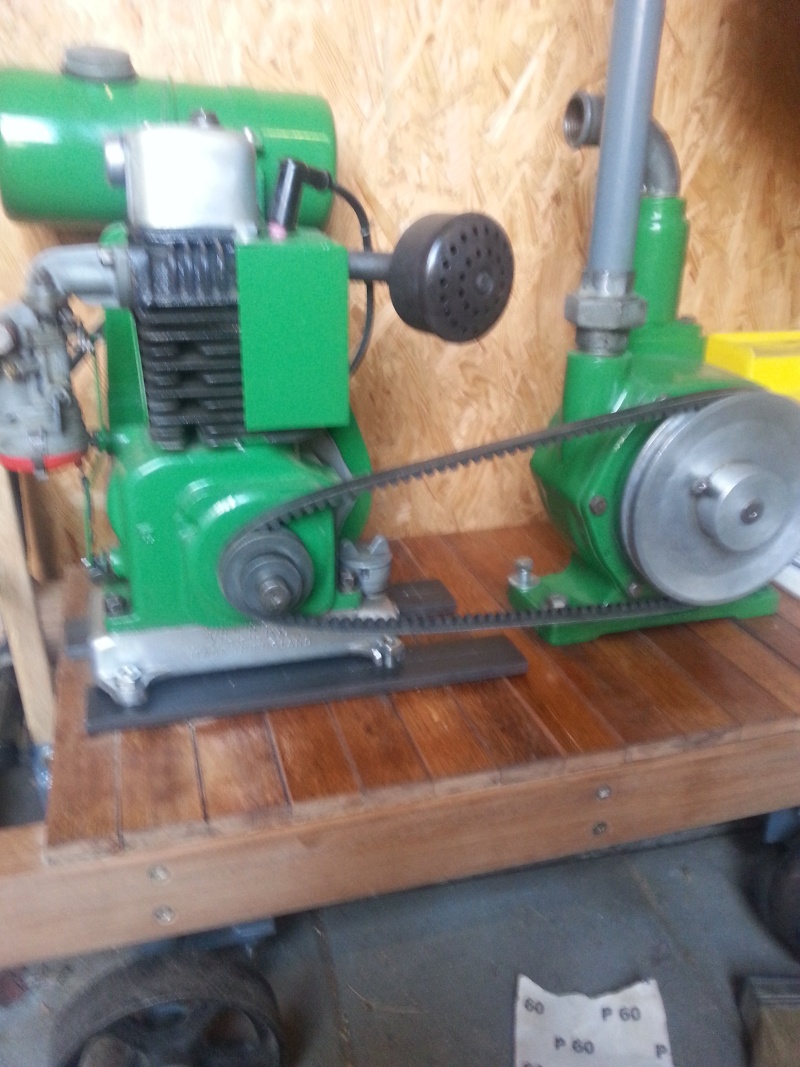
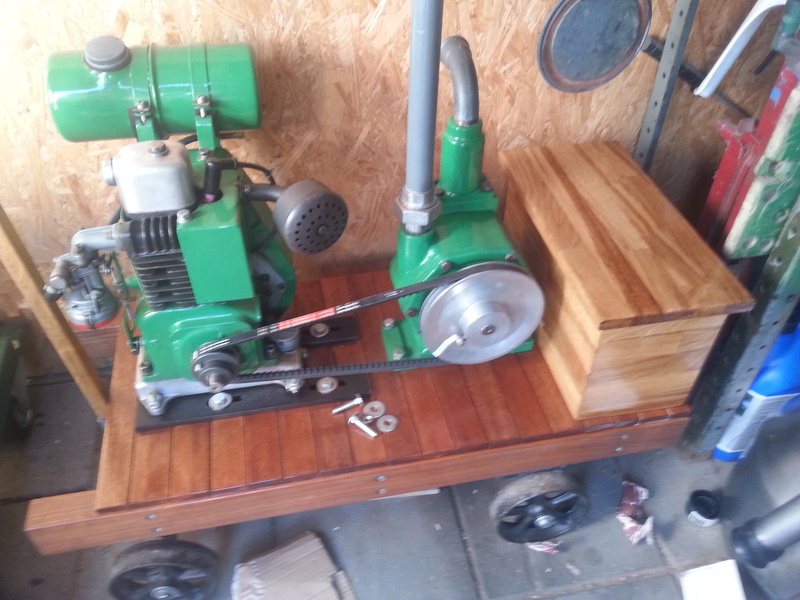
Villiers rear axle painted, pulley and spanner
![]() by Mark15 user Wed Apr 13 2016, 21:43
by Mark15 user Wed Apr 13 2016, 21:43
It's been a long time since I've posted an update.
Minor progress on the trolley since then.
The rear axle has become his final dark grey top coat.

The RPM counter which I've ordered on Aliexpress didn't show up.
Will ask the seller for a refund
I've ordered a pulley of 63mm and a V belt at a local toolshop.
Meanwhile I've machined the ID of the pulley to fit on the Villiers shaft.
Only the keyway has to be machined and then the pulley is ready.
For the spanner I've decided to make them myself.
I wil use 2 strips of 50 x 10 mm (length 325mm)
For connection of the motor on the strips I wil machine 4 threaded holes and mount threaded rods.
To mount the strips on the wooden floor I will make slotted holes in the strips and connect them with hexagon bolts.
between the strips a piece of wood will be placed to ensure that the oil sump is supported as well.
For the milking set I've changed some of the vacuum hoses. The old ones were in bad shape.
Milking liners needs to be replaced as well. Found a shop on the web who can provide these parts.
After varnish of the floor I will mount the Villiers engine and the Benco pump on their final position.
In the picture below I've made a model of the spanner strips from restpiece of wood.

Edit 16-4-2016
First threaded holes finished. See the pictures below.
Slotted holes to be done. I will use a milling machine to do that
Keep you posted!
Best regards,
Steef Pronk
Last edited by Mark15 user on Sat Apr 16 2016, 10:42; edited 2 times in total (Reason for editing : pictures added 16-4-2016)
Mark15 user- A true Stationary engine owner
- Posts : 137
Join date : 2014-09-06
Age : 54
Location : Holland
Making slotted holes by hand in 4 steps
![]() by Mark15 user Fri Apr 29 2016, 18:18
by Mark15 user Fri Apr 29 2016, 18:18
The spanners need 4 slotted holes. ( 2 per side)
Originally I thought to machine it by milling; then I had to outsource it.
Unfortunately I didn't find a source with a favorable rate.
Therefore I 've decided to make the slotted holes by hand.
The idea is to dril several holes in a row and shape the slotted hole by filing the remaining material.
A lot of work; however it seems that the final shape is acceptable.
First step is to determine the position of the holes by making a centrepoint.
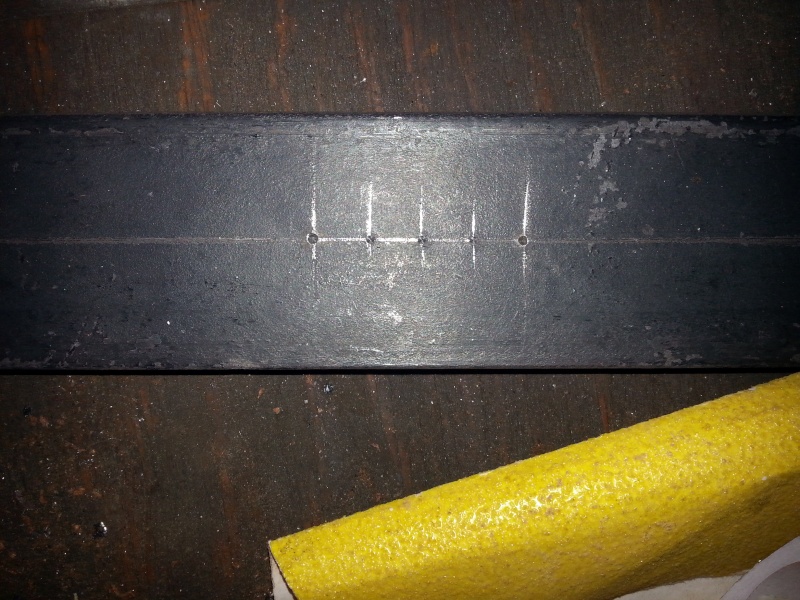
Second step to dril holes with a diameter of 4mm.

Third step increase the ID of the holes with a dril of 10mm
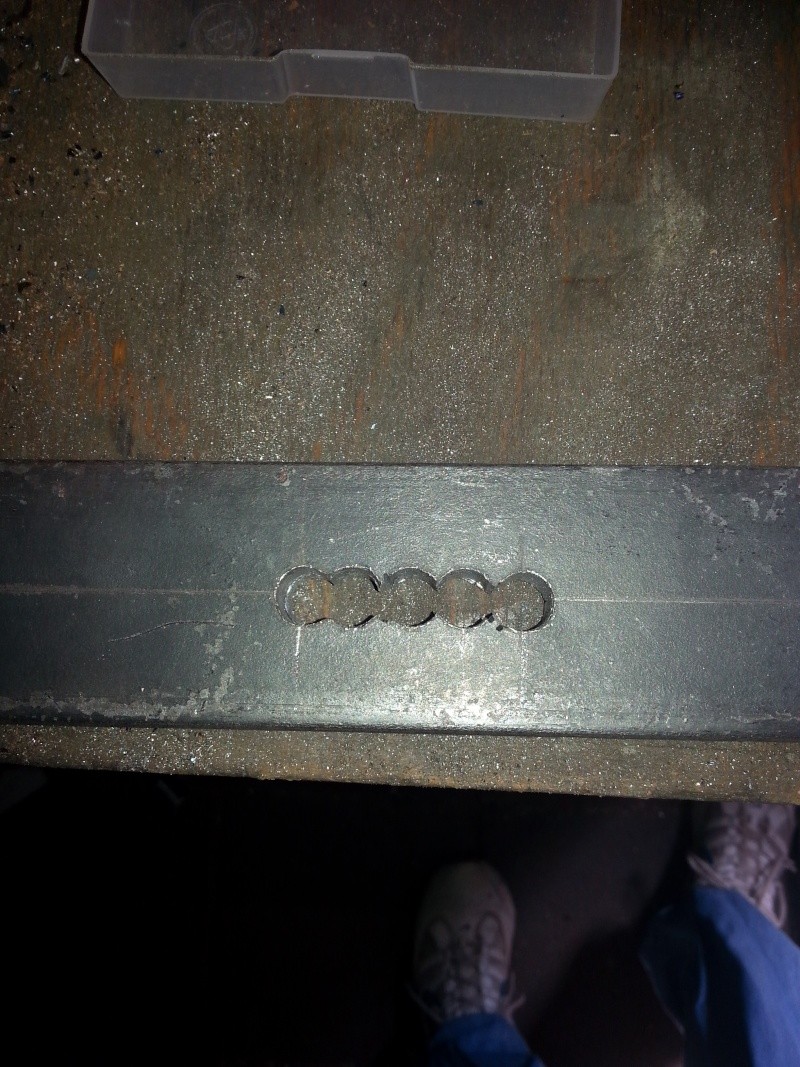
Fourth step is removing the remaining material by filing.
A lot of work, but finally the shape is acceptable.
The strips will be painted black; however at the moment it's to cold for painting.
See the final mounting pictures below.


Started sanding off the old varnish of the floor. Nice work which helps to clear my head after busy workdays.
Will put on a clear yacht varnish to let it shine again.
Remaining jobs: painting the moisture can and pipe work and making a toolbox.
Want to be ready for the Nuenen ralley 15th of May. Seems to be a challenge
Keep you updated
Best regards,
Steef Pronk
Mark15 user- A true Stationary engine owner
- Posts : 137
Join date : 2014-09-06
Age : 54
Location : Holland
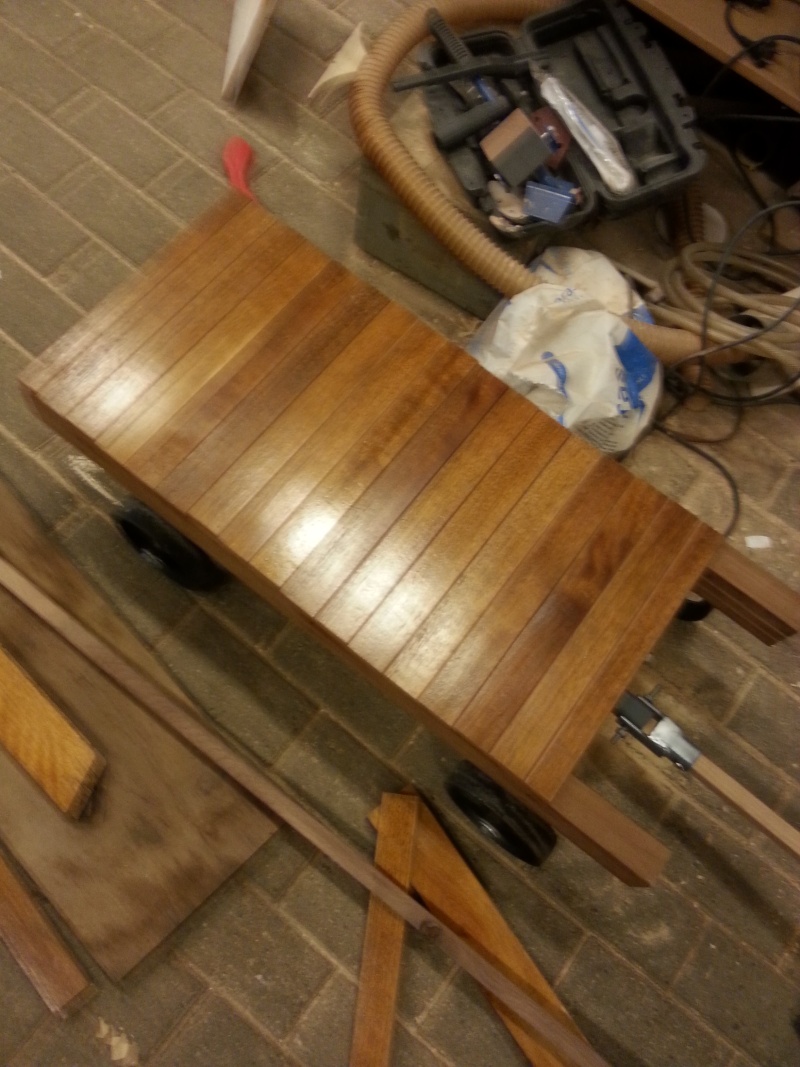
Varnishing the floor and painting the spanner strips
![]() by Mark15 user Wed May 04 2016, 22:35
by Mark15 user Wed May 04 2016, 22:35
The temperatures are now at an acceptable level for painting and varnishing.
After a lot of sanding I've started to varnish the floor.

Clear Yacht varnish

First layer

Now 3 layers are done and the wood starts to shine again.


The spanner strips were painted in matt black paint.

Made a list with to do items and there is some work to be done.
- Varnishing the floor (Done)
- Painting the spanner strips (Done)
- Painting the moisure can and piping
- Making toolbox on the rear end (Done)
- Renew milking liners and milk hoses (Done)
- Assembly and testing (Done)
Hoping to have it ready and working for the Nuenen Ralley (15th of May)
Pictures will be uploaded tommorow. (Battery of cell phone empty)
Keep you updated.
Best regards,
Steef Pronk
Last edited by Mark15 user on Mon Sep 12 2016, 16:33; edited 7 times in total (Reason for editing : pictures added)
Mark15 user- A true Stationary engine owner
- Posts : 137
Join date : 2014-09-06
Age : 54
Location : Holland
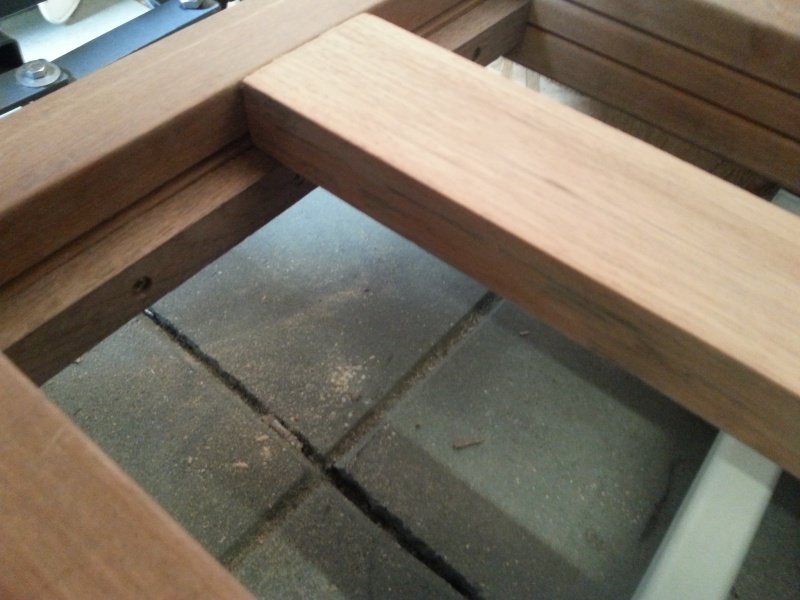
Tool box woodwork
![]() by Mark15 user Mon Sep 05 2016, 08:05
by Mark15 user Mon Sep 05 2016, 08:05
Seems a decade that I've post an update.
Milking set is running quite well. For the winter season I've to overhaul the the trothle mechanism / governor of the carburator.
To many play on the joints results in too many variaton of the ideal RPM.
For a long time I was searching for wood for the tool box and couldn't find what I was looking for.
Some people suggested to make it from plywood; however that was not what I had in mind.
When I visited a local DIY shop I've found oak panels from Cando. LxWxH (1000x200x18mm). Exactly what I had in mind

On the hobbyclub I've made a miter joint on the sides and glued them together.
They have convenient tools to clamp the sides and ensure a straight connection.


I've decided to take of the cover completely instead of using hinges. The cover protrudes 3/4" from the cover on all sides.
To fit the cover in the box I've glued two small wooden pieces on the cover.
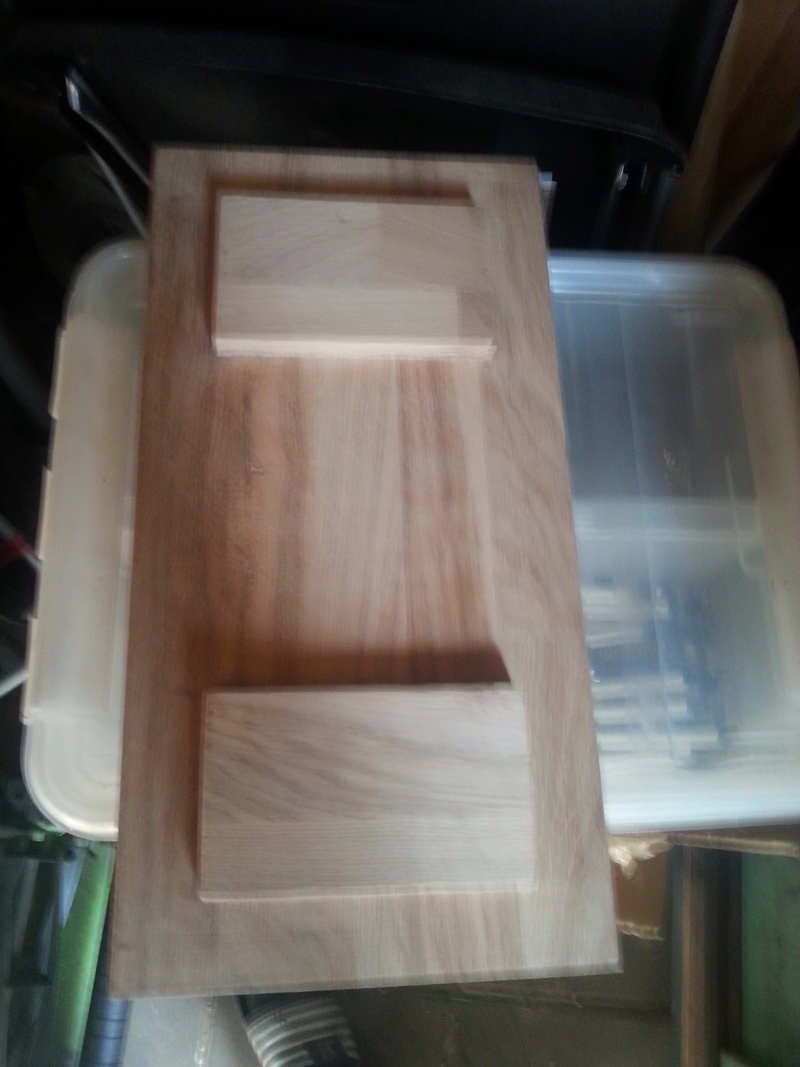
Placing of the bottom was a very precise job. It took some attempts to create a tight fit.


After that the connection to the trolley will be made by cup head bolts to keep the possibility to remove the toolbox.
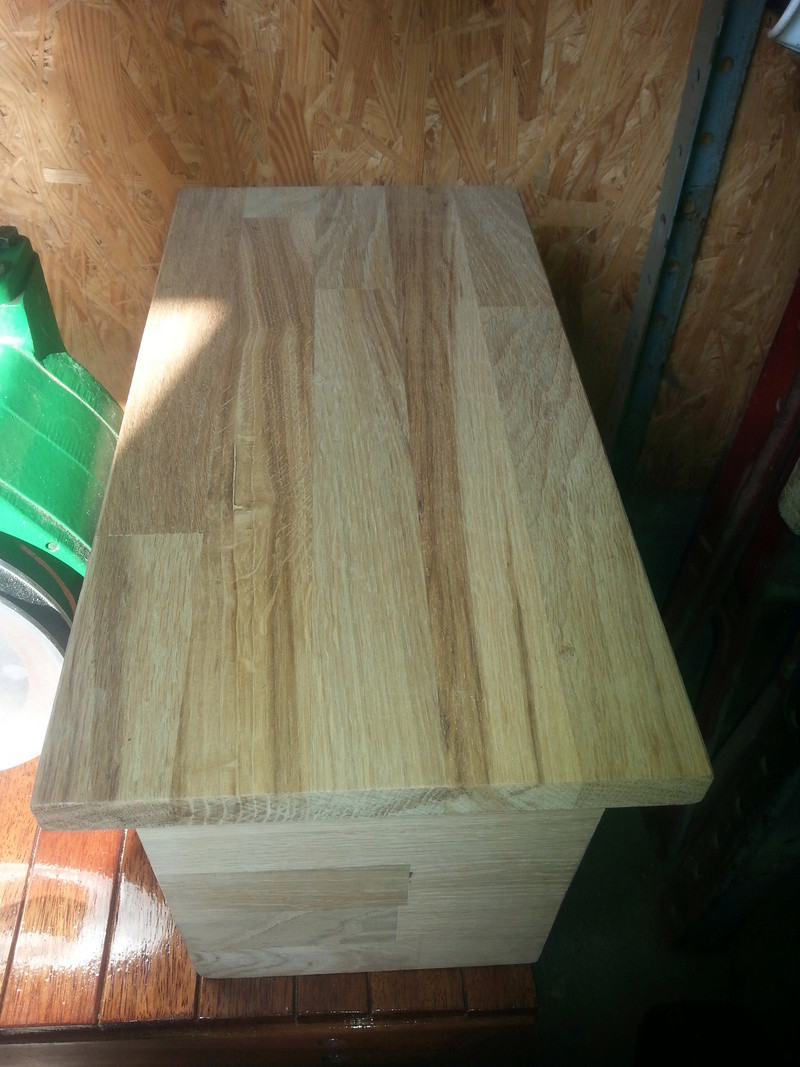
The complete toolbox will be varnished with clear yacht varnish.
Varnished!!!!! Update 12-9-2016


Keep you updated.
Best regards,
Steef Pronk
Last edited by Mark15 user on Mon Sep 12 2016, 16:45; edited 1 time in total (Reason for editing : pictures added)
Mark15 user- A true Stationary engine owner
- Posts : 137
Join date : 2014-09-06
Age : 54
Location : Holland
Re: Trolley for Villiers Mk15 wooden toolbox new pics 5-9-2016
![]() by RustonMark Fri Sep 23 2016, 13:42
by RustonMark Fri Sep 23 2016, 13:42
RustonMark- Born to be wild

- Posts : 30
Join date : 2014-03-07
Re: Trolley for Villiers Mk15 wooden toolbox new pics 5-9-2016
![]() by Woodsman Fri Sep 23 2016, 17:49
by Woodsman Fri Sep 23 2016, 17:49
_________________
Regards Paul
Tha can alus tell a Yorkshireman - but tha can't tell him much.
Woodsman- Admin
- Posts : 2678
Join date : 2014-08-24
Age : 72
Location : God's own county
Sponsored content
Page 2 of 2 • 1, 2
» Connection Villiers engine MK 15 on trolley floor. How to avoid crack of mounting points engine? Need your advise
» Dutch Villiers Mark 15
» new toy .......Villiers Mk15
» strange problem with big end Villiers Mk15
|
|
|